The Dreamiest No-Bake Oreo Pie! So Easy, So Good!
If you’re a fan of all things cookies and cream, you’re going to fall head over heels for this no-bake Oreo pie. It’s creamy, light, and loaded with real Oreo chunks, all nestled in a classic Oreo crust. This is the kind of dessert that looks impressive on the table but only takes about 15 minutes of hands-on time—no oven required!
No-Bake Oreo Pie
Whether you’re making this for a holiday, birthday, potluck, or just a regular Tuesday night treat, it’s a guaranteed crowd-pleaser. Plus, it pairs perfectly with just about anything. If you love easy desserts, be sure to check out my mini cheesecakes, Reese’s Mini Cheesecakes, or even these Oreo dip.
This pie chills overnight in the fridge, which means it’s a great make-ahead dessert. The filling is silky and fluffy, thanks to homemade whipped cream and softened cream cheese. Fold in a generous amount of chopped Oreos, and you’ve got a cookies-and-cream masterpiece. Top it off with sweetened whipped cream and even more Oreos, and you’ve just won dessert.

Handy tip: Prepare Ahead!
No oven, no stress – It’s completely no-bake, so you don’t have to heat up the kitchen.
Simple ingredients – You probably already have most of these in your fridge or pantry.
Totally customizable – Swap in Cool Whip, use reduced-fat cream cheese, or get fancy with flavored Oreos.
Perfect texture – Creamy, light, and fluffy with a little crunch from the cookie bits.

INGREDIENTS:
- 1 store-bought Oreo pie crust
Filling:
- 1 cup heavy cream
- ¾ cup + 2 tablespoons powdered sugar
- Pinch of salt
- OPTIONAL ½ teaspoon vanilla extract
- 1 cup (8 oz) softened full-fat cream cheese (I used Philadelphia), room temperature
- 1 cup chopped Oreos
Whipped cream topping:
- 1 cup heavy cream
- 2 tablespoons powdered sugar
- ¼ teaspoon meringue powder (OPTIONAL)
- ½ teaspoon vanilla extract OPTIONAL
- 3 halved Oreos

How to Make No-Bake Oreo Pie
Filling:
- In a large bowl with a hand mixer or a stand-up mixer, mix the heavy cream, 2 tablespoons of powdered sugar, and salt until stiff peaks start to form.
- Set aside the whipped cream.
*You could substitute the homemade whipped cream with an 8 oz tub of thawed Cool Whip*
- In a large mixing bowl, beat the cream cheese until it has become fluffy. You can use a hand mixer or a stand-up mixer. In this step is important that the cream cheese is at room temperature, as you mix you incorporate air in the cream cheese which will result in a nice, light, and airy filling.
- Add in the ¾ cup of powder sugar. Mix with the hand mixer until you have all ingredients incorporated


- Add the chopped Oreos. Mix until the Oreo pieces are evenly throughout the mixture.

- Fold the whipped cream into the cream cheese/Oreo mixture

- Pour the filling into the crust.

- Spread evenly with an offset spatula.
- Place the pie in the fridge to chill. We have found out you will get a better result overnight, but if you are in a hurry 3 to 4 hours can work, the filling won’t be as set, but still delicious.
Whip cream toppings:
- In a large bowl with a hand mixer or mixer, mix the heavy cream, and powder sugar on high until stiff peaks start to form.
- Spread the whipped cream on the cooled pie or place the whipped cream in a piping bag. (If you don’t have a piping bag, you can always use a Ziplock back and cut one of the corners and start pipping)
*NOTE*
– I would recommend putting the whipped cream on the pie when you are almost ready to serve.
– Always keep the pie in the refrigerator until ready to serve, it will be easier to serve, and the pie will keep its light and fluffy filling texture.
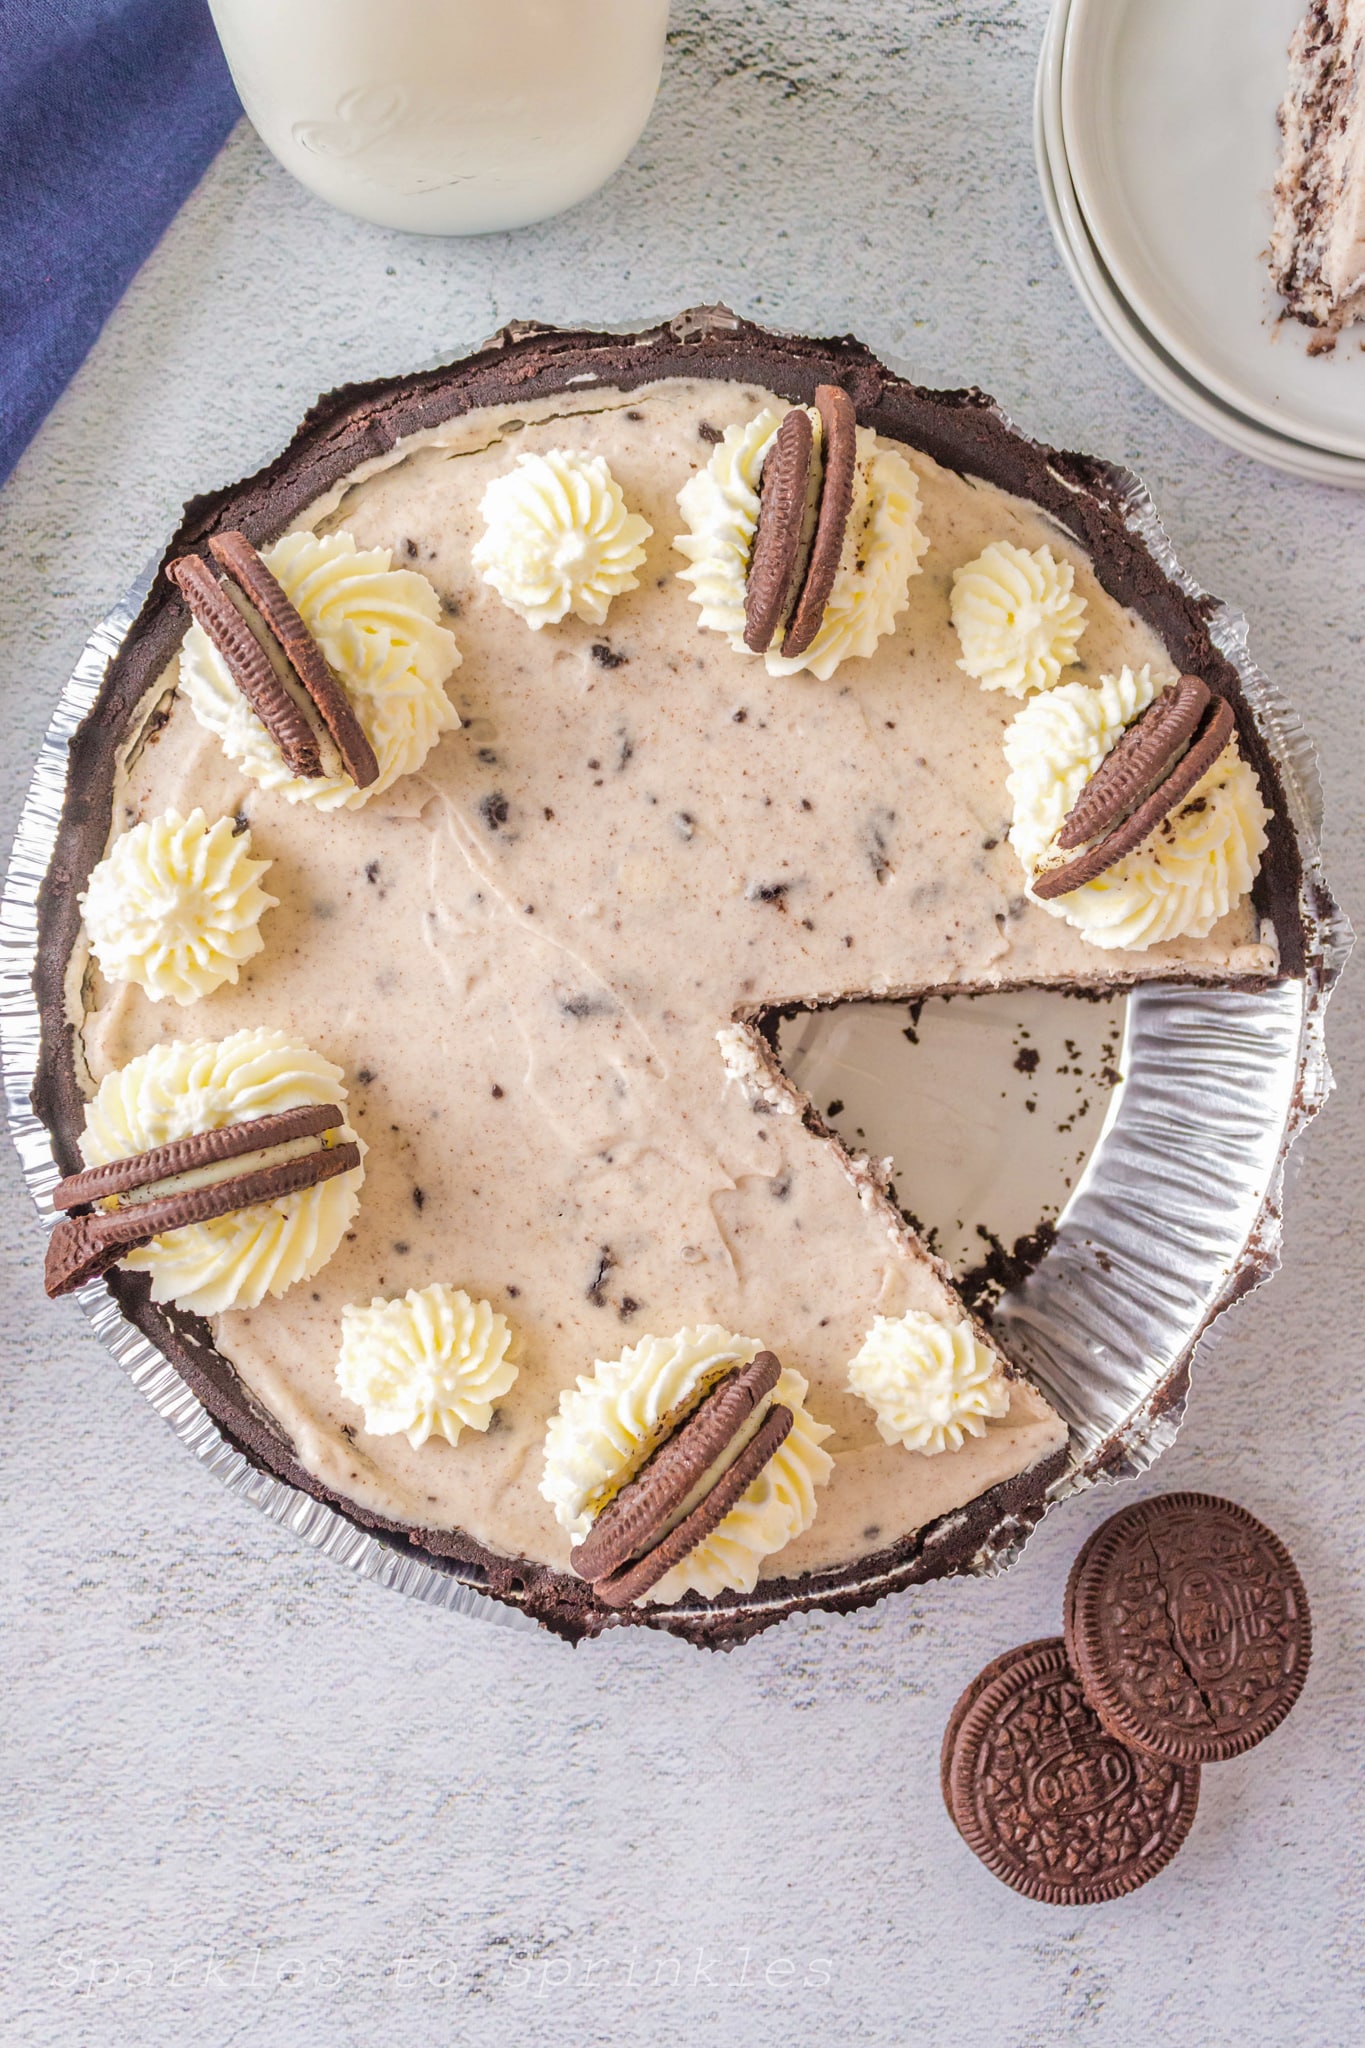
How to Decorate your No-Bake Oreo Pie
- Next, pipe six large rosettes on the pie.
- Pipe small rosettes on each side of the large rosettes.
- Place the Oreos on the large rosettes.

- Place the pie back in the fridge until ready to serve.

- Serve and enjoy!

Tips & Tricks
- Room temperature cream cheese is key: This helps give you that ultra-smooth, whipped filling. Cold cream cheese = lumpy filling.
- Chop your Oreos, don’t crush them: Bigger chunks give you that iconic cookies-and-cream texture.
- Cool Whip shortcut: If you’re short on time or heavy cream, an 8 oz tub of Cool Whip will totally work in the filling.
- Make it ahead: This pie tastes even better the next day after a good chill in the fridge.
- Top just before serving: Add the whipped cream and Oreo decorations just before serving so they stay fresh and pretty.

FAQs


No-Bake Oreo Pie
Ingredients
- 1 store-bought Oreo pie crust
- Filling:
- 1 cup heavy cream
- ¾ cup + 2 tablespoons powdered sugar
- Pinch of salt
- OPTIONAL ½ teaspoon vanilla extract
- 1 cup (8 oz) softened full-fat cream cheese (I used Philadelphia), room temperature
- 1 cup chopped Oreos
- Whip cream topping:
- 1 cup heavy cream
- 2 tablespoons powdered sugar
- ¼ teaspoon meringue powder (OPTIONAL)
- ½ teaspoon vanilla extract OPTIONAL
- 3 halved Oreos
Instructions
Filling:
- In a large bowl with a hand mixer or a stand-up mixer, mix the heavy cream, 2 tablespoons powdered sugar, and salt until stiff peaks start to form.
- Set aside the whipped cream.
*You could substitute the homemade whipped cream with an 8 oz tub of thawed Cool Whip*
- In a large mixing bowl, beat the cream cheese until it has become fluffy. You can use a hand mixer or a stand-up mixer. This step is important that the cream cheese is at room temperature, as you mix you incorporate air in the cream cheese which will result in a nice, light, and airy filling.
- Add in the ¾ cup powder sugar. Mix with the hand mixer until you have all ingredients incorporated
- Add the chopped Oreos. Mix until the Oreo pieces are evenly throughout the mixture.
- Fold the whip cream into the cream cheese/Oreo mixture
- Pour the filling into the crust.
- Spread evenly with an offset spatula.
- Place the pie in the fridge to chill. We have found out you will get a better result overnight, but if you are in a hurry 3 to 4 hours can work, the filling won’t be as set, but still delicious.
Whip cream toppings:
- In a large bowl with a hand mixer or mixer, mix the heavy cream, powder sugar on high until stiff peaks start to form.
- Spread the whipped cream on the cooled pie or place the whipped cream in a piping bag. (If you don't have a piping bag, you can always use a Ziplock back and cut one of the corners and start pipping)
*NOTE*
- I would recommend putting the whipped cream on the pie when you are almost ready to serve.
- Always keep the pie in the refrigerator until ready to serve, it will be easier to serve, and the pie will keep its light and fluffy filling texture.
Decorations ideas:
- Next, pipe six large rosettes on the pie.
- Pipe small rosettes on each side of the large rosettes.
- Place the Oreos on the large rosettes.
- Place the pie back in the fridge until ready to serve.
- Serve and enjoy!
Notes
BAKER’S NOTES:
- INGREDIENTS SUBSTITUTION
- Meringue powder is optional
- Vanilla extract is optional but brings a great flavor
- You can decorate this pie however you wish.
- When making the whipped cream make sure whisks and bowls are clean and free of all residues.
- I like making my whipped cream with my stand-up mixer but a hand mixer works as well.
- You can make your pie in advance, up to 2 days.
- Leftovers will keep in the fridge for 5 days total.
- Keep the pie refrigerated until ready to serve.
- This pie can be enjoyed with a glass of milk or lemonade.
Nutrition Information:
Yield:
8Serving Size:
1Amount Per Serving: Calories: 496Total Fat: 34gSaturated Fat: 17gTrans Fat: 1gUnsaturated Fat: 15gCholesterol: 71mgSodium: 286mgCarbohydrates: 44gFiber: 2gSugar: 25gProtein: 5g
I’m Melissa, the imaginative force behind Sparkles to Sprinkles, where creativity comes to life, and sprinkles of joy are scattered generously. Melissa is a proud Jersey girl who found love with a New York boy. As a mom to four wonderful boys and a few fur babies, her journey into the world of blogging began after making the life-changing decision to stay home and raise her children. Previously a dedicated workaholic, Melissa’s blog became her creative outlet and passion project. Inspired by her mother-in-law, a masterful cook renowned for her delicious home-cooked meals and legendary holiday feasts (think mouthwatering sausage stuffing), Melissa honed her culinary skills through a combination of family recipes and countless cooking classes. She often attended these classes with her son Michael, who shared her enthusiasm for cooking from a young age. Melissa’s love for learning extends beyond familiar cuisines, as she enjoys exploring international recipes in hands-on cooking classes. Her blog features a diverse array of recipes, showcasing her expertise with various kitchen appliances such as the Instant Pot, air fryer, Slow Cooker, Ninja Foodi, Instant Vortex Plus, and more. Join Melissa on her culinary adventures as she shares tried-and-true family favorites alongside exciting new discoveries!