Fall in Love with Pumpkin Pie Rice Krispie Treats: A Festive Twist!
If you’re looking for a fun and festive fall treat, these Pumpkin Pie Rice Krispie Treats are the perfect combination of your favorite classic snack and the flavors of autumn. Not only are they easy to make, but they also look like adorable mini pumpkin pies, making them a fantastic addition to any Halloween or Thanksgiving spread. Plus, they’re no-bake, so you don’t have to spend hours in the kitchen!
Pumpkin Pie Rice Krispie Treats
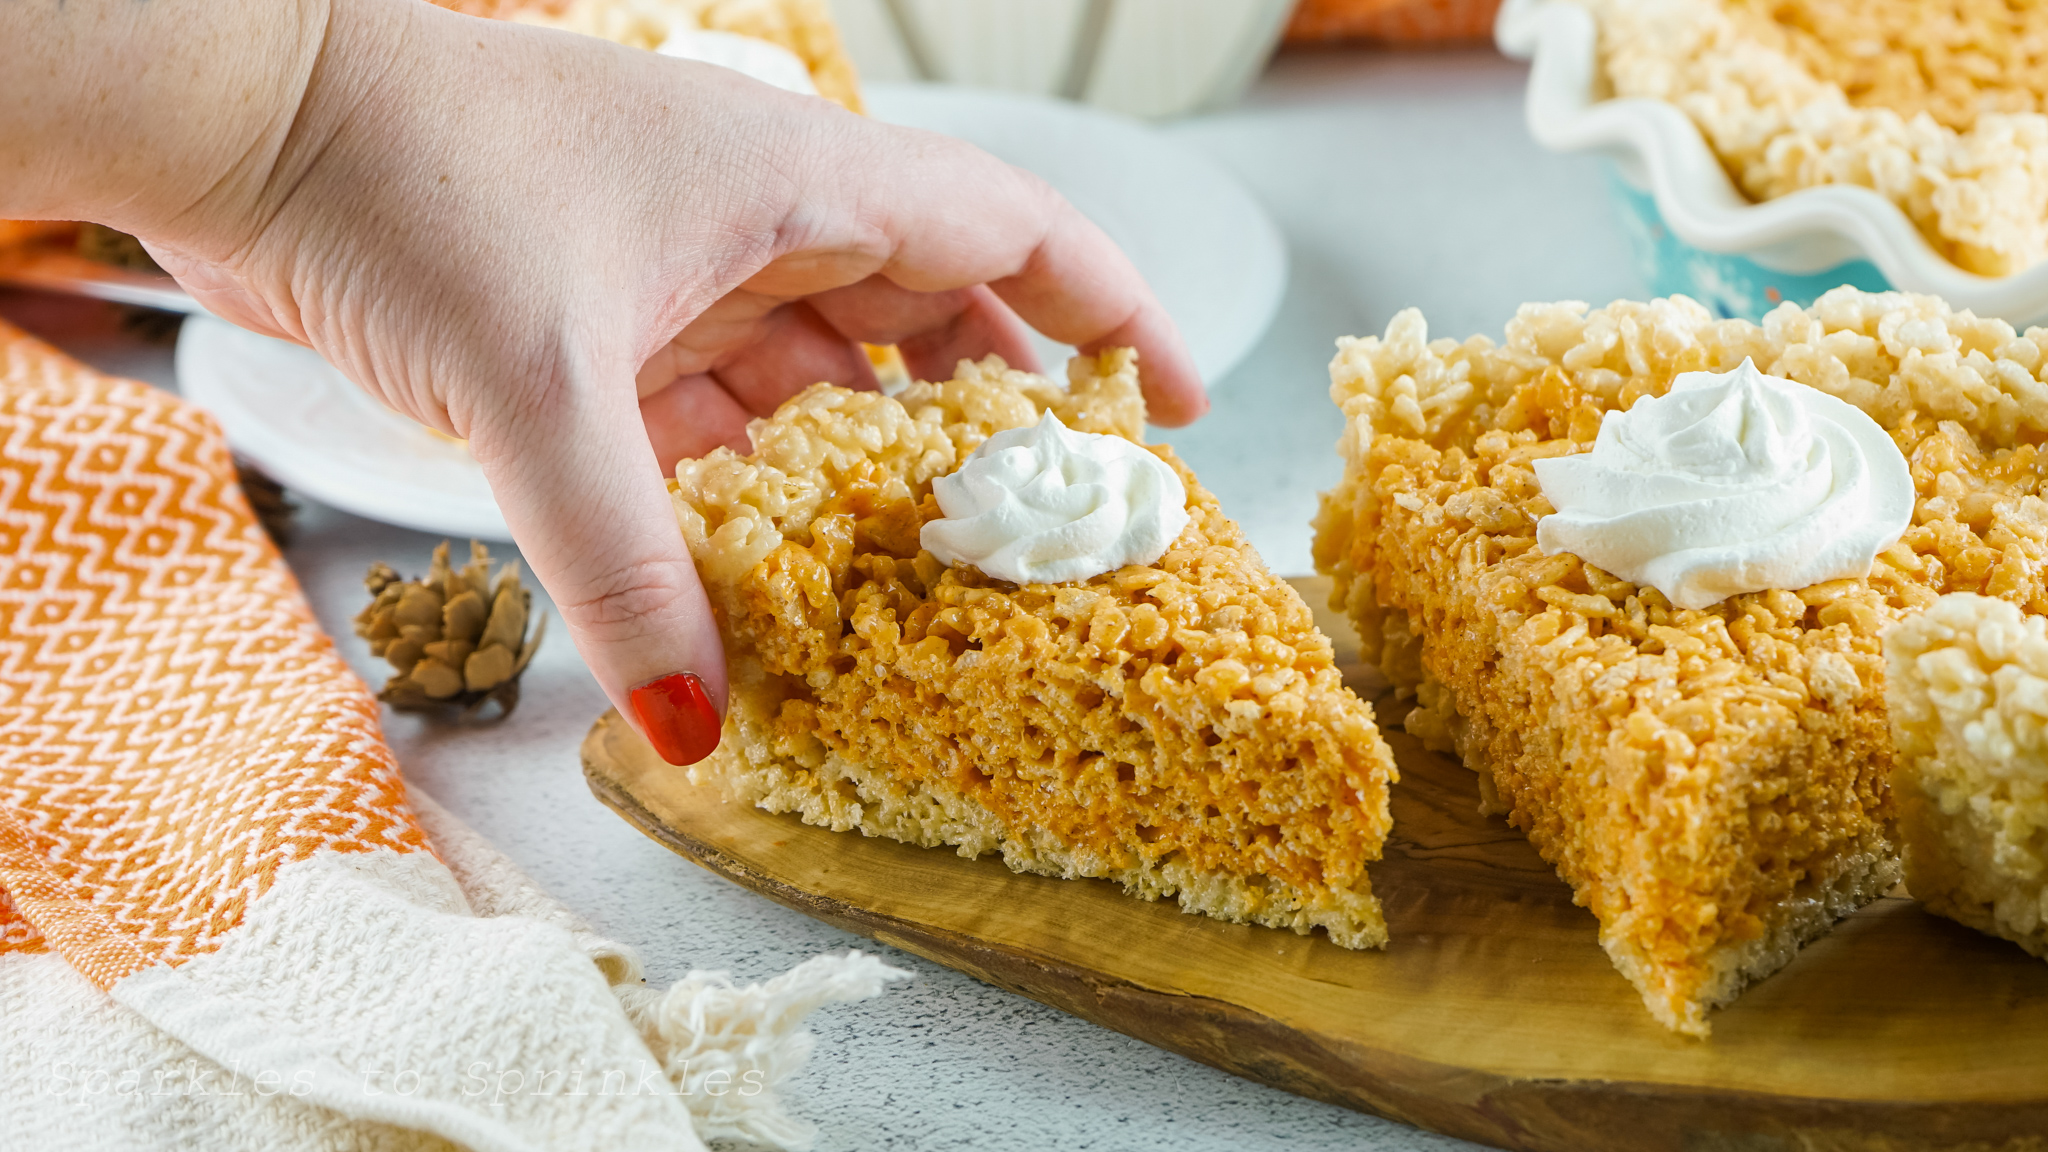
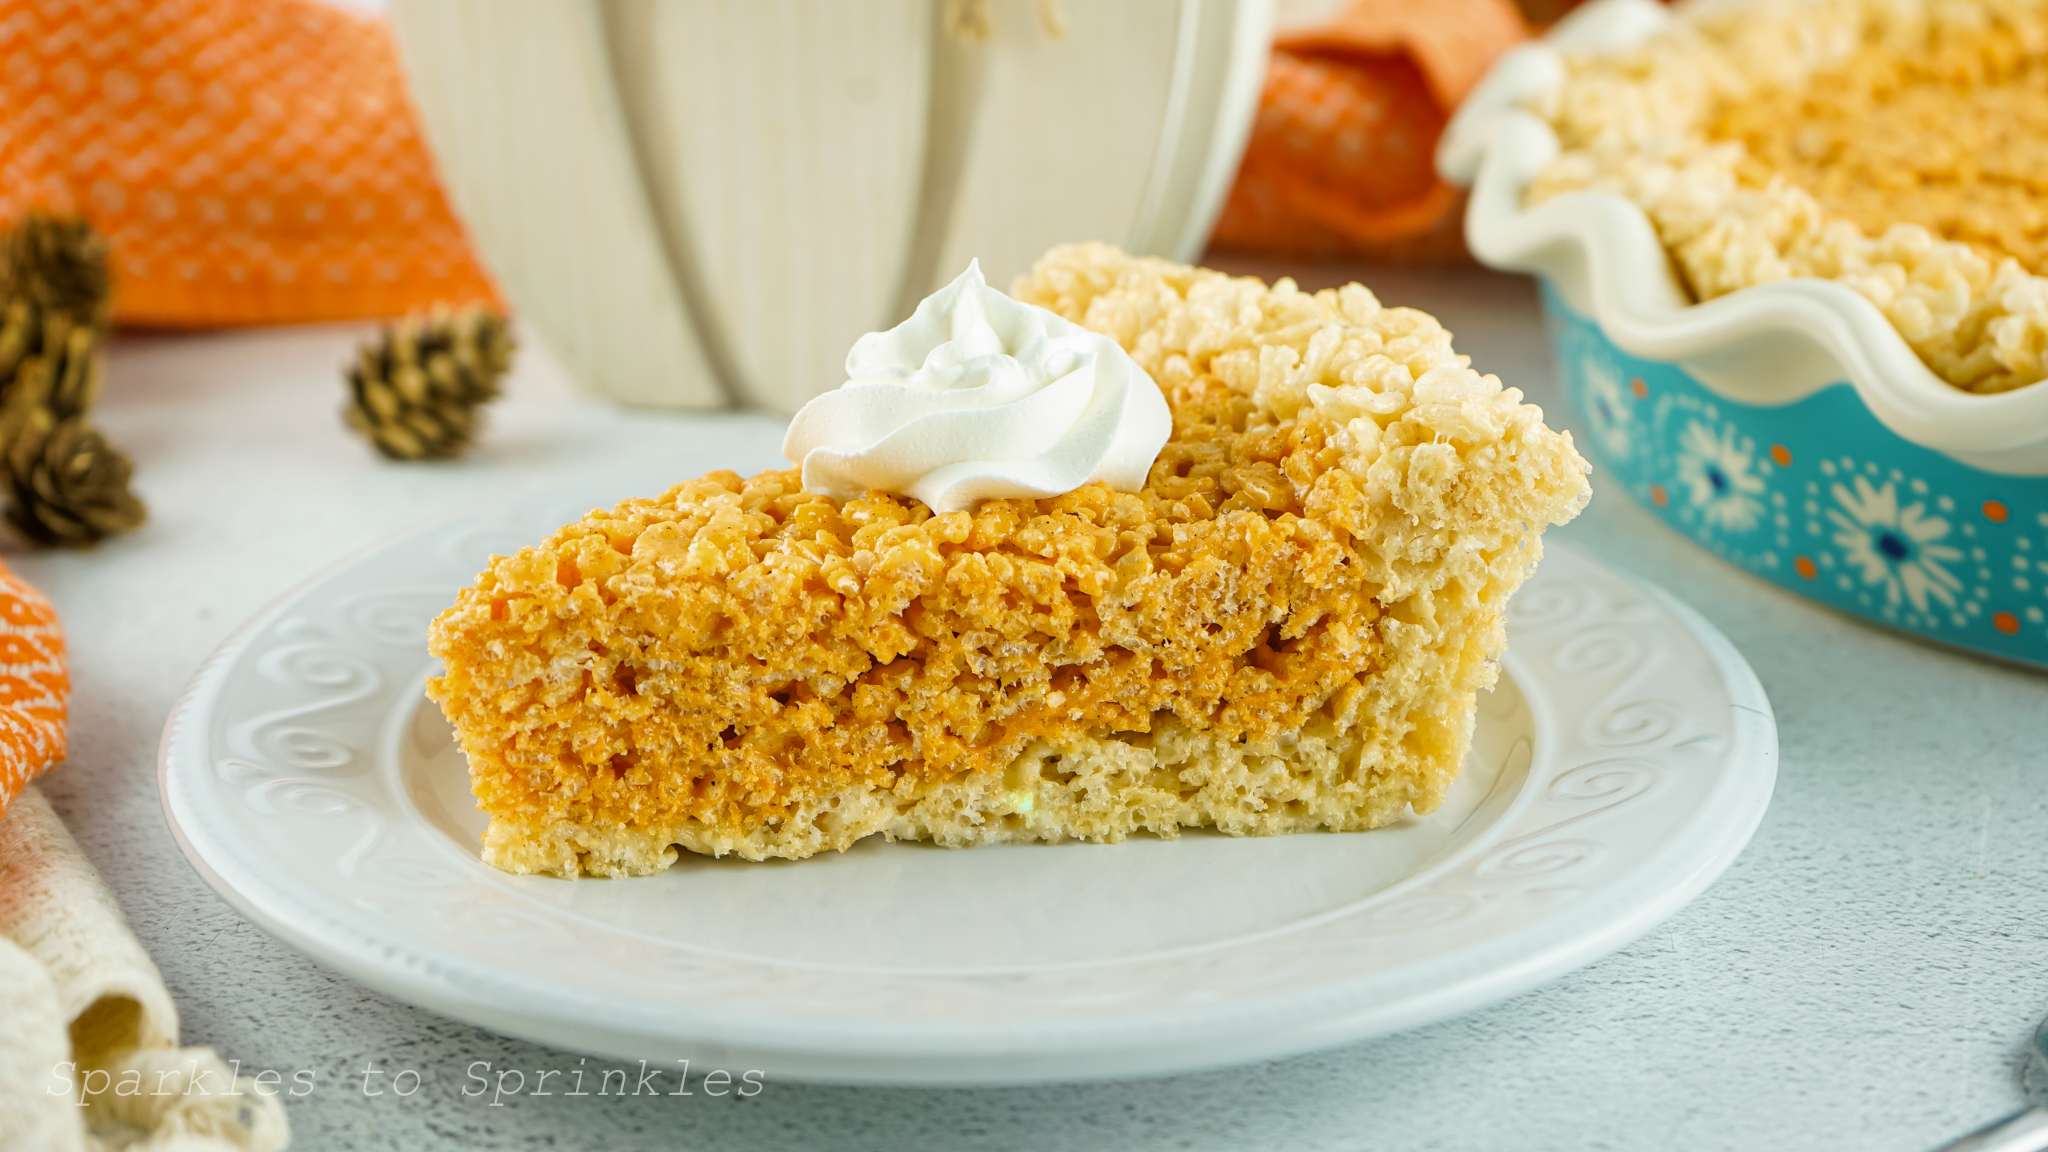
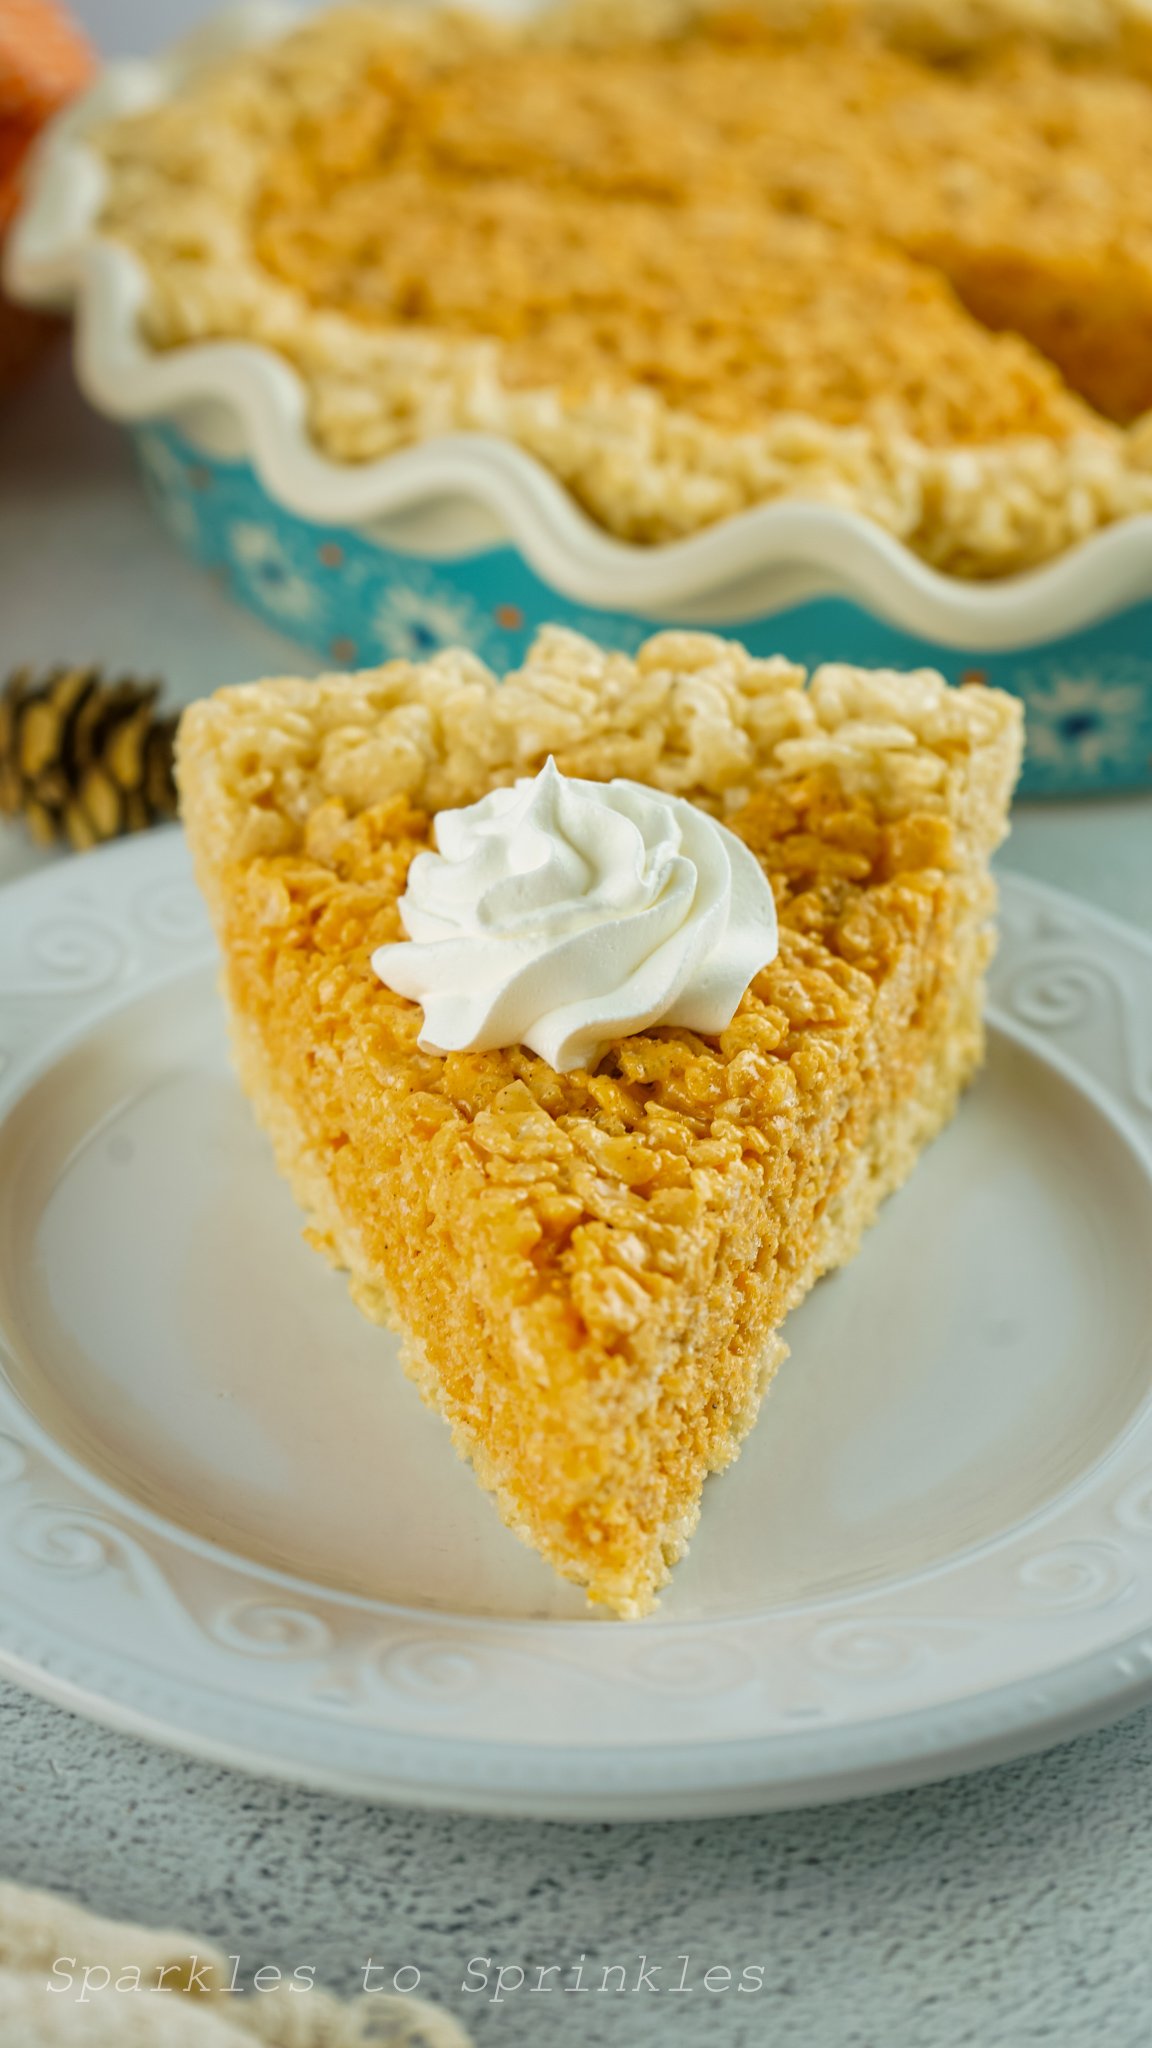
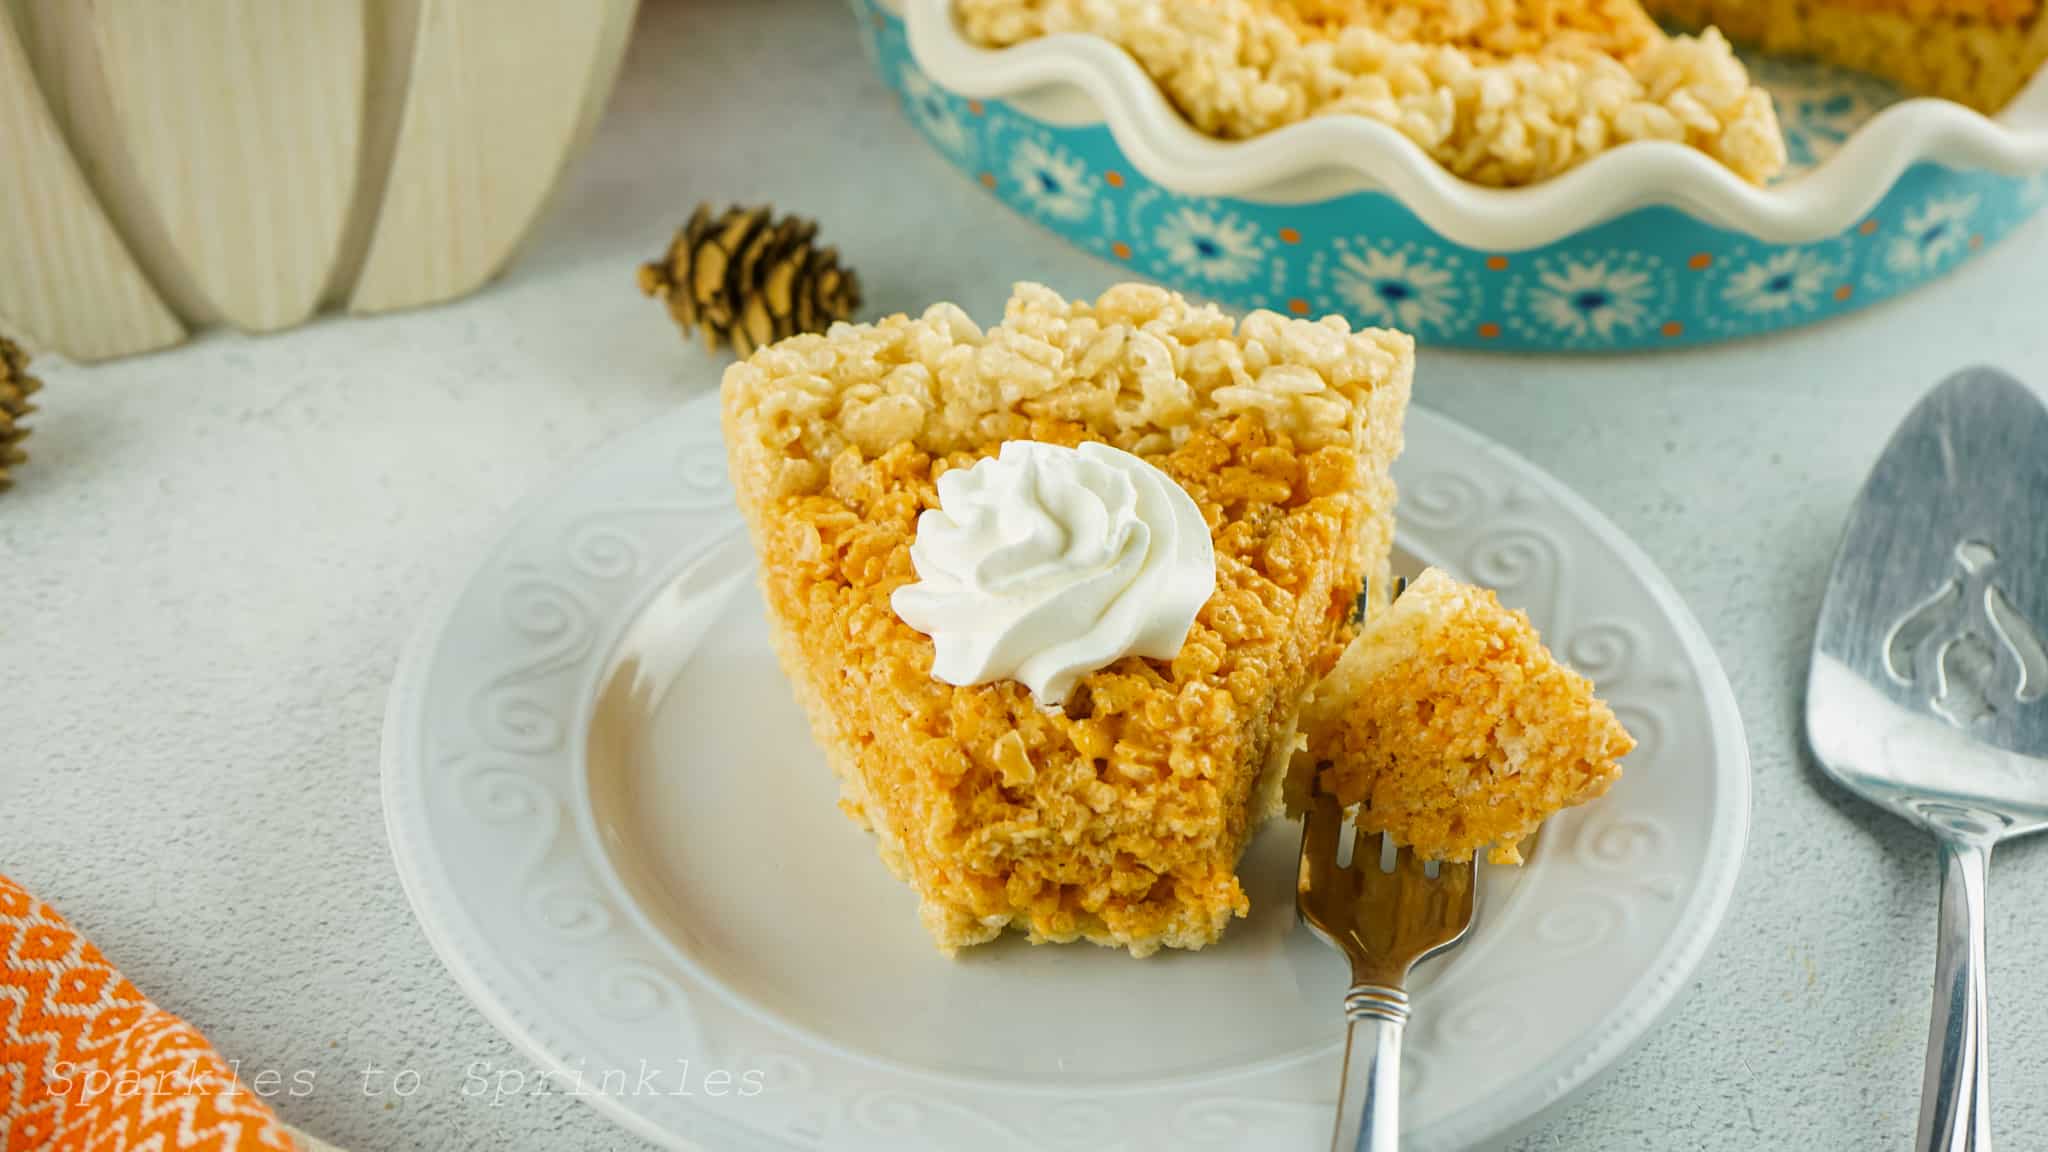
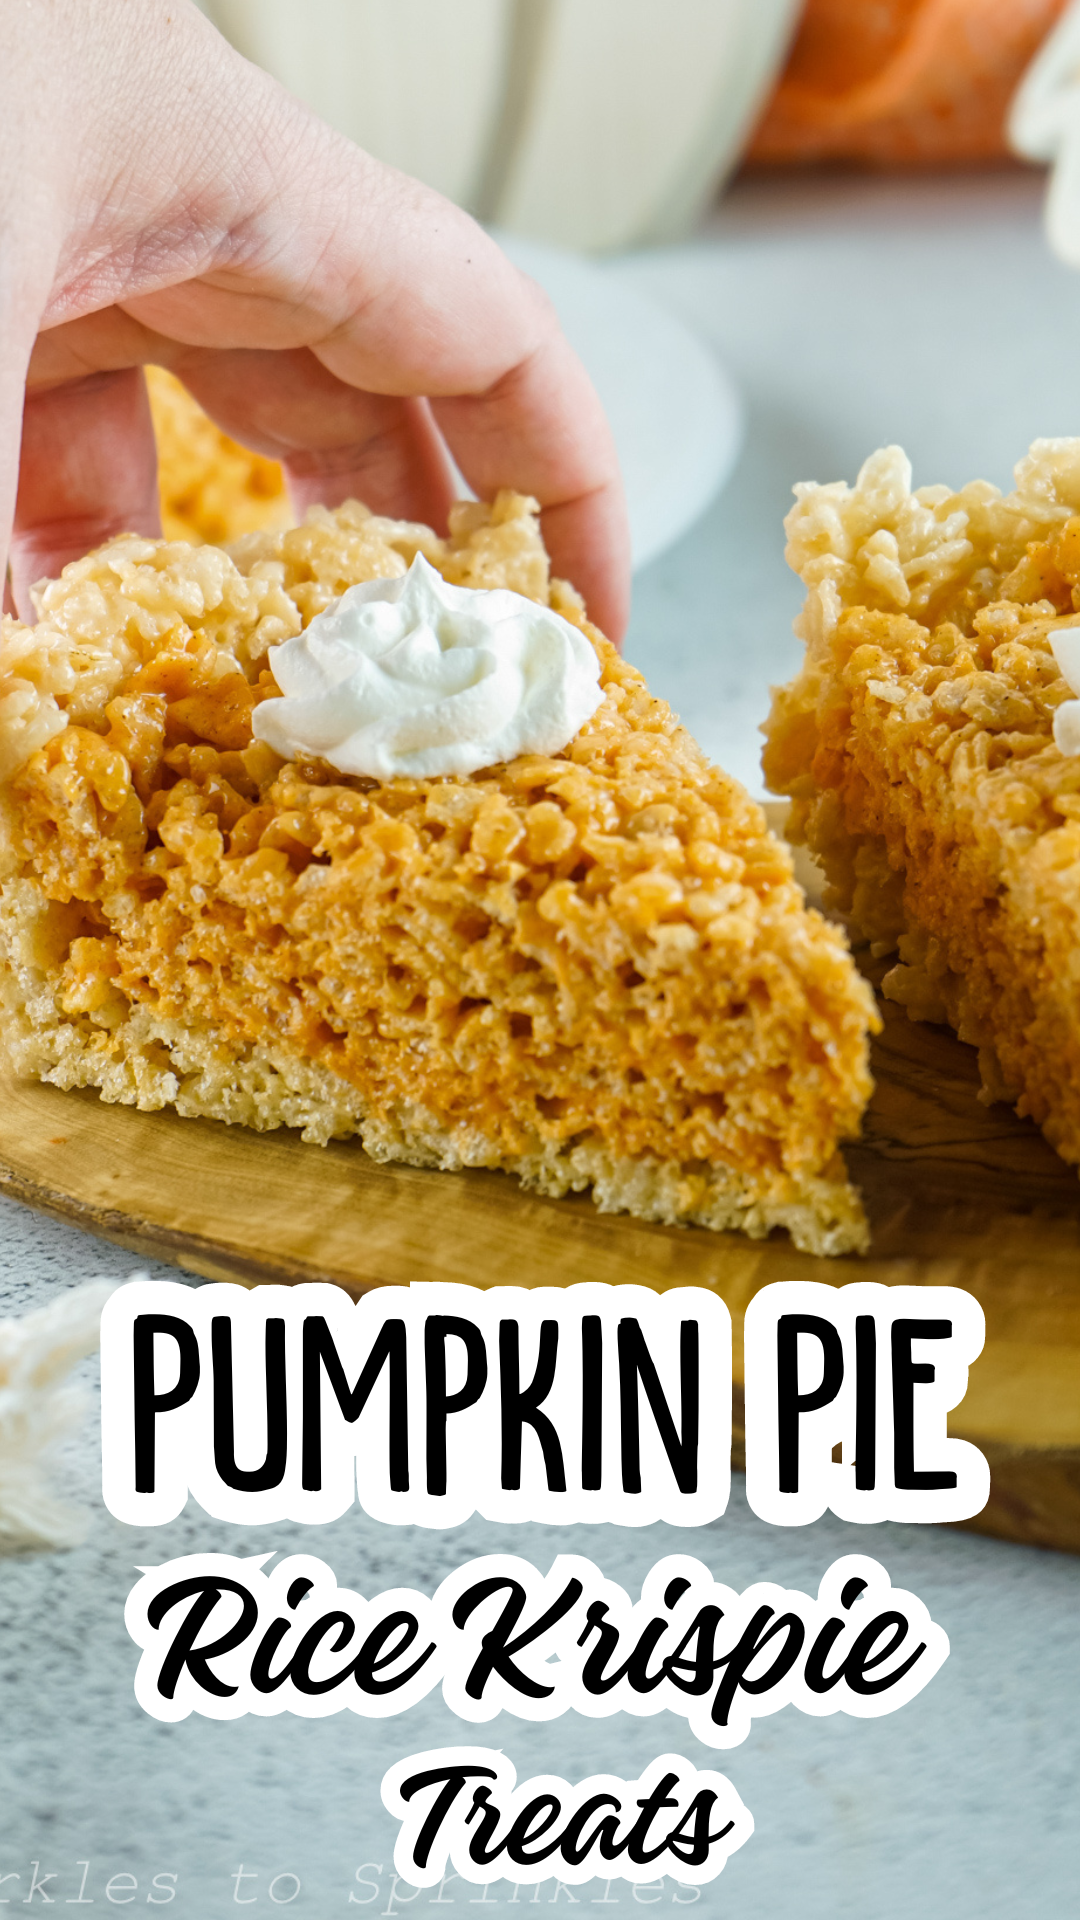
This recipe brings together two delicious layers— a crispy rice cereal “crust” and a pumpkin spice-flavored top layer, complete with that signature orange color. With just a few simple ingredients, you’ll have a treat that’s sure to wow friends and family alike. And if you’re feeling extra festive, you can even top each slice with a dollop of whipped cream to really mimic the look of a classic pumpkin pie.
Kids and adults will love the fun presentation and seasonal twist on a beloved snack. Plus, these Pumpkin Pie Rice Krispie Treats are perfect for making ahead, so you can whip them up the day before your gathering and focus on other details while your dessert is already set to go.
Love pumpkin recipes? Try our pumpkin brownies, our pumpkin cream cheese muffins, or our pumpkin spice pudding shots!
What You Will lOve About This Recipe
Delicious Flavor: The combination of mini marshmallows, Rice Krispies, and pumpkin pie spice offers a delightful blend of sweetness and seasonal flavor that captures the essence of fall.
Fun Presentation: The treat’s pie-like shape and vibrant orange color make them visually appealing, perfect for festive occasions like Halloween and Thanksgiving.
Easy to Make: This no-bake recipe is straightforward and requires minimal ingredients, making it accessible even for novice bakers. Plus, it’s a great activity to involve kids in!
Versatile Serving Options: You can easily customize these treats by adding toppings like whipped cream or sprinkles, allowing for creativity when serving.
Make-Ahead Convenience: These treats can be prepared in advance, making them ideal for parties or gatherings, so you can enjoy the festivities without the last-minute rush.
Ingredients:
Crust Layer:
- 5 Cups Mini Marshmallows
- 4 Cups Rice Cereal
- 3 Tablespoons Unsalted Butter
- Nonstick Cooking Spray
Pumpkin Layer:
- 5 Cups Mini Marshmallows
- 4 Cups Rice Cereal
- 3 Tablespoons Unsalted Butter
- 2 Teaspoons Pumpkin Pie Spice
- ½ Teaspoon Orange Gel Food Dye
- Whipped Cream (optional)

Items Needed:
- Deep Dish Pie Pan
- Flat Bottomed Measuring Cup or Glass
How to Make Pumpkin Pie Rice Krispie Treats
- Spray your pie pan with nonstick cooking spray.
- In a large mixing bowl, add the marshmallows and butter for the crust layer. Place it in the microwave for 1.5 minutes or until the marshmallows swell to large in size.

- Mix well until the butter has fully dissolved.

- Add the rice cereal for the crust layer and fold together the ingredients until the cereal is fully coated.
- Pour the mixture into the prepared pie pan. Spread out the mixture and lightly press it up the sides.
- Using a flat bottomed measuring cup or glass sprayed with a bit of nonstick cooking spray, flatten the cereal to the bottom and up the sides until it’s nice and even.

- For the pumpkin layer, add the marshmallows and butter to a large mixing bowl.
- Microwave for 1.5 minutes or until the marshmallows have swollen to a large size.
- Mix until the butter has all melted.
- Add the pumpkin spice and orange dye. Mix until no color streaks appear.

- Add the cereal to the mixture and fold the ingredients together until the cereal is fully coated.

- Add the mixture to the top of the crust and use the measuring cup or glass to flatten it nice and tight into the crust opening. Be sure to make it a little lower than the top of the crust.

- Cover and let sit for 4 hours or until set.
- Slice into equal slices, dollop each slice with whipped cream, serve, and enjoy!

Tips & Tricks
- Use Fresh Ingredients: Ensure your marshmallows and butter are fresh for the best texture and flavor. Stale marshmallows can result in a less-than-perfect treat.
- Customize the Flavor: Feel free to adjust the amount of pumpkin pie spice to suit your taste. You can also add a touch of vanilla extract for extra flavor.
- Nonstick Spray: Use a generous amount of nonstick cooking spray on your pie pan to prevent sticking. It will make removing the treats much easier once they are set.
- Flatten Evenly: When pressing the cereal mixture into the pie pan, use a flat-bottomed measuring cup or glass to ensure it is evenly distributed. This helps achieve a uniform thickness for both the crust and the pumpkin layer.
- Set in the Fridge: For quicker setting, place the pie pan in the refrigerator instead of leaving it at room temperature. This can help the treats firm up more quickly.
- Cutting Techniques: Use a sharp knife or a pizza cutter to slice the treats once set. Warming the knife with hot water (then drying it) can help make cleaner cuts.
- Decorate for Presentation: For a festive touch, consider topping each slice with whipped cream and a sprinkle of pumpkin pie spice or crushed graham crackers to mimic a pie crust.
- Store Properly: Keep the treats in an airtight container at room temperature for up to a week. If you need to stack them, place parchment paper between layers to prevent sticking.
FAQs

Pumpkin Pie Rice Krispie Treats
Pumpkin Pie Rice Krispie Treats is the perfect way to welcome fall as it takes your classic rice krispie treats and elevates them to the next level with pumpkin spice flavor. Top it with a dollop of whipped cream for a fun dessert that everyone will enjoy this fall.
Ingredients
- Crust Layer:
- 5 Cups Mini Marshmallows
- 4 Cups Rice Cereal
- 3 Tablespoons Unsalted Butter
- Nonstick Cooking Spray
- Pumpkin Layer:
- 5 Cups Mini Marshmallows
- 4 Cups Rice Cereal
- 3 Tablespoons Unsalted Butter
- 2 Teaspoons Pumpkin Pie Spice
- ½ Teaspoon Orange Gel Food Dye
- Whipped Cream (optional)
Instructions
- Spray your pie pan with nonstick cooking spray.
- In a large mixing bowl, add the marshmallows and butter for the crust layer. Place it in the microwave for 1.5 minutes or until the marshmallows swell to large in size.
- Mix well until the butter has fully dissolved.
- Add the rice cereal for the crust layer and fold together the ingredients until the cereal is fully coated.
- Pour the mixture into the prepared pie pan. Spread out the mixture and lightly press it up the sides.
- Using a flat bottomed measuring cup or glass sprayed with a bit of nonstick cooking spray, flatten the cereal to the bottom and up the sides until it’s nice and even.
- For the pumpkin layer, add the marshmallows and butter to a large mixing bowl.
- Microwave for 1.5 minutes or until the marshmallows have swollen to a large size.
- Mix until the butter has all melted.
- Add the pumpkin spice and orange dye. Mix until no color streaks appear.
- Add the cereal to the mixture and fold the ingredients together until the cereal is fully coated.
- Add the mixture to the top of the crust and use the measuring cup or glass to flatten it nice and tight into the crust opening. Be sure to make it a little lower than the top of the crust.
- Cover and let sit for 4 hours or until set.
- Slice into equal slices, dollop each slice with whipped cream, serve, and enjoy!
Nutrition Information:
Yield:
8Serving Size:
1Amount Per Serving: Calories: 391Total Fat: 10gSaturated Fat: 6gTrans Fat: 0gUnsaturated Fat: 3gCholesterol: 23mgSodium: 198mgCarbohydrates: 76gFiber: 1gSugar: 39gProtein: 3g
I’m Melissa, the imaginative force behind Sparkles to Sprinkles, where creativity comes to life, and sprinkles of joy are scattered generously. Melissa is a proud Jersey girl who found love with a New York boy. As a mom to four wonderful boys and a few fur babies, her journey into the world of blogging began after making the life-changing decision to stay home and raise her children. Previously a dedicated workaholic, Melissa’s blog became her creative outlet and passion project. Inspired by her mother-in-law, a masterful cook renowned for her delicious home-cooked meals and legendary holiday feasts (think mouthwatering sausage stuffing), Melissa honed her culinary skills through a combination of family recipes and countless cooking classes. She often attended these classes with her son Michael, who shared her enthusiasm for cooking from a young age. Melissa’s love for learning extends beyond familiar cuisines, as she enjoys exploring international recipes in hands-on cooking classes. Her blog features a diverse array of recipes, showcasing her expertise with various kitchen appliances such as the Instant Pot, air fryer, Slow Cooker, Ninja Foodi, Instant Vortex Plus, and more. Join Melissa on her culinary adventures as she shares tried-and-true family favorites alongside exciting new discoveries!