
Instant Pot Easter Eggs + Natural Easter Egg Dyes
Spring is in the air, and Easter is just around the corner! What better way to celebrate the season than with beautifully dyed eggs? In this article, we’ll show you how to create stunning Instant Pot Easter Eggs using natural dyes made from ingredients like beets, blueberries, and red cabbage. With the help of your Instant Pot and a few simple steps, you can achieve vibrant hues that will make your Easter egg hunt truly memorable. So gather your supplies and get ready to dye eggs the natural way!

Instant Pot Easter Eggs + Natural Easter Egg Dyes
Say goodbye to artificial dyes and hello to all-natural colors straight from your kitchen! With just a few pantry staples and some creative flair, you can create a rainbow of colors to adorn your Easter eggs. Whether you’re looking to achieve soft pastels or bold jewel tones, the possibilities are endless with these natural dye recipes. Plus, by using ingredients like blueberries and turmeric, you’ll add a delightful aroma to your kitchen as you dye your eggs. So let’s dive in and explore the art of natural Easter egg dyeing with your trusty Instant Pot!
As you embark on this Easter egg dyeing adventure, you’ll not only create beautiful eggs but also foster a deeper connection to nature and the vibrant colors it offers. From the earthy hues of beets to the rich purples from blueberries and red cabbage, each dye ingredient brings its own unique charm to the table. Experimenting with different combinations and techniques allows you to unleash your creativity and produce eggs that are truly one-of-a-kind. Whether you’re dyeing eggs with kids, friends, or enjoying a solo crafting session, this activity promises fun and enjoyment for all ages. So gather your ingredients, prepare your Instant Pot, and let the Easter egg dyeing festivities begin!

What You Will Love About Making Natural Easter Egg Dyes
- Natural Beauty: Harnessing the vibrant colors of fruits, vegetables, and teas, you’ll create Easter eggs with hues that are both stunning and naturally derived. From deep purples to soft blues and earthy reds, each egg becomes a work of art, showcasing the beauty of nature’s palette.
- Sustainable Crafting: Using ingredients like beets, blueberries, and red cabbage allows you to embrace sustainable crafting practices. You’ll skip the artificial dyes and chemicals, opting instead for wholesome, eco-friendly alternatives that are safe for both you and the environment.
- Hands-On Experience: From peeling beets to crushing blueberries and brewing herbal teas, this process invites you to roll up your sleeves and get hands-on. Whether you’re working solo or with loved ones, there’s a sense of joy and satisfaction in crafting something beautiful from scratch.
- Creative Expression: With a variety of dye ingredients at your disposal, you have endless possibilities for experimentation and creative expression. Mix and match colors, layer different shades, or try out new techniques to customize your Easter eggs and make each one unique.
- Connection to Tradition: Dyeing Easter eggs is a cherished tradition in many households, and by using natural ingredients and the Instant Pot method, you’re adding a modern twist to an age-old practice. It’s a wonderful way to connect with the past while infusing your celebration with fresh, contemporary flair.
In essence, making Easter eggs this way is not just about decorating eggs—it’s about embracing nature, fostering creativity, and creating lasting memories with loved ones. So dive in, enjoy the process, and revel in the beauty of your handcrafted Easter creations!

Natural Easter Egg Dye
Looking to add a natural and vibrant touch to your Easter egg decorating this year? Look no further than natural Easter egg dyes! By harnessing the colors found in everyday fruits, vegetables, and teas, you can create stunning hues that are both beautiful and safe for your eggs. From deep purples made with blueberries to vibrant pinks from beets, the possibilities are endless. Get ready to unleash your creativity and add a touch of nature to your Easter egg tradition with these simple and eco-friendly dye ingredients.

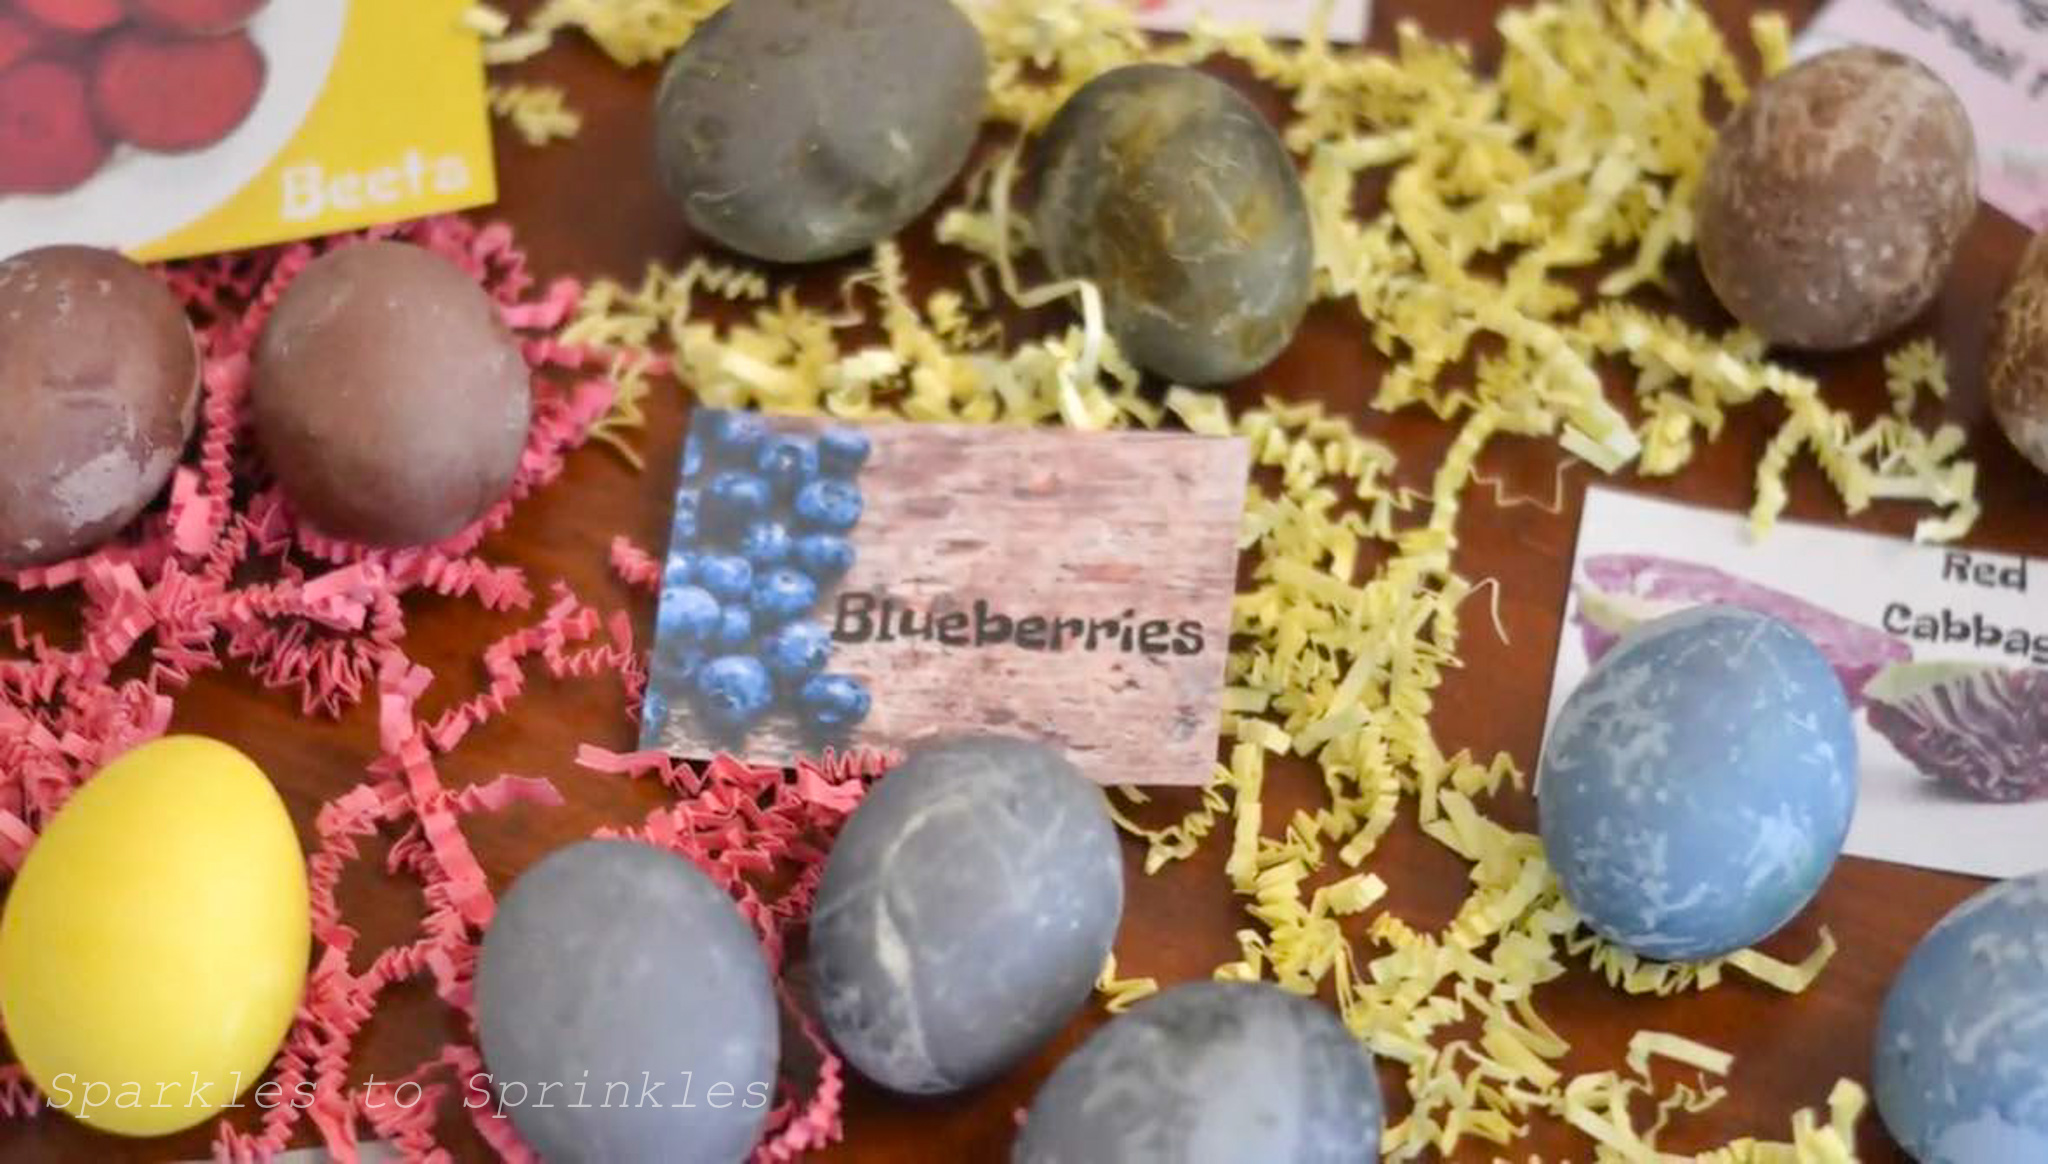
Ingredients I Used
- Beets
- Red Cabbage
- Ground Tumeric
- Purple Acai Blueberry Green Tea
- Raspberry Zinger Herbal Tea
- Blueberries
There are so many vegetables and fruits you can use, but these are what I used for the colorful eggs you see! By using your electric pressure cooker, it helps make darker dye so it has more of a chance of soaking into your eggshell and giving you a deep colorful egg.
5 + 5 + 5 Instant Pot Hard Boiled Eggs
What is the 5-5-5 Hard Boiled egg method you ask? You start by cooking your eggs on high pressure for five minutes in your Instant Pot. Then allow the pressure to come down naturally for five minutes. Do a quick release to get rid of any other pressure in the Instant Pot. Then place your eggs in an ice bath for five more minutes.
Yes, it is THAT easy to make hard-boiled eggs in your Instant Pot! They come out perfect each and every single time! It is my go-to method that I use anytime we are using eggs in our home!
How to Mak Instant Pot Easter Eggs + Natural Easter Egg Dye
- Hard boil eggs using the 5+5+5 method. Set aside in fridge until needed.
- Pour 2 cups of water into the pot.
- Add coloring agent. (beets, blueberries, red cabbage, etc)

- Close lid and pressure cook at High Pressure for 10 minutes + Natural Release

- Strain liquid into a large mason jar, and allow to cool to room temperature.

- Stir in 2 tablespoons white vinegar and add 2-3 hard-boiled eggs.

- Seal the jar, and refrigerate overnight. Intermittently give the jars a soft shake.

- Remove eggs from the jars and lets dry on a cooling rack. Keep track of your colors by drying in groups next to your coordinating tag.

Do The Foods Flavor The Dyed Eggs
No, they really don’t. Now if you use onions, you might catch an aroma of an onion. But all of these I used above work great. They color the shells, and inside you still, have the perfectly cooked egg.
You are able to peel and use the eggs how you want. From egg salad, potato salad, to deviled eggs. The beauty of this recipe is the eggs are totally edible after being dyed! The classic flavor of a hard-boiled egg stays intact.

Why Opt For Naturally Dyed Easter Eggs
Opting for naturally dyed eggs offers numerous benefits beyond just vibrant colors. Unlike artificial dyes, natural dyes are non-toxic and safe for both children and the environment. They also provide an opportunity to explore creativity while learning about the natural pigments found in fruits, vegetables, and spices. Additionally, using natural ingredients promotes sustainability by reducing reliance on synthetic chemicals. With a wide range of colors achievable from ingredients like blueberries, beets, turmeric, and tea, natural dyes allow you to create unique and beautiful Easter eggs while embracing a healthier and more eco-friendly approach.

Tip & Tricks For Making Natural Dye Easter Egg Dyes
- Experiment with Ingredients: Don’t be afraid to get creative with your dye ingredients. Try different combinations of fruits, vegetables, and teas to achieve a wide range of colors and effects. You might discover unexpected hues that add a unique touch to your eggs.
- Adjust Dye Concentration: Depending on the intensity of color you desire, you can adjust the concentration of your dye solution. For deeper, more vibrant shades, use a higher ratio of dye ingredients to water. For softer pastel tones, dilute the solution with more water.
- Play with Soaking Times: The longer you soak your eggs in the dye solution, the richer the color will be. Experiment with different soaking times to achieve the perfect hue for your eggs. Keep in mind that some colors may develop more quickly than others.
- Use Mason Jars for Dyeing: Mason jars are ideal for dyeing Easter eggs as they provide a convenient and mess-free way to soak the eggs in the dye solution. Plus, they can be sealed and refrigerated overnight, allowing the colors to fully develop.
- Label Your Dye Jars: To keep track of which dye solution corresponds to each color, label your mason jars with tags or labels. This will prevent any confusion and ensure that you know which eggs are soaking in each dye. Print out ours tags posted below.
- Get Creative with Designs: Once your eggs are dyed and dried, unleash your creativity by adding designs or patterns using markers, stickers, or wax crayons. Personalize each egg with initials, doodles, or intricate designs to make them truly one-of-a-kind.
- Have Fun and Be Patient: Dyeing Easter eggs is a fun and creative activity, so enjoy the process and don’t rush it. Take your time to experiment, play around with different techniques, and most importantly, have fun creating beautiful Easter eggs to enjoy and share with family and friends.
FAQ’s
- Can I reuse the dye solution? Yes, you can reuse the dye solution for multiple batches of eggs. Simply strain out any solids and store the liquid in a sealed container in the refrigerator until you’re ready to use it again.
- How long will the dyed eggs last? Dyed eggs should be consumed within one week if they are kept refrigerated. Be sure to store them in a covered container to prevent any odors from affecting the eggs.
- Can I dye brown eggs? Yes, you can dye brown eggs using this method, but keep in mind that the resulting colors may appear different compared to white eggs. Experiment with different dye ingredients to achieve the desired shades.
- Can I use other types of vinegar? While white vinegar is commonly used for egg dyeing, you can also use other types of vinegar such as apple cider vinegar or rice vinegar. However, keep in mind that they may affect the final color of the dyed eggs.
- How can I achieve a marbled effect on the eggs? To create a marbled effect, you can dip the eggs in multiple dye solutions or gently swirl the eggs in the dye mixture before letting them soak. Experiment with different techniques to achieve unique patterns.
- Can I dye eggs with natural ingredients if I don’t have an Instant Pot? Yes, you can still dye eggs using natural ingredients without an Instant Pot. Simply simmer the dye ingredients in water on the stovetop and follow the same process for soaking the eggs.
- Are the dye ingredients safe for consumption? Yes, the dye ingredients used in this method, such as fruits, vegetables, and teas, are safe for consumption. However, it’s best to avoid eating the shells of the dyed eggs as they may contain traces of the dye solution.
For another fun way to make Easter Eggs in your Instant Pot check out my Silk Tie (Dyed) Easter Eggs In The Instant Pot
Make sure you scroll all the way down to print your own dye tags.

Instant Pot Easter Eggs + Natural Easter Egg Dye
Learn how to successfully dye Easter eggs naturally. Best of all I am using my Instant Pot Easter Eggs recipe so it is quick to whip up, perfect hard boiled eggs each and every single time. Natural Easter egg dye is where you use foods to color the eggs, instead of the vinegar and color tablets or food coloring.
Materials
- Eggs
- White Vinegar
- 3 Beets, pealed and quartered
- 1 Pint Blueberries
- 1 head of Red Cabbage
- 2 TBSP Ground Tumeric
- 6-8 Raspberry Zinger Herbal Tea Bags
- 6-8 Purple Acai Blueberry Green Tea
Tools
- Mason Jars (wide mouthed are a bit easier to work with)
- Dye Tags (print below)
Instructions
- Hard boil eggs using the 5+5+5 method. Set aside in fridge until needed.
- Pour 2 cups of water into the pot.
- Add coloring agent. (beets, blueberries, red cabbage, etc)
- Close lid and pressure cook at High Pressure for 10 minutes + Natural Release
- Strain liquid into a large mason jar, and allow to cool to room temperature.
- Stir in 2 tablespoons white vinegar and add 2-3 hard-boiled eggs.
- Seal the jar, and refrigerate overnight. Intermittently give the jars a soft shake.
- Remove eggs from the jars and lets dry on a cooling rack. Keep track of your colors by drying in groups next to your coordinating tag.
Notes
- 5-minute cook time
- 5-minute natural pressure release
- 5-minute ice bath
- ** Eggs will have a matte finish. You can rub dried eggs with a dab of vegetable oil to give them a shinier finish.
Click here to print this set of tags

Click here to print this set of tags

I’m Melissa, the imaginative force behind Sparkles to Sprinkles, where creativity comes to life, and sprinkles of joy are scattered generously. Melissa is a proud Jersey girl who found love with a New York boy. As a mom to four wonderful boys and a few fur babies, her journey into the world of blogging began after making the life-changing decision to stay home and raise her children. Previously a dedicated workaholic, Melissa’s blog became her creative outlet and passion project. Inspired by her mother-in-law, a masterful cook renowned for her delicious home-cooked meals and legendary holiday feasts (think mouthwatering sausage stuffing), Melissa honed her culinary skills through a combination of family recipes and countless cooking classes. She often attended these classes with her son Michael, who shared her enthusiasm for cooking from a young age. Melissa’s love for learning extends beyond familiar cuisines, as she enjoys exploring international recipes in hands-on cooking classes. Her blog features a diverse array of recipes, showcasing her expertise with various kitchen appliances such as the Instant Pot, air fryer, Slow Cooker, Ninja Foodi, Instant Vortex Plus, and more. Join Melissa on her culinary adventures as she shares tried-and-true family favorites alongside exciting new discoveries!


What a wonderful idea! One question, did you use raw or cooked beets?
Raw