Cast Iron Buttermilk Biscuits
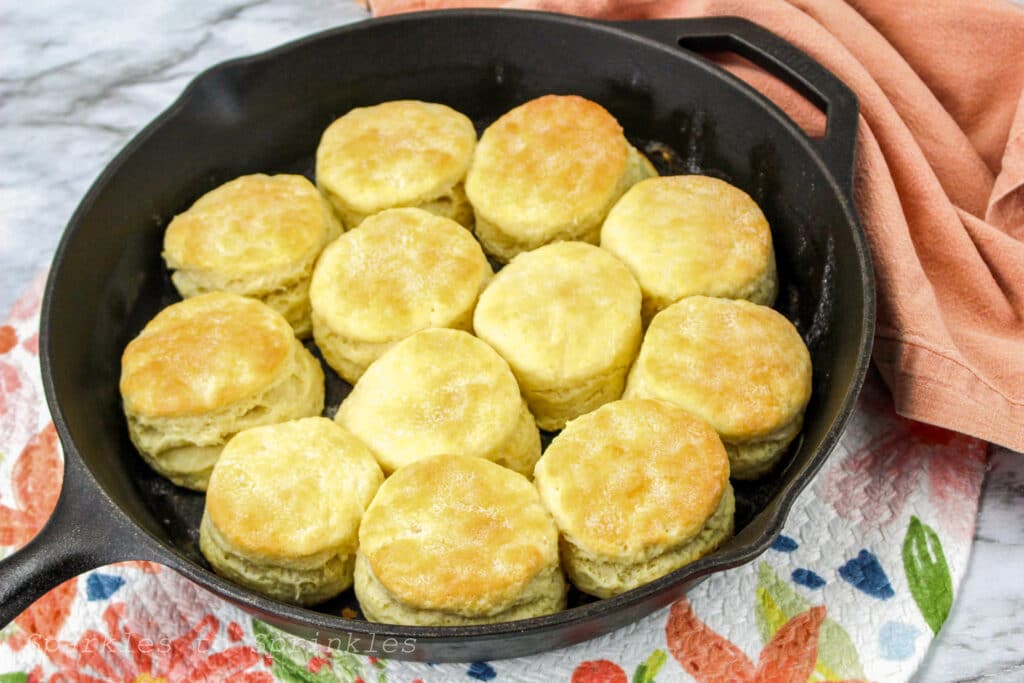
Cast Iron Buttermilk Biscuits are the perfect biscuits! They are buttery and flaky and make for the perfect side to dinner or top with gravy for biscuits and gravy. The best news is these biscuits are ready to enjoy in just 30 minutes.
Cast Iron Buttermilk Biscuits
CastIron buttermilk biscuits are one of my favorite ways to make biscuits! I love how easy they are and the fact that they require no rise time! These make it the perfect addition to dinner to serve with your Instant Pot Turkey Chili or alongside your slow cooker chicken pot pie soup.

How to Make Cast Iron Buttermilk Biscuits
- Preheat the oven to 425 degrees. Place 2 tablespoons of butter into a 12 to 15 inch cast iron skillet. Put The skillet in the oven until the butter is melted.
- Whisk together the eggs in buttermilk.

- In a large bowl or food processor, combine the flour, baking powder, cream of tartar, and salt. Cut in the remaining butter until the mixture is sandy.

- Combine the flour mixture with the buttermilk mixture until it comes together in a large ball.

- Turn the dough out onto a lightly floured surface. Fold the dough over 6 to 8 times. (The more times the dough is folded, the more layers the biscuits will have.) Pat into a large rectangle, about 1/2 inch thick. use a biscuit cutter to cut 12 to 15 biscuits from the dough, reshaping the dough as needed.


- Transfer the biscuits to the prepared skillet.

- Place in the oven and bake for 15 to 20 minutes.
- If desired, brush with melted butter before serving.

Tips Tricks and FAQs
- For softer biscuits you will want to let the skillet cool briefly before adding the biscuits in step 6.
- It is best to let these cool for about 5 minutes before serving.
- While our oven is heating up, you can put your uncooked, cut biscuits in the fridge. This will help keep them cool.
- Be sure you don’t over knead the dough.
- You may double or triple the recipe if you prefer.
- A secret to mixing the cold butter in is to grate frozen butter and cut that in.

Storage
You can store your leftover biscuits at room temperature in an airtight container for up to 4 days.
Freezer
If you would like your biscuits to last longer you will want to let your biscuits completely cool and then place them on a lined baking sheet and freeze. Once frozen, transfer them to a freezer-safe bag. These will last for up to 3 months.
Can you freeze uncooked biscuits?
Yes! You can freeze these cast-iron buttermilk biscuits prior to baking!
Place your cut biscuits on a baking sheet lined with parchment paper and freeze until hard. Once frozen, transfer them to a freezer-safe bag.
When you are ready to enjoy, place your frozen biscuits in the preheated skillet in the preheated oven.

Cast Iron Buttermilk Biscuits
Cast Iron Buttermilk Biscuits are the perfect biscuits! They are buttery and flaky and make for the perfect side to dinner or top with gravy for biscuits and gravy. The best news is these biscuits are ready to enjoy in just 30 minutes.
Ingredients
- ½ cup cold butter, divided
- 1 ⅓ cup buttermilk
- 2 eggs
- 4 cups all-purpose flour
- 5 teaspoons baking powder
- 1 teaspoon cream of tartar
- 1 teaspoon salt
Instructions
- Preheat the oven to 425 degrees. Place 2 tablespoons of butter into a 12 to 15 inch cast iron skillet. Put The skillet in the oven until the butter is melted.
- Whisk together the eggs in buttermilk.
- In a large bowl or food processor, combine the flour, baking powder, cream of tartar, and salt. Cut in the remaining butter until the mixture is sandy.
- Combine the flour mixture with the buttermilk mixture until it comes together in a large ball.
- Turn the dough out onto a lightly floured surface. Fold the dough over 6 to 8 times. (The more times the dough is folded, the more layers the biscuits will have.) Pat into a large rectangle, about 1/2 inch thick. use a biscuit cutter to cut 12 to 15 biscuits from the dough, reshaping the dough as needed.
- Transfer the biscuits to the prepared skillet.
- Place in the oven and bake for 15 to 20 minutes.
- If desired, brush with melted butter before serving.
Notes
*Yield: 12 to 15 biscuits
*Recipe adapted from all recipes
I’m Melissa, the imaginative force behind Sparkles to Sprinkles, where creativity comes to life, and sprinkles of joy are scattered generously. Melissa is a proud Jersey girl who found love with a New York boy. As a mom to four wonderful boys and a few fur babies, her journey into the world of blogging began after making the life-changing decision to stay home and raise her children. Previously a dedicated workaholic, Melissa’s blog became her creative outlet and passion project. Inspired by her mother-in-law, a masterful cook renowned for her delicious home-cooked meals and legendary holiday feasts (think mouthwatering sausage stuffing), Melissa honed her culinary skills through a combination of family recipes and countless cooking classes. She often attended these classes with her son Michael, who shared her enthusiasm for cooking from a young age. Melissa’s love for learning extends beyond familiar cuisines, as she enjoys exploring international recipes in hands-on cooking classes. Her blog features a diverse array of recipes, showcasing her expertise with various kitchen appliances such as the Instant Pot, air fryer, Slow Cooker, Ninja Foodi, Instant Vortex Plus, and more. Join Melissa on her culinary adventures as she shares tried-and-true family favorites alongside exciting new discoveries!


