
Pizookie
Satisfy your sweet tooth and indulge in a warm, gooey delight with the irresistible allure of Pizookie. A delightful fusion of pizza and cookie, Pizookie promises a decadent dessert experience that’s perfect for sharing with friends and family. In this article, we’ll explore the magic of Pizookie, revealing the secrets behind crafting this mouthwatering treat that’s sure to become a favorite in your baking repertoire. Whether you’re craving a cozy night in or looking to impress guests at your next gathering, this recipe will elevate your dessert game to new heights. So, grab your ingredients and get ready to embark on a delicious journey with Pizookie.
At its core, a Pizookie is a delightful combination of warm, freshly baked cookie dough and cold, creamy ice cream. This heavenly dessert is typically served straight out of the oven, allowing the cookie to remain soft and gooey while the ice cream slowly melts into a deliciously creamy pool. The contrast between the warm, melty cookie and the cool, refreshing ice cream creates a symphony of flavors and textures that’s simply irresistible. Whether enjoyed on its own or shared with loved ones, a Pizookie promises to satisfy even the most insatiable sweet cravings. Join us as we uncover the secrets to creating the ultimate Pizookie experience right in your own kitchen.
Pizookie
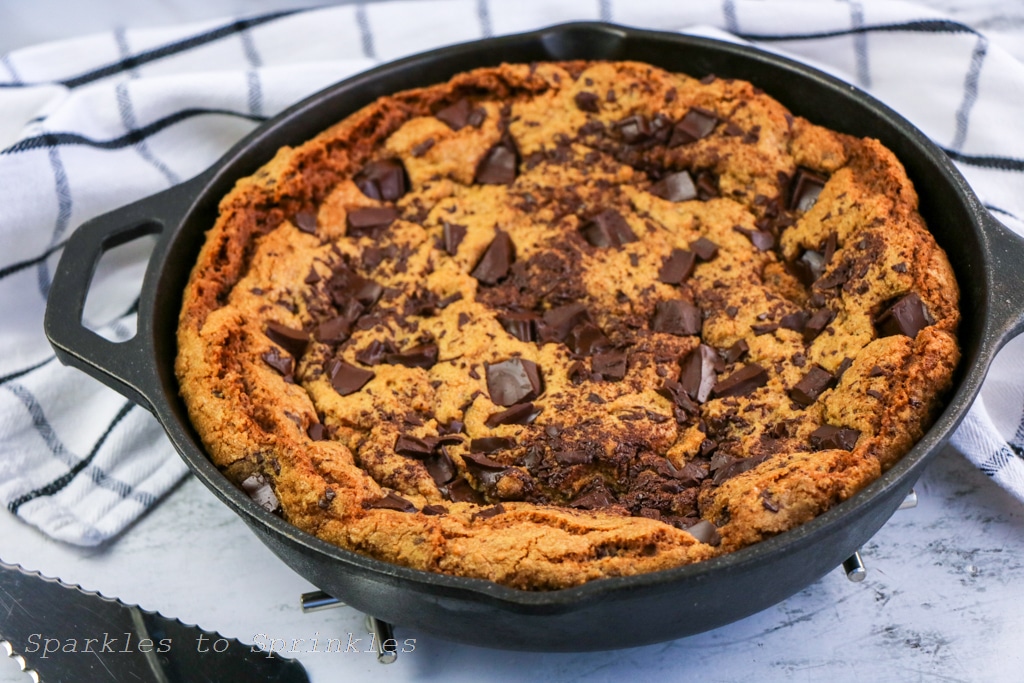
Whether you call this a skillet chocolate chip cookie or a pizookie there is one thing for sure, it is delicious and irresistible. In fact, when you are eating this you might just think you ordered it from your favorite restaurant.

You will love this recipe for so many reasons! You will love how easy it is to make. There is no pulling cookies in and out of the oven for an hour, it is just one giant cookie everyone can enjoy together! You will also love the crispy crust and the soft gooey middle! There is no better way to eat a cookie than this way! Pair it with these delicious s’more cookies for the perfect dessert night with friends and family!
Ingredients
- 1 cup brown sugar
- ½ cup sugar
- ½ cup (1 stick) salted butter, room temperature
- 1 egg
- 3 tablespoons heavy cream
- 1 ½ teaspoons vanilla extract
- 2 cups all-purpose flour
- 1 teaspoon baking soda
- ¼ teaspoon table salt
- 2 (4 ounce) boxes semisweet chocolate baking bar, chopped

How to Make Pizookie
- Preheat the oven to 325 degrees, Prepare a 10-inch cast-iron skillet with nonstick cooking spray.
- In a mixing bowl, cream the butter, brown sugar, and sugar until light and creamy, about 5 minutes.
- Beat in the egg and vanilla.
- In a separate bowl, whisk together the flour, baking soda, and salt. Add to the mixer and beat until well mixed.

- Fold in the chocolate chunks, reserving some for the top.

- Transfer the batter to the prepared skillet and spread evenly. Top with the remaining chocolate chunks.

- Bake for 50 to 55 minutes or until golden. Allow to rest for 10 minutes prior to serving.
- Best if served warm, cut into wedges, and topped with ice cream.

Tips Tricks and FAQs
- If you want to add another layer of flavor add a little bit of sea salt!
- Swap out the chocolate chips for other chips like white chocolate chips, or even dark chocolate chips. The possibilities are endless.
- You can easily make individual skillet cookies if you choose. You will need to adjust the cooking time a bit because they won’t take as long to bake.

Storage
This skillet chocolate chip cookie can be stored at room temperature, covered.
You can easily store this in the freezer as well. Just let it completely cool and then cut the pieces into wedges. Store each wedge individually wrapped in the freezer for up to 2 months.
Make Ahead
You can easily make this ahead of time. Mix up the dough, add to the skillet and then place it in the fridge until you are ready to bake.

Can I add anything to my Pizookie?
You can mix all kinds of amazing treats into your skillet cookie. Add chopped nuts, marshmallows, crushed pretzels, a variety of other baking chips, maybe even some salted caramel chips.

Top your skillet cookie with vanilla ice cream, chocolate sauce, caramel, and whipped cream if you choose.

Tips & Tricks
Mastering the art of making a perfect Pizookie is easier than you might think! Here are some tips and tricks to ensure your dessert turns out warm, gooey, and utterly delicious:
- Choose the Right Pan: Use a cast iron skillet or a deep-dish pizza pan for the best results. These pans retain heat well and help create a crisp outer layer while keeping the center soft and gooey.
- Preheat the Pan: Preheat your skillet or pan in the oven before adding the cookie dough. This helps ensure that the cookie cooks evenly and develops a crispy exterior.
- Don’t Overmix the Dough: Be careful not to overmix the cookie dough, as this can lead to tough cookies. Mix until just combined to keep the texture soft and chewy.
- Use High-Quality Ingredients: Use high-quality chocolate chips, cocoa powder, and vanilla extract for the best flavor. You can also add mix-ins like nuts, caramel bits, or toffee pieces for extra indulgence.
- Chill the Dough: For extra thick and chewy cookies, chill the dough in the refrigerator for at least 30 minutes before pressing it into the pan.
- Press the Dough Evenly: Press the cookie dough evenly into the preheated pan using your hands or a spatula. Make sure it’s spread out to the edges for even baking.
- Bake at the Right Temperature: Bake the Pizookie at a high temperature, around 375°F (190°C), for a short period of time to ensure the center stays soft and gooey while the edges get crispy.
- Serve Immediately: Enjoy your Pizookie straight out of the oven while it’s still warm and gooey. Top it with a scoop of your favorite ice cream and any desired toppings, and dig in!
By following these tips and tricks, you’ll be well on your way to creating the perfect Pizookie that’s sure to impress your friends and family with its irresistible flavor and texture.

FAQ’s
- Can I use store-bought cookie dough for a Pizookie? Yes, you can use store-bought cookie dough for convenience. However, homemade cookie dough typically yields better results in terms of flavor and texture.
- Can I make a Pizookie without a cast iron skillet or pizza pan? While a cast iron skillet or pizza pan is ideal for making a Pizookie, you can use any oven-safe dish with high sides, such as a pie dish or cake pan, as an alternative.
- How do I prevent the cookie from burning on the edges while baking? To prevent the cookie from burning on the edges, you can cover the edges of the pan with aluminum foil halfway through baking, or reduce the oven temperature slightly.
- Can I make a Pizookie ahead of time and reheat it later? While Pizookies are best enjoyed fresh out of the oven, you can make them ahead of time and reheat them in the oven or microwave before serving. Keep in mind that the texture may be slightly different after reheating.
- What are some popular toppings for Pizookies? Popular toppings for Pizookies include vanilla ice cream, chocolate syrup, caramel sauce, whipped cream, chopped nuts, and sprinkles. Get creative and customize your Pizookie with your favorite toppings!
- How do I know when a Pizookie is done baking? A Pizookie is done baking when the edges are golden brown and crispy, and the center is set but still soft and gooey. You can also test for doneness by inserting a toothpick into the center – it should come out with a few moist crumbs attached.
- Can I make a gluten-free or vegan Pizookie? Yes, you can make a gluten-free Pizookie by using gluten-free flour and ensuring that all other ingredients are gluten-free. For a vegan version, use plant-based butter and replace the eggs with a flax egg or another egg substitute.
- How should I store leftover Pizookie? Store leftover Pizookie in an airtight container at room temperature for up to 2 days. Reheat before serving, if desired.
With these FAQs, you’ll have all the information you need to make the perfect Pizookie every time!


Pizookie
This Skillet chocolate chip cookie recipe is one of the best ways to cook a chocolate chip cookie! It is soft, chewy, and delicious and pairs perfectly with a scoop of ice cream on top. You will love creating this over and over again.
Ingredients
- 1 cup brown sugar
- ½ cup sugar
- ½ cup (1 stick) salted butter, room temperature
- 1 egg
- 3 tablespoons heavy cream
- 1 ½ teaspoons vanilla extract
- 2 cups all-purpose flour
- 1 teaspoon baking soda
- ¼ teaspoon table salt
- 2 (4 ounce) boxes semisweet chocolate baking bar, chopped
Instructions
- Preheat the oven to 325 degrees, Prepare a 10-inch cast-iron skillet with nonstick cooking spray.
- In a mixing bowl, cream the butter, brown sugar, and sugar until light and creamy, about 5 minutes.
- Beat in the egg and vanilla.
- In a separate bowl, whisk together the flour, baking soda, and salt. Add to the mixer and beat until well mixed.
- Fold in the chocolate chunks, reserving some for the top.
- Transfer the batter to the prepared skillet and spread evenly. Top with the remaining chocolate chunks.
- Bake for 50 to 55 minutes or until golden. Allow resting for 10 minutes prior to serving.
- Best if served warm, cut into wedges, and topped with ice cream.
Nutrition Information:
Yield:
8Serving Size:
1Amount Per Serving: Calories: 311Total Fat: 5gSaturated Fat: 3gTrans Fat: 0gUnsaturated Fat: 2gCholesterol: 31mgSodium: 247mgCarbohydrates: 62gFiber: 1gSugar: 38gProtein: 4g
I’m Melissa, the imaginative force behind Sparkles to Sprinkles, where creativity comes to life, and sprinkles of joy are scattered generously. Melissa is a proud Jersey girl who found love with a New York boy. As a mom to four wonderful boys and a few fur babies, her journey into the world of blogging began after making the life-changing decision to stay home and raise her children. Previously a dedicated workaholic, Melissa’s blog became her creative outlet and passion project. Inspired by her mother-in-law, a masterful cook renowned for her delicious home-cooked meals and legendary holiday feasts (think mouthwatering sausage stuffing), Melissa honed her culinary skills through a combination of family recipes and countless cooking classes. She often attended these classes with her son Michael, who shared her enthusiasm for cooking from a young age. Melissa’s love for learning extends beyond familiar cuisines, as she enjoys exploring international recipes in hands-on cooking classes. Her blog features a diverse array of recipes, showcasing her expertise with various kitchen appliances such as the Instant Pot, air fryer, Slow Cooker, Ninja Foodi, Instant Vortex Plus, and more. Join Melissa on her culinary adventures as she shares tried-and-true family favorites alongside exciting new discoveries!


