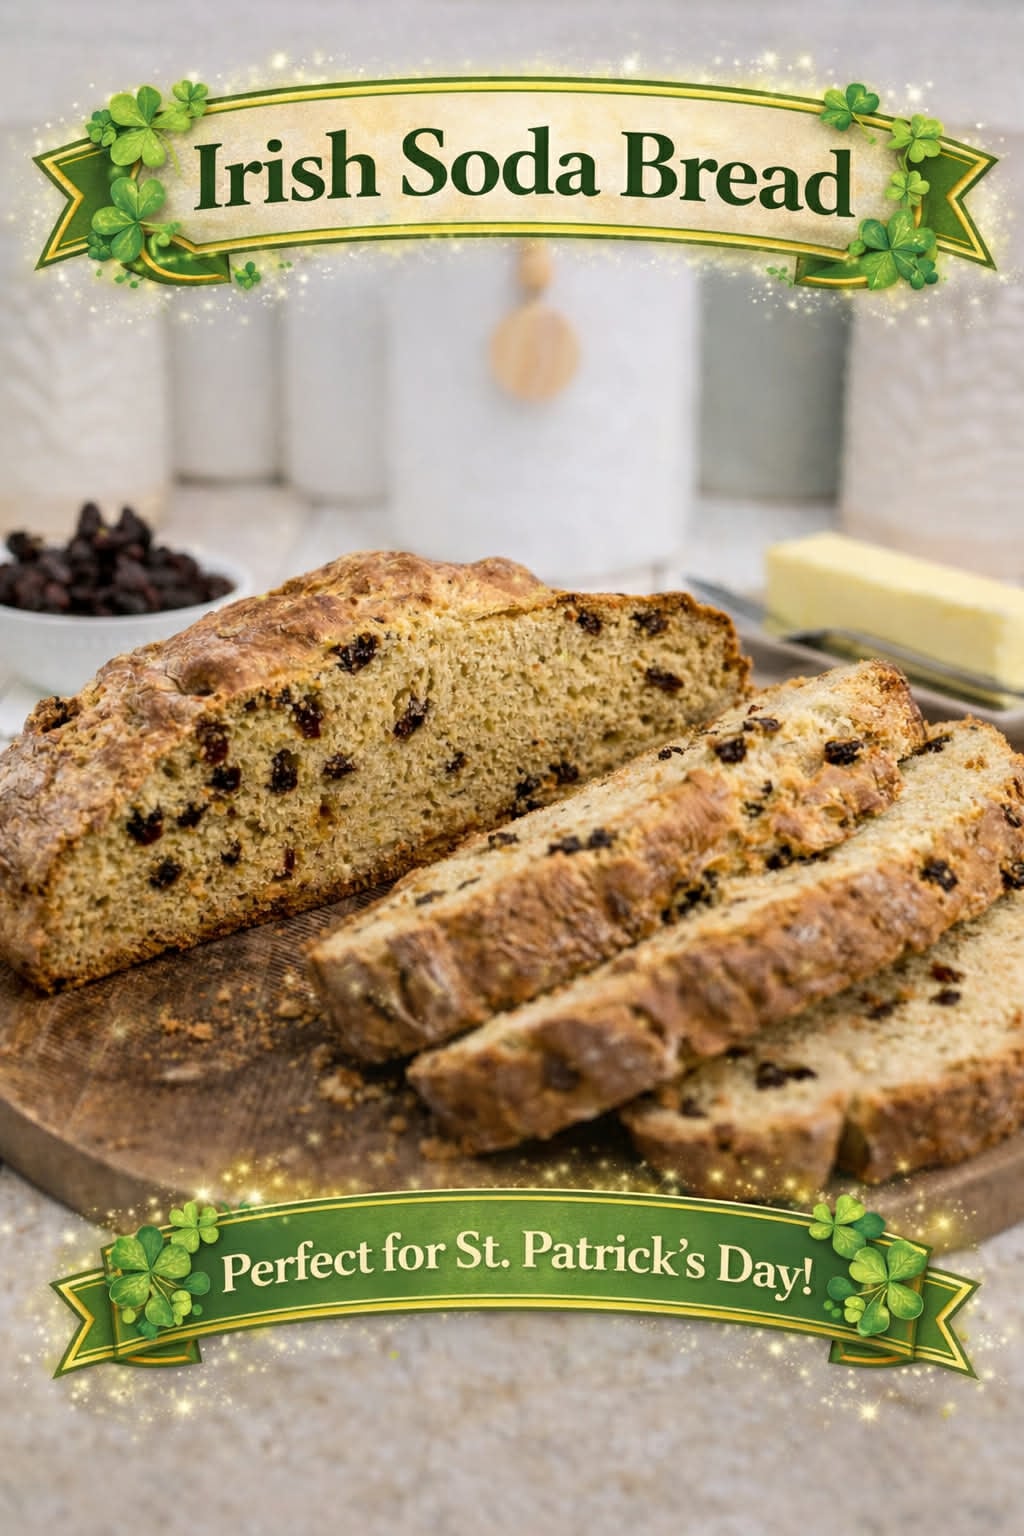
Traditional Irish Soda Bread – Easy, Rustic, and Perfect Every Time
Nothing beats the aroma of freshly baked Irish soda bread coming out of the oven! This classic recipe has been a staple for generations, and it’s incredibly simple to make – no yeast, no waiting, just mix, shape, and bake. The result? A beautifully golden, slightly sweet bread with a tender crumb and bursts of juicy raisins in every bite. Whether you’re serving it for St. Patrick’s Day or just want a hearty homemade bread to go with your favorite soups and stews, this recipe delivers every time!

Irish Soda Bread
The secret to great Irish soda bread is using buttermilk and baking soda to create a light, fluffy texture with just the right amount of chew. The crust is crisp and golden, while the inside stays soft and rich. Plus, since there’s no kneading or long rising times, this is a fantastic beginner-friendly bread that’s nearly impossible to mess up. If you’ve never made homemade bread before, this is the perfect place to start!
Want to take your soda bread to the next level? Baking it in a hot cast iron skillet gives it that perfect crunchy crust while keeping the inside soft and tender. Serve it warm with a pat of butter, a drizzle of honey, or alongside a steaming bowl of hearty Irish stew – no matter how you enjoy it, this traditional loaf is sure to become a household favorite.

What You Will Love About This Recipe
No yeast, no hassle – Just mix, shape, and bake!
Crispy crust, soft inside – A perfect balance of texture.
Quick & beginner-friendly – Ready in under an hour.
Versatile & delicious – Enjoy it with butter, soups, or jam!

The History Of Irish Soda Bread
Irish soda bread has a rich history that dates back to the early 1800s when baking soda (also known as sodium bicarbonate) became available in Ireland. Before this, most bread in Ireland was made using yeast, but with the introduction of baking soda, home bakers found a quicker and easier way to make bread without the need for lengthy proofing or kneading.
Traditional Irish soda bread was a necessity rather than a luxury. Many Irish families, especially those in rural areas, relied on simple, readily available ingredients—flour, baking soda, salt, and buttermilk. The buttermilk, a byproduct of butter-making, reacted with the baking soda to create a natural leavening, giving the bread its light texture. Since Irish wheat is naturally lower in gluten, this quick bread method was perfect for the type of flour available.
One of the most recognizable features of Irish soda bread is the cross cut into the top before baking. While this helps the bread bake evenly, it also has cultural and superstitious roots. Many believed that scoring a cross on the bread would “let the devil out” and protect the household from evil spirits. Over time, variations of soda bread emerged, including those with raisins, sugar, and butter—sometimes called “spotted dog” in Ireland.
Today, Irish soda bread remains a beloved staple, especially around St. Patrick’s Day, as a nod to Irish heritage and tradition. Whether made in its simplest form or dressed up with dried fruit and butter, it continues to be a comforting and easy-to-make bread enjoyed worldwide.

What will I need to make Irish Soda Bread?
You will need the following supplies:
- Cast iron skillet, if not a baking sheet is fine.
- Mixing bowls
- Dough cutter
Ingredients
- 4-1/4 Cups Bread Flour + more for dusting
- ¼ Cup Granulated Sugar
- 1 Teaspoon Baking Soda
- 1 Teaspoon Sea Salt
- 6 Tablespoons Butter, unsalted and cold, cut into cubes
- 1 Cup Raisins
- 1-3/4 Cups Buttermilk
- 1 Large Egg

How to Make Irish Soda Bread
- Preheat the oven to 400°F and add a cast iron skillet to heat up.
- In a large mixing bowl add the flour, sugar, baking soda, and sea salt. Mix well with a whisk.

- Using a dough cutter, cut the butter into the flour mixture until no lumps remain and resemble fine bread crumbs.

- Stir in the raisins.

- Mix the egg with the buttermilk and add to the flour mixture.

- Stir until you no longer can due to thickness.

- Empty the dough onto a floured surface and gently turn and press into a mound. The dough will be very soft, almost sticky at this point. If it’s too sticky to mold then add a little more flour until it is easier to work with. Do not overwork the dough.

- Drop the bread dough into the heated skillet then using a sharp knife cut a cross into the top. This will aid in cooking the loaf in the middle.

- Place the skillet into the oven and bake for 45 minutes. Keep checking in the last 10 minutes, if it is browning too much place a piece of foil over the top to prevent burning.
- Remove from the oven and allow to cool slightly in the skillet. After about 10 minutes turn out onto a cooling rack to cool more.

- Once cooled completely, slice and serve with butter and your favorite soups/stew.

Tips & Tricks
- Use cold butter – Cutting in cold butter creates a flaky, tender texture.
- Don’t overmix the dough – Stir just until combined to keep it soft.
- Preheat your cast iron skillet – This helps achieve a beautifully crisp crust.
- Add a little extra flour if needed – The dough should be soft but not too sticky to shape.
- Cut a deep “X” on top – This helps the bread bake evenly and gives it a traditional look.

FAQs

Irish Soda Bread
Irish Soda Bread is the perfect quick bread that is crusty on the outside and deliciously soft on the inside. It is the perfect shortcut bread if you find yourself nervous about baking with yeast. This Irish Soda bread has a golden-brown crust that is full of flavor.
Ingredients
- 4-1/4 Cups Bread Flour + more for dusting
- ¼ Cup Granulated Sugar
- 1 Teaspoon Baking Soda
- 1 Teaspoon Sea Salt
- 6 Tablespoons Butter, unsalted and cold, cut into cubes
- 1 Cup Raisins
- 1-3/4 Cups Buttermilk
- 1 Large Egg
Instructions
- Preheat the oven to 400°F and add a cast iron skillet to heat up.
- In a large mixing bowl add the flour, sugar, baking soda, and sea salt. Mix well with a whisk.
- Using a dough cutter, cut the butter into the flour mixture until no lumps remain and resemble fine bread crumbs.
- Stir in the raisins.
- Mix the egg with the buttermilk and add to the flour mixture.
- Stir until you no longer can due to thickness.
- Empty the dough onto a floured surface and gently turn and press into a mound. The dough will be very soft, almost sticky at this point. If it’s too sticky to mold then add a little more flour until it is easier to work with. Do not overwork the dough.
- Drop the bread dough into the heated skillet then using a sharp knife cut a cross into the top. This will aid in cooking the loaf in the middle.
- Place the skillet into the oven and bake for 45 minutes. Keep checking in the last 10 minutes, if it is browning too much place a piece of foil over the top to prevent burning.
- Remove from the oven and allow to cool slightly in the skillet. After about 10 minutes turn out onto a cooling rack to cool more.
- Once cooled completely, slice and serve with butter and your favorite soups/stew.
Notes
Makes: 1 loaf
You will need the following supplies:
- Cast iron skillet, if not a baking sheet is fine.
- Mixing bowls
- Dough cutter
Nutrition Information:
Yield:
8Serving Size:
1Amount Per Serving: Calories: 569Total Fat: 14gSaturated Fat: 8gTrans Fat: 0gUnsaturated Fat: 5gCholesterol: 63mgSodium: 1178mgCarbohydrates: 89gFiber: 2gSugar: 36gProtein: 22g
I’m Melissa, the imaginative force behind Sparkles to Sprinkles, where creativity comes to life, and sprinkles of joy are scattered generously. Melissa is a proud Jersey girl who found love with a New York boy. As a mom to four wonderful boys and a few fur babies, her journey into the world of blogging began after making the life-changing decision to stay home and raise her children. Previously a dedicated workaholic, Melissa’s blog became her creative outlet and passion project. Inspired by her mother-in-law, a masterful cook renowned for her delicious home-cooked meals and legendary holiday feasts (think mouthwatering sausage stuffing), Melissa honed her culinary skills through a combination of family recipes and countless cooking classes. She often attended these classes with her son Michael, who shared her enthusiasm for cooking from a young age. Melissa’s love for learning extends beyond familiar cuisines, as she enjoys exploring international recipes in hands-on cooking classes. Her blog features a diverse array of recipes, showcasing her expertise with various kitchen appliances such as the Instant Pot, air fryer, Slow Cooker, Ninja Foodi, Instant Vortex Plus, and more. Join Melissa on her culinary adventures as she shares tried-and-true family favorites alongside exciting new discoveries!