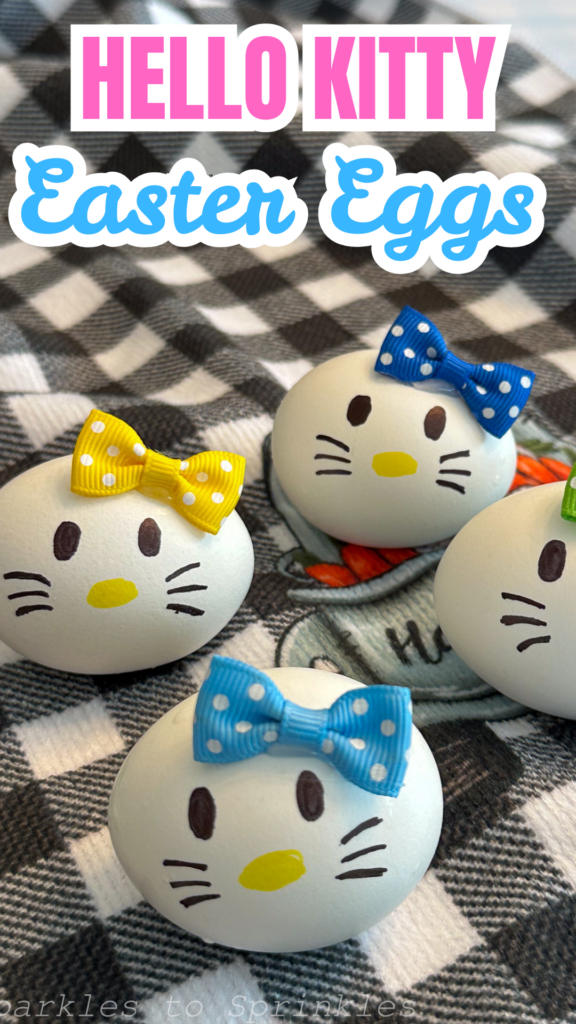
Hello Kitty Easter Eggs – The Cutest DIY Easter Craft
If you’re looking for a fun and adorable Easter craft, these Hello Kitty Easter Eggs are perfect! They’re super easy to make with just a few simple materials—hard-boiled eggs, Sharpie markers, and tiny bows. Whether you’re decorating eggs with your kids, making a cute Easter basket filler, or adding a fun twist to your holiday table, this craft is a must-try. Plus, it’s mess-free compared to traditional egg dyeing, which is always a win!
Hello Kitty Easter Eggs
These Hello Kitty Easter Eggs pair perfectly with other festive Easter projects and recipes! If you love easy and creative Easter ideas, be sure to check out Easter Chick Rice Krispie Treats, Easter Chick Slime, and Kool-Aid Easter Eggs. Whether you’re crafting with kids or making treats for a spring gathering, these ideas will bring extra fun and color to your holiday celebrations.
A Cute, Quick, and Easy Easter DIY
One of the best things about this craft is how simple and stress-free it is. You don’t need any fancy supplies—just some markers, glue, and small decorations. In just a few minutes, you’ll have the cutest Hello Kitty eggs that will brighten up your Easter baskets and holiday displays. Plus, since you’re using hard-boiled eggs, they can even double as a snack after the festivities!
Instant Pot 5-5-5 Method
Now you can boil your eggs in a pan on the stovetop of you would like. But I have found sometimes that method leads me to over-cooked or undercooked eggs often.
With the Instant Pot 5-5-5 method, I get hard-boiled eggs that are cooked each and every single time. You don’t have that worry of will your eggs turn out.
- 5 minute cook time
- 5 minute natural release of pressure
- 5 minute ice bath
What You’ll Love About This Craft
✔️ Super Easy – No messy dyes or complicated steps!
✔️ Kid-Friendly – A perfect Easter activity for little hands.
✔️ Adorable & Customizable – Add different bows, flowers, or stickers for a unique touch.
✔️ Doubles as a Snack – Enjoy the eggs when you’re done displaying them!
Materials
Hard Boiled Eggs
Black & Yellow Sharpie Markers (permanent)
Small bows, craft flowers or other cute glittery things to use as a bow
Craft Glue/Hot Glue Gun
Instructions
1.) create the eyes with a black sharpie.
2) Create the nose with a yellow sharpie.
3) now create the whiskers with the black sharpie.
4) using either a hot glue gun or craft glue, glue a bow over the left eye.
5) Now you have an adorable Hello Kitty Easter Egg!
Tips & Tricks
✅ Use a Fine-Tip Sharpie – This helps create clean, precise lines for Hello Kitty’s face.
✅ Let the Ink Dry – Give the Sharpie a few minutes to dry before handling to avoid smudging.
✅ Choose the Right Glue – A hot glue gun works best for securing bows quickly, but craft glue is a safer option for kids.
✅ Get Creative – Swap the bow for tiny stickers, mini pom-poms, or even tiny felt flowers for a different look!
FAQs
Can I use plastic eggs instead of real eggs?
Yes! If you want a keepsake version, use plastic or wooden eggs instead of hard-boiled ones. Just make sure to use paint markers instead of regular Sharpies, as they stick better to plastic surfaces.
How long do hard-boiled eggs last?
If you plan to eat them, keep them refrigerated and consume them within one week.
What if I don’t have a bow?
No worries! You can draw a bow with markers, use stickers, or even cut one out of colored paper and glue it on.
Can kids do this craft?
Absolutely! This is a perfect Easter activity for kids, especially since it doesn’t involve messy dyes. Just supervise if using a hot glue gun!

Hello Kitty Easter Eggs
Create the cutest Hello Kitty Easter Eggs with this easy DIY craft! No messy dyes—just markers, glue, and bows for an adorable Easter decoration. Perfect for kids and Hello Kitty fans!
Materials
- Hard Boiled Eggs
- Markers (permanent)
- Ribbons, flowers or other cute glittery things to use as a bow
- Craft Glue
Instructions
1.) Create the eyes with a black sharpie.
2) Create the nose with a yellow sharpie.
3) now create the whiskers with the black sharpie.
4) glue a bow over the left eye using either a hot glue gun or craft glue.
5) Now you have an adorable Hello Kitty Easter Egg!
I’m Melissa, the imaginative force behind Sparkles to Sprinkles, where creativity comes to life, and sprinkles of joy are scattered generously. Melissa is a proud Jersey girl who found love with a New York boy. As a mom to four wonderful boys and a few fur babies, her journey into the world of blogging began after making the life-changing decision to stay home and raise her children. Previously a dedicated workaholic, Melissa’s blog became her creative outlet and passion project. Inspired by her mother-in-law, a masterful cook renowned for her delicious home-cooked meals and legendary holiday feasts (think mouthwatering sausage stuffing), Melissa honed her culinary skills through a combination of family recipes and countless cooking classes. She often attended these classes with her son Michael, who shared her enthusiasm for cooking from a young age. Melissa’s love for learning extends beyond familiar cuisines, as she enjoys exploring international recipes in hands-on cooking classes. Her blog features a diverse array of recipes, showcasing her expertise with various kitchen appliances such as the Instant Pot, air fryer, Slow Cooker, Ninja Foodi, Instant Vortex Plus, and more. Join Melissa on her culinary adventures as she shares tried-and-true family favorites alongside exciting new discoveries!


2 Comments