
Bunny in Egg Pouch, Easter Craft Project
Looking for a simple and adorable Easter craft? These Bunny in Egg Pouch, Easter Craft Project is the perfect DIY project! They’re easy to make, reusable, and a great way to add a handmade touch to your Easter celebrations. Whether you’re filling them with candy, small gifts, or little surprises, these pouches will be a hit with both kids and adults. Plus, they make great party favors or Easter basket additions!

If you love fun and festive Easter crafts, be sure to check out my Easter Bunny Treat Bags for another adorable way to package goodies. Want to make some edible Easter treats? Try my Easter Bark or Hello Kitty Easter Eggs for creative and delicious holiday fun. Whether you’re crafting or baking, these projects will make your Easter extra special!
One of the best things about this project is how customizable it is. You can mix and match colors, create unique felt patterns, or even add embellishments like buttons and embroidery for extra charm. It’s an easy, no-fuss craft that’s perfect for beginners and experienced crafters alike!

What You Will Love About This Craft
- Beginner-Friendly – Simple stitches and minimal materials make this an easy craft for all skill levels.
- Reusable & Eco-Friendly – Unlike disposable gift bags, these felt pouches can be used year after year.
- Customizable – Choose your favorite colors, patterns, and decorations to make each pouch unique.
- Perfect for Gifting – Fill with chocolates, small toys, or Easter treats for a thoughtful handmade gift.

List of Supplies:
- Felt fabric – 4-5 different colors
- Scissors
- Craft glue or fabric glue
- Needle and thread
- Pink highlighter
- Pencil – for tracing template
- Template cut outs

Step (1)
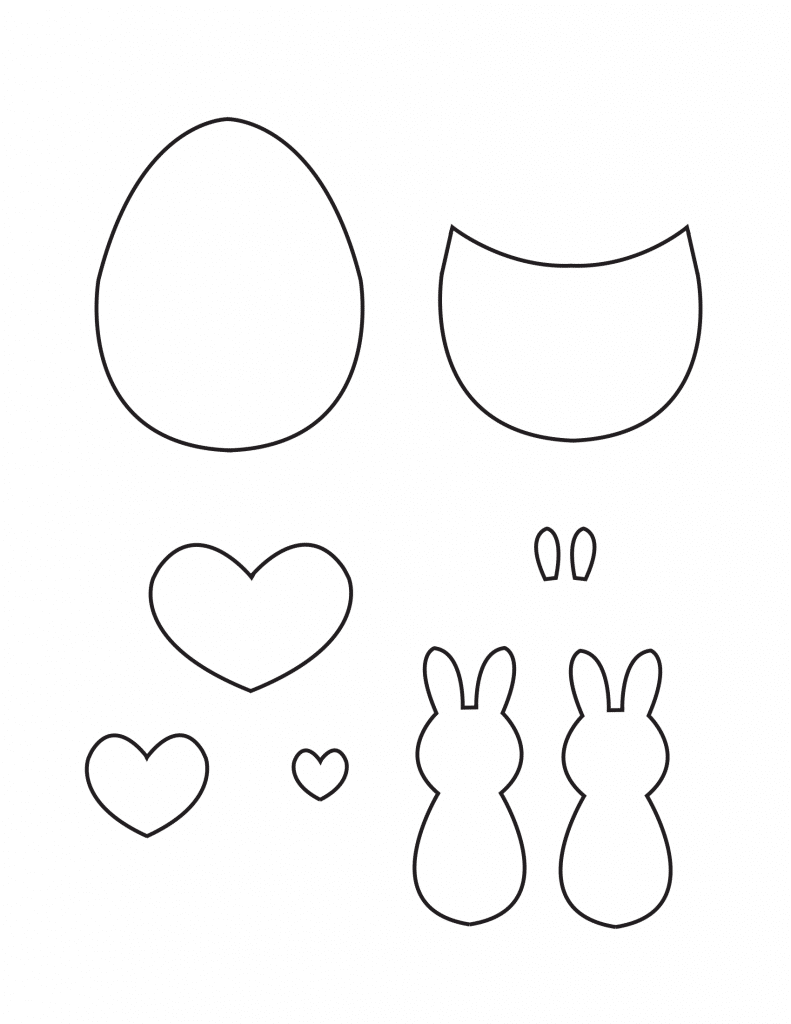
Prepare your template by printing and cutting out the patterns. Use a pencil to trace the patterns on the selected felt fabrics and cut them out of the felt carefully.
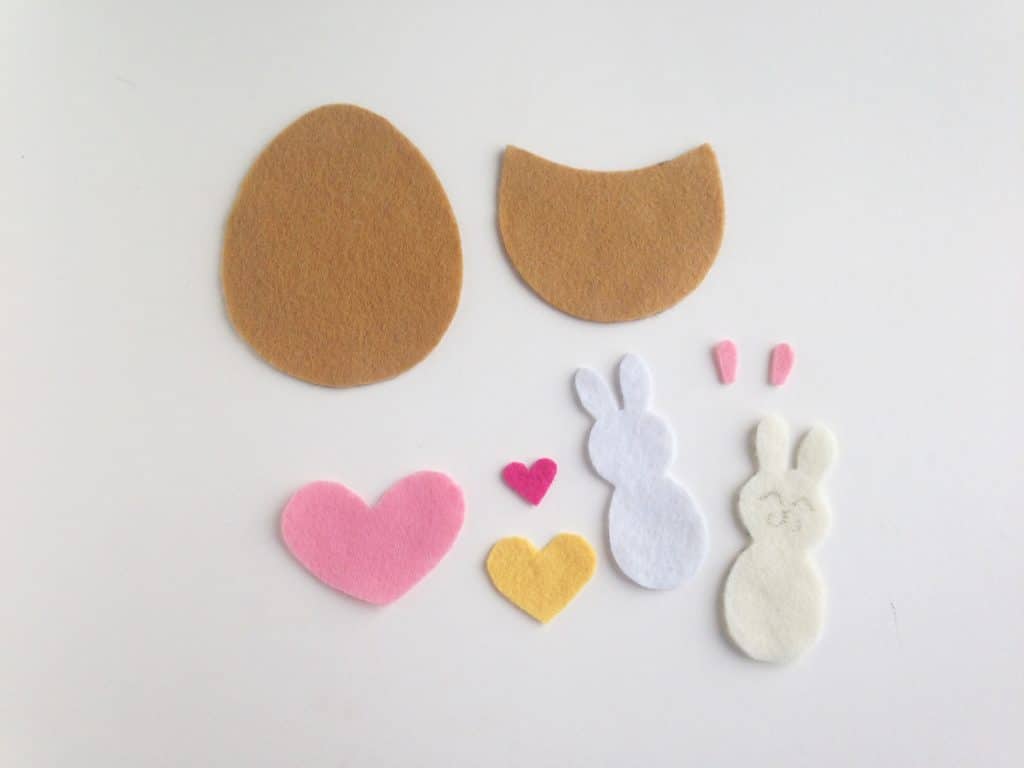
Step (2)
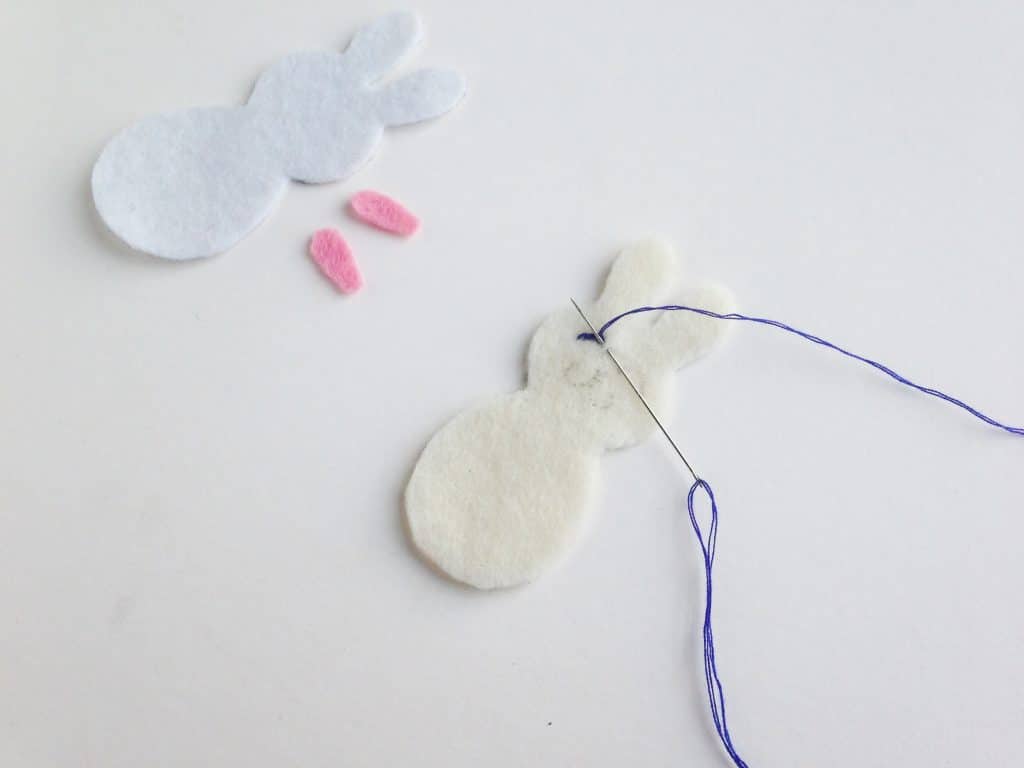
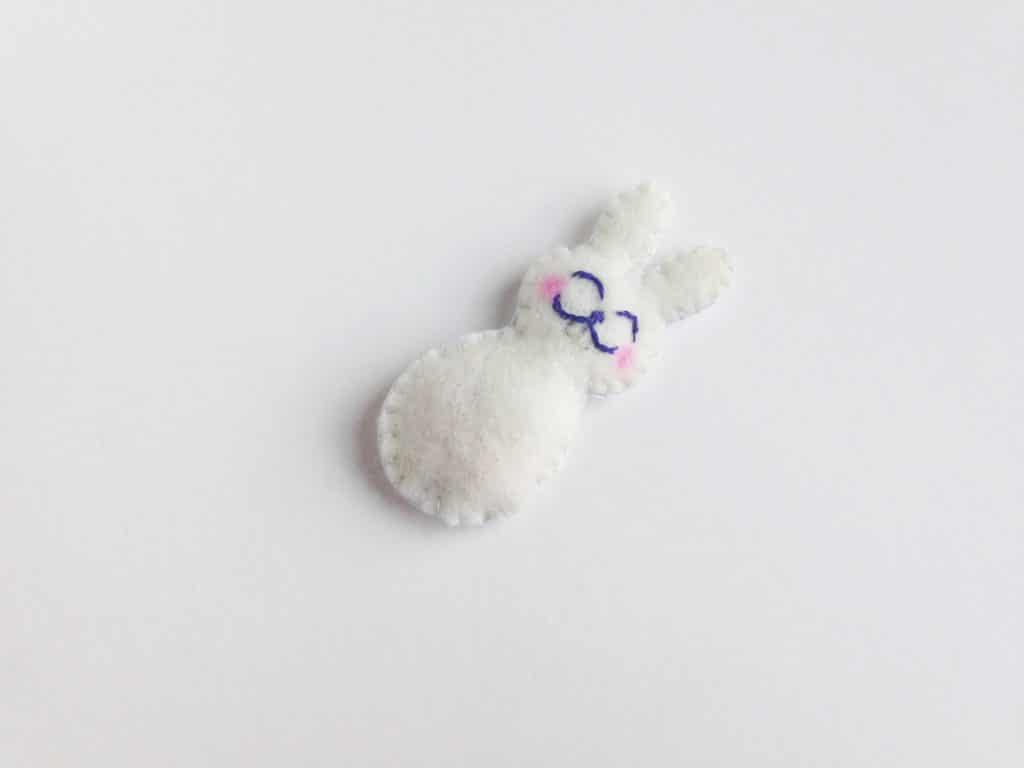
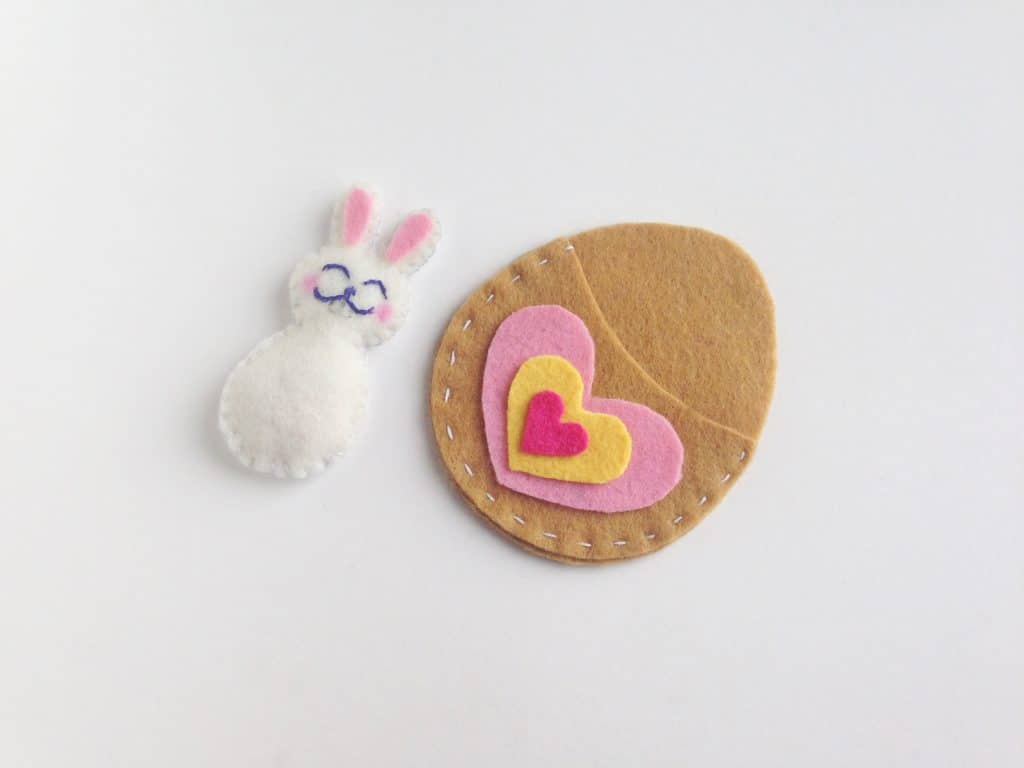
The bunny plushie has 2 parts, 1 front and 1 back. Take the front part and use a dark thread to stitch the face details of the bunny.
Step (3)
Done stitching the face details? Use a pink highlighter to create blush shades on both cheeks of the bunny. Also prepare needle and thread to join the front part of the bunny with the back part. You can start your stitching from anywhere but keep in mind to keep a small opening for stuffing.
Step (4)
Using the left over felt pieces for the stuffing is the best. Cut the left over felt pieces into smaller pieces and push them inside the bunny through its open end. Use the pencil to push the stuffing towards the head part of the bunny.
Step (5)
When you’re satisfied with the stuffing you can simply close the open end and tie 2 tight knots; cut off extra thread.

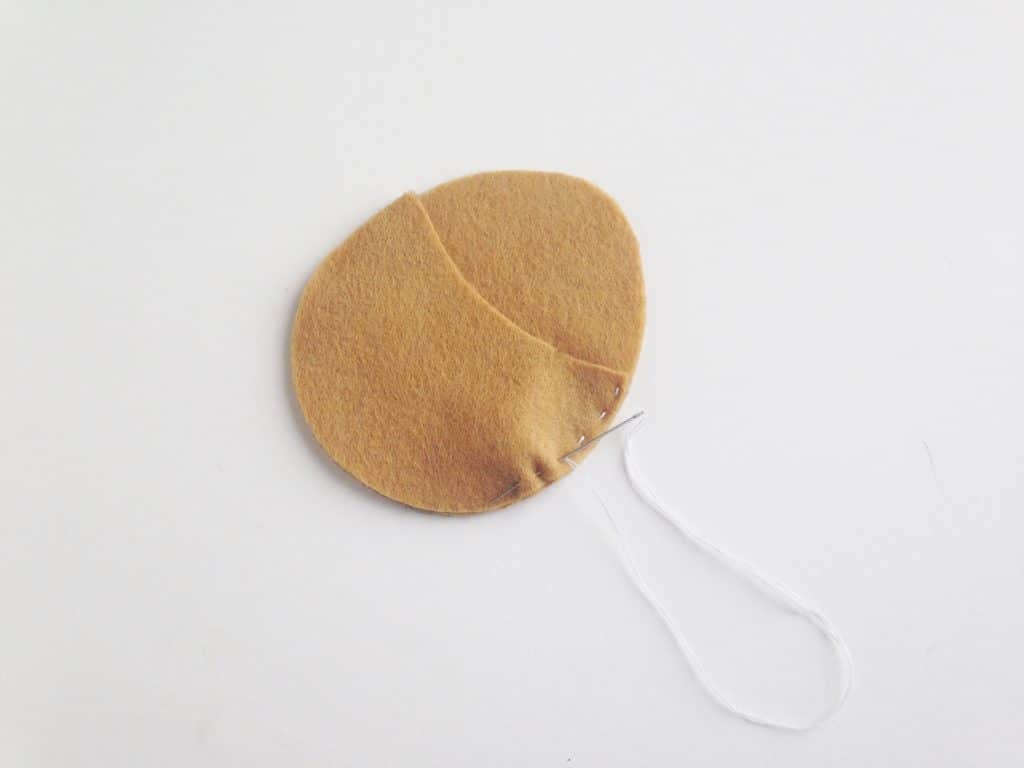
Step (6)
The Egg pouch has 2 parts, 1 full egg pattern and 1 about half. Place the smaller part on the top of the larger part and match their bottom ends. Prepare needle and thread to join both parts together. You can do running stitch or flat blanket stitch to join the pieces.

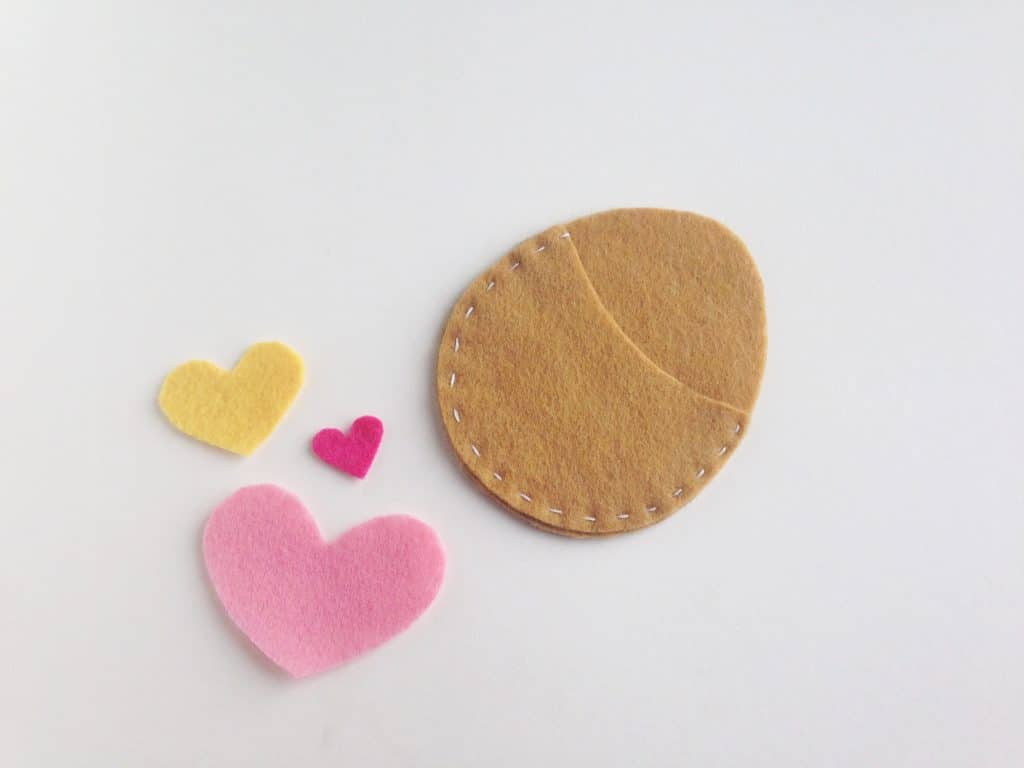
(7)
Keep the top side of the smaller part open. Once you are done stitching the sides tie a tight knot and trim extra thread. To attach the heart patterns on the pouch you can either stitch them or use craft glue, however you want.
(8)
You can add more details to the bunny or pouch, the possibilities to decorate them are endless! Have fun!
Click HERE to PRINT this TEMPLATE
Tips & Tricks
Use Leftover Felt for Stuffing – Instead of using store-bought stuffing, cut up scrap felt pieces for an eco-friendly option.
Secure with Fabric Glue – If you prefer a no-sew method, strong fabric glue can be used instead of stitching.
Add Extra Details – Use embroidery thread for whiskers, buttons for eyes, or even a small pom-pom for a bunny tail!
Make it Interactive – Instead of stitching the bunny in place, keep it removable so kids can play with it.
FAQ’s
Can I make this a no-sew craft?
Yes! You can use fabric glue instead of sewing, but stitching will make the pouch and bunny more durable.
What size should I make these pouches?
You can print and resize the template to create different sizes depending on what you plan to use them for.
How do I store these for next year?
Keep them in a sealed plastic bag or a craft storage box to prevent dust and keep them in great shape for next Easter!


Bunny In Egg Pouch, Easter Craft Project
Materials
- 1. Felt fabric – 4-5 different colors
- 2. Scissors
- 3. Craft glue or fabric glue
- 4. Needle and thread
- 5. Pink highlighter
- 6. Pencil – for tracing template
- 7. Template cut outs
Instructions
Step (1)
Prepare your template by printing and cutting out the patterns. Use a pencil to trace the
patterns on the selected felt fabrics and cut them out of the felt carefully.
Step (2)
The bunny plushie has 2 parts, 1 front and 1 back. Take the front part and use a dark thread
to stitch the face details of the bunny.
Step (3)
Done stitching the face details? Use a pink highlighter to create blush shades on both
cheeks of the bunny. Also prepare needle and thread to join the front part of the bunny
with the back part. You can start your stitching from anywhere but keep in mind to keep a
small opening for stuffing.
Step (4)
Using the left over felt pieces for the stuffing is the best. Cut the left over felt pieces into
smaller pieces and push them inside the bunny through its open end. Use the pencil to push
the stuffing towards the head part of the bunny.
Step (5)
When you’re satisfied with the stuffing you can simply close the open end and tie 2 tight
knots; cut off extra thread.
Step (6)
The Egg pouch has 2 parts, 1 full egg pattern and 1 about half. Place the smaller part on the
top of the larger part and match their bottom ends. Prepare needle and thread to join both
parts together. You can do running stitch or flat blanket stitch to join the pieces.
Step (7)
Keep the top side of the smaller part open. Once you are done stitching the sides tie a tight
knot and trim extra thread. To attach the heart patterns on the pouch you can either stitch
them or use craft glue, however you want.
Step (8)
You can add more details to the bunny or pouch, the possibilities to decorate them are
endless! Have fun!
I’m Melissa, the imaginative force behind Sparkles to Sprinkles, where creativity comes to life, and sprinkles of joy are scattered generously. Melissa is a proud Jersey girl who found love with a New York boy. As a mom to four wonderful boys and a few fur babies, her journey into the world of blogging began after making the life-changing decision to stay home and raise her children. Previously a dedicated workaholic, Melissa’s blog became her creative outlet and passion project. Inspired by her mother-in-law, a masterful cook renowned for her delicious home-cooked meals and legendary holiday feasts (think mouthwatering sausage stuffing), Melissa honed her culinary skills through a combination of family recipes and countless cooking classes. She often attended these classes with her son Michael, who shared her enthusiasm for cooking from a young age. Melissa’s love for learning extends beyond familiar cuisines, as she enjoys exploring international recipes in hands-on cooking classes. Her blog features a diverse array of recipes, showcasing her expertise with various kitchen appliances such as the Instant Pot, air fryer, Slow Cooker, Ninja Foodi, Instant Vortex Plus, and more. Join Melissa on her culinary adventures as she shares tried-and-true family favorites alongside exciting new discoveries!


