
Valentine’s Crack Candy – A Sweet & Addictive Treat Made with Love
Valentine’s Day is all about showing love, and what better way to do that than with a batch of homemade Valentine’s Crack? This sweet, salty, and irresistible crack candy is as fun to make as it is to eat! Think of it as an edible work of art—you get to drizzle, swirl, and sprinkle your way to a treat that’s not only delicious but also beautiful.

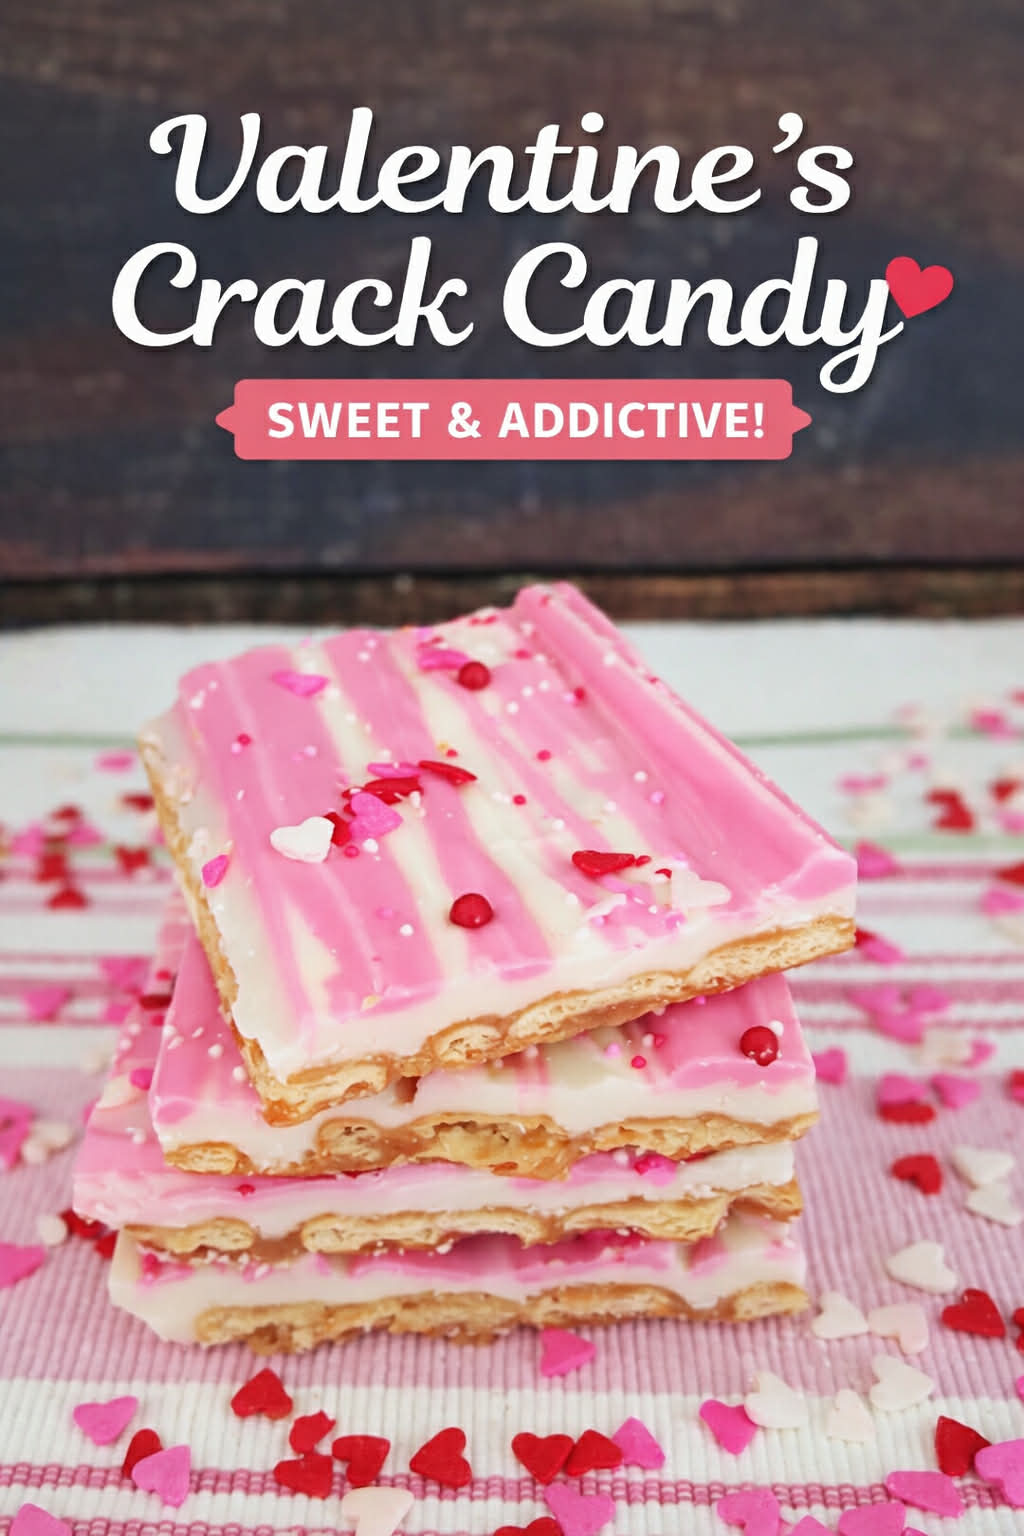
Valentine’s Crack
This irresistible homemade candy is perfect for sharing with family, friends, teachers, or that special someone on Valentine’s Day. A buttery toffee layer melts into crunchy saltine crackers, all topped with a rich chocolate coating for a sweet-and-salty treat that’s totally addictive—hence the nickname “crack” candy! The festive pink chocolate and sprinkles make it a true Valentine’s Day showstopper. For even more holiday fun, try pairing it with a batch of Valentine’s Day Puppy Chow — another easy, chocolatey treat that’s perfect for gifting or snacking!
Get Creative & Have Fun!
Making Valentine’s Crack Candy is a fun, hands-on activity that lets you get creative with your toppings. Swirl the pink chocolate into dreamy patterns, sprinkle on some love, and make a treat that’s as unique as your Valentine. Whether you’re making this with kids or on your own, have fun with it!

What You Will Love About This Recipe
❤️ Super easy to make – just a few ingredients and minimal effort.
❤️ The perfect mix of sweet and salty – a flavor combo that’s always a hit.
❤️ Fun and festive – a creative way to celebrate Valentine’s Day.
❤️ Customizable – swap out the toppings or add different colors of chocolate.
❤️ Great for gifting – package it up in cute bags for an easy homemade Valentine’s treat!

Ingredients
- 50 Saltine Crackers
- 1 Cup butter cut into chunks to melt down, 2 sticks
- 1 Cup LIght Brown Sugar
- 1 TSP Vanilla Extract
- 2 Cups White Chocolate Chips
- 1/4 Cup Pink Chocolate Melts
- Valentine’s Sprinkles


Instructions
- Preheat oven to 400 degrees. Line a large cookie tray with aluminum foil. Spray with cooking spray. Line saltines up neatly in rows.

- In a medium sized pot melt your butter and brown sugar. Once butter is melted down, bring to a boil. Continue to stir the entire time and boil for about 2 minutes. It will look gorgeous and bubbly.

- Remove from the heat and add in the vanilla extract.

- Pour over the top of the saltines. Gently spread across the saltines.

- Place in oven and bake for about 3-5 minutes.
- Melt the white chocolate metls and the pink melts in the microwave, following the directions above. Melt the white melts first, then melt the pink melts, leaving them in the microwave in case you need to heat them a little more if it takes a bit longer to work with your chocolate. (usually just giving your chocolate a few good stirs will keep it nice and loose.
- Remove the crackers from the oven. Allow them to cool for 1 minute.
- Cover your crackers with the melted white chocolate. Smooth it out evenly across your saltines.

- Pour your pink chocolate over the white chocolate, pour it over the top in a decorative way. I also used a butter knife tip to help combine my colors to my liking. Quickly decorate with sprinkles that tickle your fancy, the melted chocolate will act as your glue.

- Chill in the fridge to cool before cracking the crackers into bite more bite-sized pieces.
- Once cracked, you are ready to serve it to all of your loves. Or wrap in packages as gifts.

Tips & Tricks for the Best Valentine’s Crack Candy
✔ Use parchment paper or foil. This makes cleanup a breeze and prevents sticking.
✔ Stir the toffee constantly. You want a smooth, golden mixture—don’t let it burn!
✔ Work quickly when spreading the chocolate. It hardens fast, so spread and swirl right away.
✔ Get creative with toppings. Try mini marshmallows, crushed cookies, or even a drizzle of dark chocolate.
✔ Store it properly. Keep in an airtight container at room temp for up to a week, or freeze for longer storage.
FAQ’s
❓ Can I use a different type of cracker?
Yes! Ritz crackers or graham crackers also work, but saltines give that classic sweet-salty contrast.
❓ Do I have to use white chocolate?
Nope! Milk or dark chocolate works just as well—just pick your favorite.
❓ How do I make my chocolate smooth?
If your chocolate is too thick, add a teaspoon of coconut oil or vegetable shortening to help it melt more smoothly.
❓ Can I freeze Valentine’s Crack Candy?
Yes! Store it in an airtight container and freeze for up to 3 months. Just let it thaw a bit before eating.
*Keep scrolling down to the next recipe card for the actual recipe instructions.

Melting chocolate:
Materials
Instructions
In a microwave-safe container microwave candy melts at 50% power or the defrost setting on your microwave. Melt for one minute to start.
Remove and stir. Place back in the microwave for additional 30 seconds at 50% power.
Remove and stir. Continue to do this in 30 second intervals until smooth and creamy. Remember less is better. You can help melt some pieces that are still not fully melted by stirring with a spoon. You do not want to over microwave your chocolate.
**Keep reading to get to the Valentine's Crack recipe**
Purchase Pink Candy Melts from Amazon


Valentine's Crack
A beautiful version of your grandma's old crack candy recipe.
Ingredients
- 50 Saltine Crackers
- 1 Cup butter cut into chunks to melt down, 2 sticks
- 1 Cup LIght Brown Sugar
- 1 TSP Vanilla Extract
- 2 Cups White Chocolate Chips
- 1/4 Cup Pink Chocolate Melts
- Valentine's Sprinkles
Instructions
- Preheat oven to 400 degrees. Line a large cookie tray with aluminum foil. Spray with cooking spray. Line saltines up
- In a medium sized pot melt your butter and brown sugar. Once butter is melted down, bring to a boil. Continue to stir the entire time and boil for about 2 minutes. It will look gorgeous and bubbly.
- Remove from the heat and add in the vanilla extract.
- Pour over the top of the saltines. Gently spread across the saltines.
- Place in oven and bake for about 5 minutes.
- Melt the white chocolate chips and the pink melts in the microwave, following the directions above. Melt the white chips first, then melt the pink melts, leaving them in the microwave in case you need to heat them a little more if it takes a bit longer to work with your chocolate. (usually just giving your chocolate a few good stirs will keep it nice and loose.
- Remove the crackers from the oven. Allow them to cool for 1 minute.
- Cover your crackers with the melted white chocolate. Smooth it out evenly across your saltines.
- Pour your pink chocolate over the white chocolate, pour it over the top in a decorative way. I also used a butter knife tip to help combine my colors to my liking. Quickly decorate with sprinkles that tickle your fancy, the melted chocolate will act as your glue.
- Chill in the fridge to cool before cracking the crackers into bite more bite-sized pieces.
- Once cracked, you are ready to serve it to all of your loves. Or wrap in packages as gifts.
Nutrition Information:
Yield:
15Serving Size:
1Amount Per Serving: Calories: 334Total Fat: 21gSaturated Fat: 13gTrans Fat: 1gUnsaturated Fat: 7gCholesterol: 38mgSodium: 217mgCarbohydrates: 34gFiber: 0gSugar: 27gProtein: 3g
I’m Melissa, the imaginative force behind Sparkles to Sprinkles, where creativity comes to life, and sprinkles of joy are scattered generously. Melissa is a proud Jersey girl who found love with a New York boy. As a mom to four wonderful boys and a few fur babies, her journey into the world of blogging began after making the life-changing decision to stay home and raise her children. Previously a dedicated workaholic, Melissa’s blog became her creative outlet and passion project. Inspired by her mother-in-law, a masterful cook renowned for her delicious home-cooked meals and legendary holiday feasts (think mouthwatering sausage stuffing), Melissa honed her culinary skills through a combination of family recipes and countless cooking classes. She often attended these classes with her son Michael, who shared her enthusiasm for cooking from a young age. Melissa’s love for learning extends beyond familiar cuisines, as she enjoys exploring international recipes in hands-on cooking classes. Her blog features a diverse array of recipes, showcasing her expertise with various kitchen appliances such as the Instant Pot, air fryer, Slow Cooker, Ninja Foodi, Instant Vortex Plus, and more. Join Melissa on her culinary adventures as she shares tried-and-true family favorites alongside exciting new discoveries!


I thought this was a great idea and can’t wait to make it for my Bingo group next week!
Thank you! This is perfect – easy to put together and looks just like yours 🙂 Making a second double batch this weekend for both of our co-workers to enjoy!!!
What are Pink Chocolate Melts, please?
Here is a link for some 🙂 http://amzn.to/2kzrMpN
Hi quick question — after they are finished do you cut them into squares or do the break apart into the individual crackers?
Just cut them into squares 🙂
FYI I used Hershey white chocolate chips and they did not melt on the toffee. Even after about 5 minutes in the oven. Not sure why. Ended up leaving them as chips and then topping the whole thing with the pink melted chocolate and sprinkles. Next time I will probably use white chocolate melts instead of chocolate chips. I’m sure they will still taste delicious and no one I am serving them to knows what they are supposed to look like anyway. 🙂
It can be a bit tricky sometimes getting the chips to melt perfectly. if it continues to give you a hard time, you can melt them in the microwave and than pour it over the top already melted. 🙂
The exact same thing happened to me. Hershey’s didn’t melt. For batch #2, I melted them in the microwave and poured them over the crackers. Also, I learned not to use generic saltines. There were hardly any whole crackers in my box. Brand crackers are sturdier.
I just tried making these and followed the instructions to a T…but the brown sugar/butter part is grainy now that it’s cooled. :(. I don’t understand why. Any suggestions?
I am not sure what it could be. BUT I will tell you, it can be a bit tricky to make. I have had days where i just can not get it right at all. Then other days it comes our perfect with no issues at all. I am not sure if the humidity can affect it or what can be the difference sometimes vs other. I really do consider myself an pro at making it now that i have made it soooo many times and yet I have days it just does not come out right!
Hello Ladies. I have gotten this a bit “long in the tooth” but I sincerely hope to help.
I hope I can help with the chocolate and sugar/butter questions. I have been working with chocolate now for about 25 years. I have used Guittard Chocolates for the most part. I originally started with they’re product named MELT AND MOLD and have been using their Couverture chocolate line almost exclusively for about 2 years. I wanted to use their best chocolate so I hand temper it myself. With that said, I hope to suggest what to do with the problems I have seen while looking at your recipes.
Even though you may follow a recipe to a “” T “” so to speak, we all live in many different parts of the country. If it’s raining it will take longer for your sugar to melt into the butter and you should probably let it cook longer ( about 3 to 5 minutes more). Then, if you think it’s done….take some out on the back of a spoon, let it sit for a minute until it cools off a bit then taste it. All Chefs taste their products before they serve it. Just test it with your finger AFTER “at least” A FULL MINUTE before you ever put your tongue to it.
You have to make sure all the sugar is completely melted into the butter and by the sound of it…. it hasn’t. Another thing, if you put a top on the pan the humidity now inside the pan will actually clean the sides of the pan by itself from the moisture inside the butter as it evaporates. OR …You may just have sugar built up around the sides of the pot and if you use a silicone brush to “wipe” it down as it cooks that might work too!
Remember, the more humid it is and the higher the altitude you always need to cook longer and check more often. As far as the chocolate…..I would highly recommend the microwave or a double boiler for melting first because there are so many different chocolates out there. ( Also, there is no such thing as “”white chocolate””. They use Cocoa Butter and fillers. If your not using a high end “white” chocolate ( for tempering) you never know what to expect. I have seen a lot! Then there is the age of the chocolate. It really goes on and on but…..back to melting.)
You can also take a glass bowl which conducts heat better and no metal taste over a pot of water. ( about 1 inch at the bottom will do if you don’t have a double boiler). NEVER LET THE WATER BOIL! ( a light simmer is best)….because chocolate takes time and is finicky. BUT THE RESULTS!!! Always remember to NEVER LET WATER TOUCH YOUR CHOCOLATE or the bottom of the bowl as you melt the chocolate . It will turn your chocolate into a rock in 5 seconds flat. If you microwave it and cook it toooo long….same results…. rock hard. If you use the double boiler method make POSITIVE that you wipe the bottom of the bowl or transfer it to a counter with 2 hand towels together and then folded in half. Wipe the bottom clean of all moisture completely. If you ZAP chocolate in the microwave do what Melissa has for tips….she is doing it really well but it takes patience and time. I just re-read Melissa’s note above and she is right about the moisture. Not good for chocolate or making candy. So! Just to be sure always melt your chocolate in the micro or stove top first. Beware of ” moist days” and take your time. Cooking and candy making should always be fun!! I really hope I’ve been able to help you out. Start a notebook like I did and remember this too……..never make chocolate if it’s over 70 degrees in the house. It usually never sets right and stays softer than you want it. Good and great chocolate will always have a perfect “snap” and shiny surface to it for the best taste and good to look at too. Take care. Eileen
Thank you Eileen <3
I remember the first time I tasted this delight. I love that it can be adapted for the season because it should certainly be enjoyed year round. Thanks for sharing with us at Merry Monday. See ya next week.
My mother in law loves the usual version of this….she would go nuts for this one! Great idea! Found you on Delicious Dishes Party.
Could you add nuts
you sure can. Just sprinkle them on before the chocolate dries.
Hello, I made this last night and although it tastes great, the hardened chocolate is separating from the cracker in many places. So I am left with crackers with toffee on them and pieces of chocolate. Any ideas why this may have happened? Thank you!
Turned out great
Thanks