
Instant Pot Garlic Parmesan Whole Roasted Cauliflower

What You Will Love About This Recipe
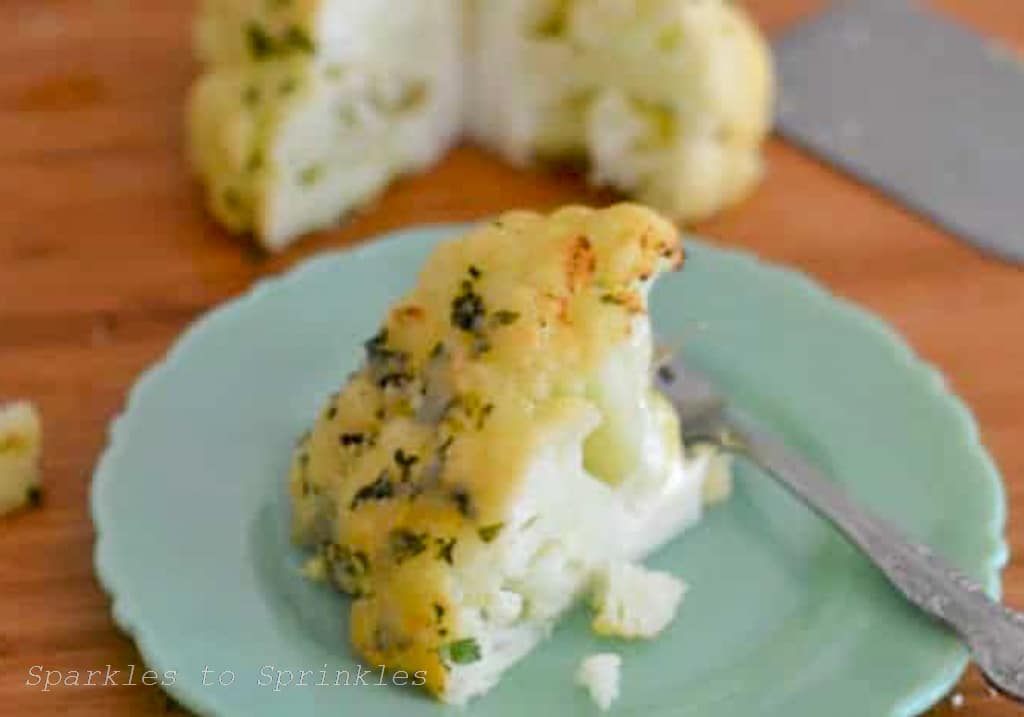
What you’ll love about this Instant Pot Garlic Parmesan Whole Roasted Cauliflower recipe is its simplicity and robust flavor. The combination of melted butter, minced garlic, and parmesan cheese creates a mouthwatering crust that enhances the natural taste of the cauliflower. The addition of lemon zest and parsley provides a refreshing twist, making every bite vibrant and delicious.
This recipe is incredibly convenient, especially for busy weeknights. The Instant Pot significantly reduces cooking time while ensuring the cauliflower is perfectly tender and infused with the savory garlic and parmesan flavors. Plus, the quick broil at the end adds a delightful crispy finish that takes this dish to the next level.
Another great aspect of this recipe is its versatility. It can be served as a main course or a hearty side dish, pairing well with a variety of proteins and other vegetables. It’s also an excellent option for those following low-carb or gluten-free diets, making it a crowd-pleaser for any dinner table.

Is this Keto Friendly
Yes, this Instant Pot Garlic Parmesan Whole Roasted Cauliflower recipe can be considered keto-friendly. Here are the reasons why:
-
Low in Carbs: Cauliflower is a low-carb vegetable, making it an excellent choice for a keto diet. One cup of cauliflower contains about 5 grams of carbohydrates, which is relatively low compared to other vegetables.
-
High in Fats: The recipe includes butter and Parmesan cheese, both of which are high in fats. These fats are essential for a keto diet, which relies on high-fat intake for energy instead of carbohydrates.
-
Minimal Sugar: There are no added sugars in this recipe. The ingredients are all low in natural sugars, making it suitable for maintaining ketosis.

Can I Still Make This If I Don’t Have An Instant Pot
If you don’t have an Instant Pot, you can still make a delicious Garlic Parmesan Whole Roasted Cauliflower using your oven. Here’s how:
-
Preheat Oven: Preheat your oven to 400°F (200°C).
-
Prepare Cauliflower: Trim the leaves from the cauliflower head and wash it thoroughly. Pat it dry.
-
Make the Butter Mixture: In a bowl, combine melted butter, minced garlic, grated lemon zest, chopped parsley, salt, and black pepper. Brush this mixture generously over the entire cauliflower head, ensuring it is well coated.
-
Roast the Cauliflower: Place the cauliflower on a baking sheet lined with parchment paper or in a baking dish. Cover it with aluminum foil to prevent it from drying out. Roast in the preheated oven for about 30-40 minutes.
-
Add Parmesan and Broil: After 30-40 minutes, remove the aluminum foil. Sprinkle 2 tablespoons of Parmesan cheese over the top and sides of the cauliflower. Return it to the oven and switch to the broil setting. Broil for about 5-10 minutes, or until the cheese is golden brown and crispy.
-
Serve: Carefully remove the cauliflower from the oven and let it cool slightly before serving. Enjoy your flavorful and tender roasted cauliflower!
This method will give you a similarly delicious result, with the cauliflower being tender on the inside and crispy on the outside, infused with garlic and Parmesan flavors.

Tips & Tricks
-
Choose Fresh Cauliflower: Select a firm, white cauliflower with tight florets and fresh green leaves. Avoid any with brown spots or soft areas.
-
Prep Thoroughly: Trim the leaves and the base of the cauliflower so it sits flat. Wash thoroughly and pat dry to ensure the seasoning sticks well.
-
Even Seasoning: When brushing the butter mixture on the cauliflower, make sure to get into all the nooks and crannies to ensure even flavor distribution.
-
Adjust Cooking Time: If your cauliflower is larger or smaller than average, you may need to adjust the cooking time. Check for tenderness by piercing the center with a knife.
-
Crispiness Factor: For extra crispiness, after broiling, you can sprinkle additional Parmesan or even a bit of breadcrumbs on top before broiling again for a few minutes.
-
Alternative Seasonings: Feel free to experiment with different herbs and spices. Adding thyme, rosemary, or even a bit of smoked paprika can give the dish a unique twist.
-
Serve with a Sauce: A side of marinara, aioli, or a light lemon butter sauce can complement the flavors of the roasted cauliflower nicely.
-
Leftover Usage: If you have leftovers, chop the cauliflower and add it to salads, grain bowls, or even pasta dishes for an extra boost of flavor and nutrients.
-
Make It Vegan: Substitute the butter with olive oil and use a plant-based Parmesan to make this dish vegan-friendly.
-
Timing for Crispness: If using an Instant Pot, remember to broil the cauliflower in the oven after pressure cooking to get that delicious crispy exterior.

FAQ’s
Q: How do I know when the cauliflower is fully cooked?
A: The cauliflower is done when it is tender enough to be easily pierced with a fork or knife. If you’re using an Instant Pot, follow the cooking times closely. If roasting in the oven, check periodically after 40 minutes.
Q: How do I store leftovers?
A: Store any leftovers in an airtight container in the refrigerator for up to 3 days. Reheat in the oven or microwave before serving.
Q: Can I prepare this recipe in advance?
A: You can prepare the cauliflower and the butter mixture in advance. Keep them separate in the refrigerator and combine just before cooking. You can also cook the cauliflower and reheat it in the oven just before serving.
Q: What other cheeses can I use instead of Parmesan?
A: If you prefer, you can use other hard cheeses like Pecorino Romano, Asiago, or even a sharp cheddar for a different flavor profile.


Instant Pot Garlic Parmesan Whole Roasted Cauliflower
This Instant Pot Parmesan Whole Roasted Cauliflower is so delicious. Either as a meal or as a side dish. Keto friendly and delicious!
Ingredients
- 1 head of cauliflower
- 1/4 cup butter melted
- 1 clove garlic minced
- 1 teaspoon grated lemon zest
- 2 tablespoons parsley chopped
- 1/4 teaspoon salt
- 1/4 teaspoon ground black pepper
- 2 tablespoons parmesan cheese
Instructions
- Trim leaves from cauliflower head and wash. Place on trivet in your pot with 1/2 - 1 cup of water.
- Combine butter, garlic, lemon zest, parsley, salt and pepper. Brush mixture on top of cauliflower. Slather it up good.
- Close the lid, make sure it’s in the sealing position and turn toggle to seal.
- Press Pressure (it should automatically set to HIGH pressure). Set time to *1 minutes. Hit START. When finished do a quick release.
For an extra crispy finish
- Carefully remove your cauliflower head & place on a baking sheet.
- Sprinkle 2 TBSP of Parmesan cheese over the top and sides.
- Place in the oven on broil until your cheese is starting to brown.
Notes
* your cauliflower will still be a bit crisp and cut well with a knife. If you prefer a softer cauliflower you may want to PC for 2 min. For a crisper cauliflower PC for 0 min.
Adapted from Spend with Pennies Garlic Parmesan Whole Roasted Cauliflower.
Nutrition Information:
Yield:
4Serving Size:
1Amount Per Serving: Calories: 148Total Fat: 13gSaturated Fat: 8gTrans Fat: 0gUnsaturated Fat: 4gCholesterol: 33mgSodium: 296mgCarbohydrates: 7gFiber: 3gSugar: 3gProtein: 4g
I’m Melissa, the imaginative force behind Sparkles to Sprinkles, where creativity comes to life, and sprinkles of joy are scattered generously. Melissa is a proud Jersey girl who found love with a New York boy. As a mom to four wonderful boys and a few fur babies, her journey into the world of blogging began after making the life-changing decision to stay home and raise her children. Previously a dedicated workaholic, Melissa’s blog became her creative outlet and passion project. Inspired by her mother-in-law, a masterful cook renowned for her delicious home-cooked meals and legendary holiday feasts (think mouthwatering sausage stuffing), Melissa honed her culinary skills through a combination of family recipes and countless cooking classes. She often attended these classes with her son Michael, who shared her enthusiasm for cooking from a young age. Melissa’s love for learning extends beyond familiar cuisines, as she enjoys exploring international recipes in hands-on cooking classes. Her blog features a diverse array of recipes, showcasing her expertise with various kitchen appliances such as the Instant Pot, air fryer, Slow Cooker, Ninja Foodi, Instant Vortex Plus, and more. Join Melissa on her culinary adventures as she shares tried-and-true family favorites alongside exciting new discoveries!


You write that you used your “crisping lid.” What does that mean?
I corrected it. I did originally write this recipe with some Ninja Foodi directions included as well and missed that. 🙂
I made it tonight and it was delicious!
I am so glad you loved it! 🙂
Can this be doubled?
If you can fit two heads in your pot, you sure can double it. The time should be the same.
Have you tried with cheddar?
Yes I have another version if you would like to try. It is cheddar cheesy delicious! https://www.sparklestosprinkles.com/instant-pot-cheesy-cauliflower/
@Melissa, cheddar cheese sauce is great too!
Yum! Have you ever tried making this with cauliflower florets? I’m wondering if it might be extra delicious if florets were tossed in the seasoning mix before cooking, giving each bite LOTS of seasoned yumminess.
anyone make this with olive oil instead of butter?
I was thinking about using one of those flavor injectors to get the seasonings inside.
Truly just one minute? Definitely want to make this.
Yes 1 min is all you need to still have a bit of crispness. If you would like a softer end result you can increase the cook time by 1 or 2 minutes.
I suppose it also changes with the size of the head… Gave mine 2 Min tonight and it’s just better than raw :-). Will do 4 next time.
By the way 3 Min at 400 with the crisper lid on the instapot duo crisp worked perfectly for the cheese crust.
I made this tonight and it was really good (and I don’t consider myself a cauliflower fan). But I think next time I’ll break it into florets to get more of the seasoning/Parmesan on the cauliflower.
I cooked it in my IP for 1 minute as instructed and did a quick release and it was super hard. We had to put it in the microwave for 10 mins to get it edible. Is 1 minute the correct time to cook in the IP?
Hi Amber, Yes 1 minute is the correct time for a still crisp cauliflower. Some folks prefer 0 minutes. Try doing yours for 4 min next time. I would be nervous with much longer. See if 4 minutes hits the spot you like.
Just FYI, 4 minutes was mush. We redid for 2 minutes and it was a little too soft so i think the 1 minute we did previously maybe my IP was not sealed correctly. Will try 1 minute next time with quick release.
Do you just put it in the IP or place some water in it?
Just place it in your IP on a trivet and add between 1/2 – 1 cup of water.
perfect 1st recipe to try with my new Instant pot! added it to a bed of rice and mushroom “gravy/rue” and it was a fantastic meal. My husband even had seconds! I too was skeptical about the 1 minute, but I think the time it took to come to pressure added to the cooking time.
Thank you for making me not so scared of my new toy!
What type of parmesan did everyone use? I’m making mine now; it’s still cooking and I used fresh grated parmesan. Did everyone else use fresh or did you use the dry stuff? If so, how did it turn out? Also, when mine is done I’ll post again and let you know how mine turns out. I’m cooking it for 2 minutes since we like it a little softer.
what do you think about AF after the quick release? just enough to melt the cheese and give it some crispness to the texture?
Oh yes, definitely air fry at the end for some crispiness. 🙂
Suggestion/direction on cooking this if you do not have an IP.
Yes you can bake in the oven at 400 degrees in a dutch oven, Cover the dutch oven with a lid and bake for 35-45 minutes, until the cauliflower is tender and pierces easily with a skewer, knife or fork.
Save 2 tablespoons of grated Parmesan cheese to finish it off under the broiler. Place the cauliflower under the broiler and broil for about 5 minutes, until the cheese is browned.
Is the trivia the item that comes with the 6 quart, or is this an accessory you have to purchase?
The trivet does come with your pot. I have purchased a silicone one that I LOVE and use. https://amzn.to/2YfndnQ
That is trivet I was asking about. Spell check changed it to trivia.
This was so easy to make and it was delicious! Thanks for sharing!