How To Grow Potatoes
Potatoes are one of the most versatile vegetables grown in the home garden. They can be prepared in a wide variety of ways, and there are many different types of potatoes used for many different culinary purposes. There are potatoes specifically for boiling, baking, mashing, and frying. Many recipes call for a specific type of potato to achieve the best results. By learning how to grow potatoes, you are opening up the door to so many culinary opportunities.

Potato Varieties
Several heirloom varieties of potatoes are available. These are interesting choices because the flesh can be shades of yellow, pink, blue, or white. Mail-order publications often sell these unusual varieties.
Another unique type of potato to consider growing is a fingerling potato variety. These are typically between two to five inches long and narrower than a standard potato, according to the same book. Because of their shape, this type would be best suited for mashing, boiling, or frying.
First is Superior Potato which is a white-skinned potato that matures fairly early. A popular red variety that matures early is Norland Potato. Pontiac Potato is also a red-skinned variety. Although this variety matures later than Norland Potato, it produces an abundant crop of odd-shaped potatoes.
Two types recommended for storage are Kennebec Potatoes and Katahdin Potato. These are an early variety that has white skin. Yukon Gold Potatoes, are available in many grocery stores. This unique type is usually priced higher because it has skin that is pale yellow and gold-colored flesh that is quite delicious. Whichever variety you choose to plant, you will discover there are endless ways to prepare this easy-to-grow, delicious vegetable.

How To Plant Potatoes
Plant potatoes in rows that are 30 inches apart. Begin by digging a trench that is eight to ten inches deep and dropping in seed potatoes about a foot apart. You might also sprinkle a little fertilizer in the bottom of the trench.
Then, mound about four inches of soil over the seed potatoes, leaving the rest of the soil in between the trenches. When the potatoesí sprouts reach about six inches tall, mound some more soil around them, covering up half the plant. Do this again when the stems grow another six inches. Potatoes need this cool mound of soil over them in order to sustain growth.
When the weather gets very hot, the shoots above ground will begin to wither and die. When the foliage is completely gone, wait another week or two and then harvest your potatoes.
How To Plant Seed Potatoes In Containers
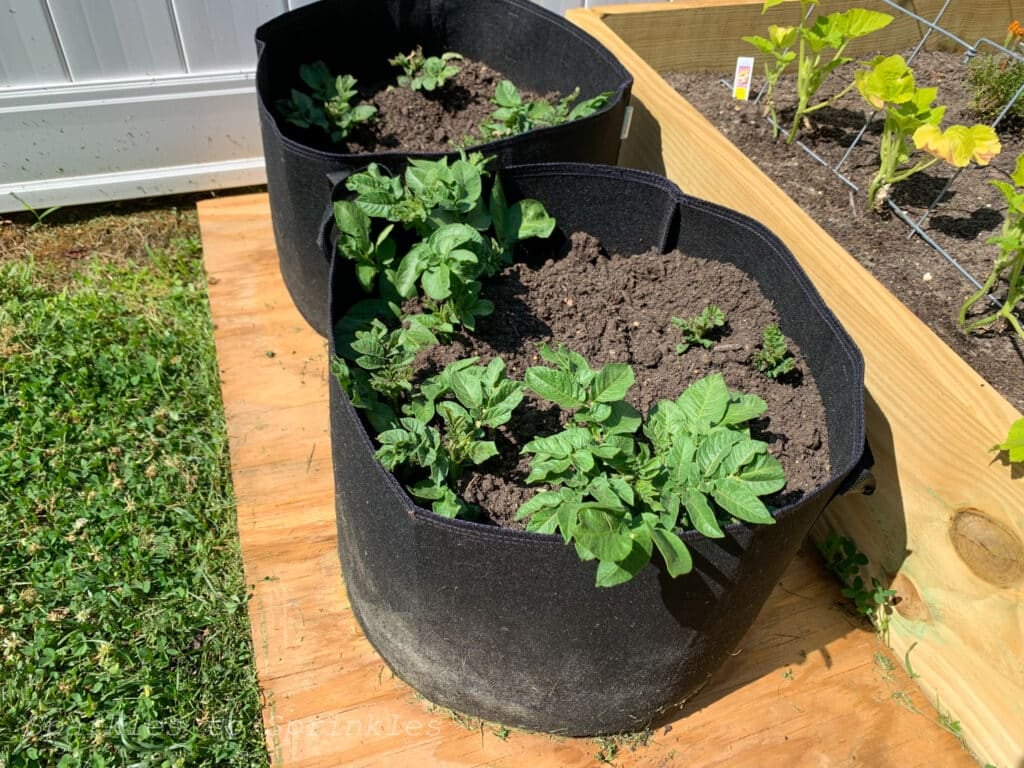
Even if you don’t have lots of space, you can enjoy an amazing yield of potatoes by growing in a container, a bucket, grow bag, half a whiskey barrel, a trash can, whatever. Clean it well and make drainage holes in the bottom.
Add about six inches of soil to the bottom and plant a layer of seed potatoes (eyes facing up), five or six is the right amount for a whiskey barrel. Cover with just enough soil to cover the tops of the potatoes. Keep your soil moist and just watch until your potato greens start to grow.

When the sprouts reach six to eight inches high, shovel more dirt in on top of them, covering three-quarters of the stems. Keep doing this until the container is full of dirt. When the shoots die back, tip over the container and see how many potatoes your five have turned into!

Good Soil Preparation
Potatoes are heavy feeders and require good, fertile soil. It is also important that the pH of the soil be 6 or above (slightly acid). Alkaline soils foster a fungal disease called potato scab. Spuds grow best in cool temperatures. A general rule of thumb is to plant three to four weeks before your last expected frost date or to plant when the soil has warmed to 55 degrees.
Good soil preparation is important when growing potatoes. The location chosen for planting potatoes should be sunny and have well-draining soil. The ground will need to be worked deeply to break up hard soil. Any stones or debris will need to be removed.

When choosing tubers, otherwise known as seed potatoes. Check the plant hardiness zone chart for information on dates to plant in your particular location, and purchase the tubers only when there is no chance of frost. Potatoes sold in food stores should not be used in place of tubers. This is due to the fact that potatoes for sale in produce markets are treated with products to prevent sprouting. These would not be ideal for planting and should not be used.
The seeds should be planted as soon as possible after purchase. The tubers can either be planted in one piece, or they can be cut into sections that have at least two buds each. It is recommended they be allowed to dry out in a ventilated location for approximately twenty-four hours before they are planted.
When planting them, be sure to allow about a foot of space between each tuber in rows that have about two feet of space between them. They should be placed with the buds facing up, about two or three inches beneath the soil.
If they are exposed above the soil they will become green. The same article says these green sections are toxic and should be disposed of. When the foliage reaches a height of about six inches, the soil should be mounded around the plant’s base. They will require consistent watering to prevent bumps and hollowed areas from forming on the tubers.
How Long Does It Take To Grow Potatoes
We can split this explanation into 3 varying types of potatoes as mentioned above, the first type being the early variety potatoes which have a shorter maturation time. These varieties tend to be fully grown and ready to harvest in 90 days.
The midseason variety potatoes take about 100 days to fully mature.
Lastly, the late variety potatoes will take around 110 days to mature. These are perfect for warmer climates since they have a longer growth time, and they will be easier for storing in the winter. The late variety potatoes tend to store much longer.
How To Harvest Potatoes
Allow the foliage to die down before harvesting. This is so the skins become strong which will allow for better preservation. If you desire “new” potatoes, they can be dug approximately ten weeks after planting when they begin to flower, says “Burpee: Complete Gardener“. It advises that care should be taken so the main root system is not damaged.

How To Store Potatoes
Freshly dug potatoes have a deliciously fresh flavor and will keep for several months when properly stored. Let them cure for about ten days, in a dark, humid location with temperatures ranging between sixty and sixty-five degrees Fahrenheit. After they have been cured, they should be stored in a dark, humid place with temperatures ranging between forty and forty-five degrees Fahrenheit.

Besides the fact that potatoes can be prepared in many ways, they are loaded with vitamins and are very cheap. Growing your own potatoes provides a wider choice of varieties than a typical grocery store. It is also very rewarding to harvest your own vegetables. It is no wonder why so many gardeners are growing their own delicious potatoes.
I’m Melissa, the imaginative force behind Sparkles to Sprinkles, where creativity comes to life, and sprinkles of joy are scattered generously. Melissa is a proud Jersey girl who found love with a New York boy. As a mom to four wonderful boys and a few fur babies, her journey into the world of blogging began after making the life-changing decision to stay home and raise her children. Previously a dedicated workaholic, Melissa’s blog became her creative outlet and passion project. Inspired by her mother-in-law, a masterful cook renowned for her delicious home-cooked meals and legendary holiday feasts (think mouthwatering sausage stuffing), Melissa honed her culinary skills through a combination of family recipes and countless cooking classes. She often attended these classes with her son Michael, who shared her enthusiasm for cooking from a young age. Melissa’s love for learning extends beyond familiar cuisines, as she enjoys exploring international recipes in hands-on cooking classes. Her blog features a diverse array of recipes, showcasing her expertise with various kitchen appliances such as the Instant Pot, air fryer, Slow Cooker, Ninja Foodi, Instant Vortex Plus, and more. Join Melissa on her culinary adventures as she shares tried-and-true family favorites alongside exciting new discoveries!


