Chocolate Covered Apple Slices Pumpkins
Who does not love candy apples?! I love all types of candy apples, caramel covered, candy covered and chocolate covered. What I don’t like, is biting into the side of a big old fat apple covered in all that gooey goodness. It is not always the easiest thing to do. These chocolate covered apple slices pumpkins are the perfect solution! All the deliciousness of a chocolate covered apple minus the struggle to get a nice juicy bite without nearly taking a tooth out.
These are perfect for the kiddos as well because their struggle is no different from ours with their tiny little mouths.
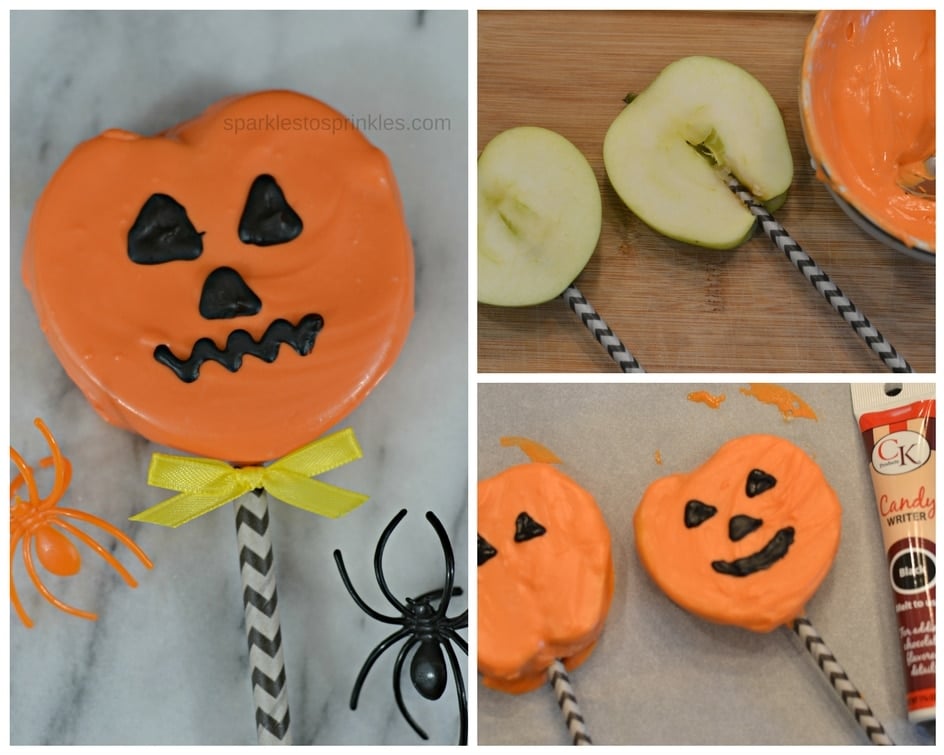
Cut your apples fairly thick so that you can easily insert your popsicle stick. You can see in my picture below I nearly ruined my apple while inserting my popsicle stick but was able to seal it up with my melted chocolate.
To make my eyes, nose and mouth I used a black Candy Writer. These are great and so easy to use.
HOW TO MELT CANDY MELTS
You can use the double boiler method or opt to do the microwave. I use my Instant Pot as a double boiler and it works great. If you choose to do the microwave method, reach for a microwave-safe container microwave candy melts at 50% power or the defrost setting on your microwave. Melt for one minute to start. Remove and stir. Place back in the microwave for an additional 30 seconds at 50% power. Remove and stir. Continue to do this in 30-second intervals until smooth and creamy. Remember less is better. You can help melt some pieces that are still not fully melted by stirring with a spoon. You do not want to over microwave your chocolate.

Chocolate Covered Apple Slices Pumpkins
Ingredients
- Apples
- Orange Candy Melts
- Popsicle Sticks
- Black Candy Writer
- Bows
Instructions
- Cut your apples into 1/2 - 3/4 inch slices.
- Insert popsicle sticks into the bottoms of your apple slices carefully.
- Melt orange candy melts using my melting directions above. Let completely dry.
- Follow directions to use the candy writer and than draw your pumpkin faces.
- Use a dot of glue to stick your bows onto your popsicle sticks.
- Keep refrigerated.
I’m Melissa, the imaginative force behind Sparkles to Sprinkles, where creativity comes to life, and sprinkles of joy are scattered generously. Melissa is a proud Jersey girl who found love with a New York boy. As a mom to four wonderful boys and a few fur babies, her journey into the world of blogging began after making the life-changing decision to stay home and raise her children. Previously a dedicated workaholic, Melissa’s blog became her creative outlet and passion project. Inspired by her mother-in-law, a masterful cook renowned for her delicious home-cooked meals and legendary holiday feasts (think mouthwatering sausage stuffing), Melissa honed her culinary skills through a combination of family recipes and countless cooking classes. She often attended these classes with her son Michael, who shared her enthusiasm for cooking from a young age. Melissa’s love for learning extends beyond familiar cuisines, as she enjoys exploring international recipes in hands-on cooking classes. Her blog features a diverse array of recipes, showcasing her expertise with various kitchen appliances such as the Instant Pot, air fryer, Slow Cooker, Ninja Foodi, Instant Vortex Plus, and more. Join Melissa on her culinary adventures as she shares tried-and-true family favorites alongside exciting new discoveries!


