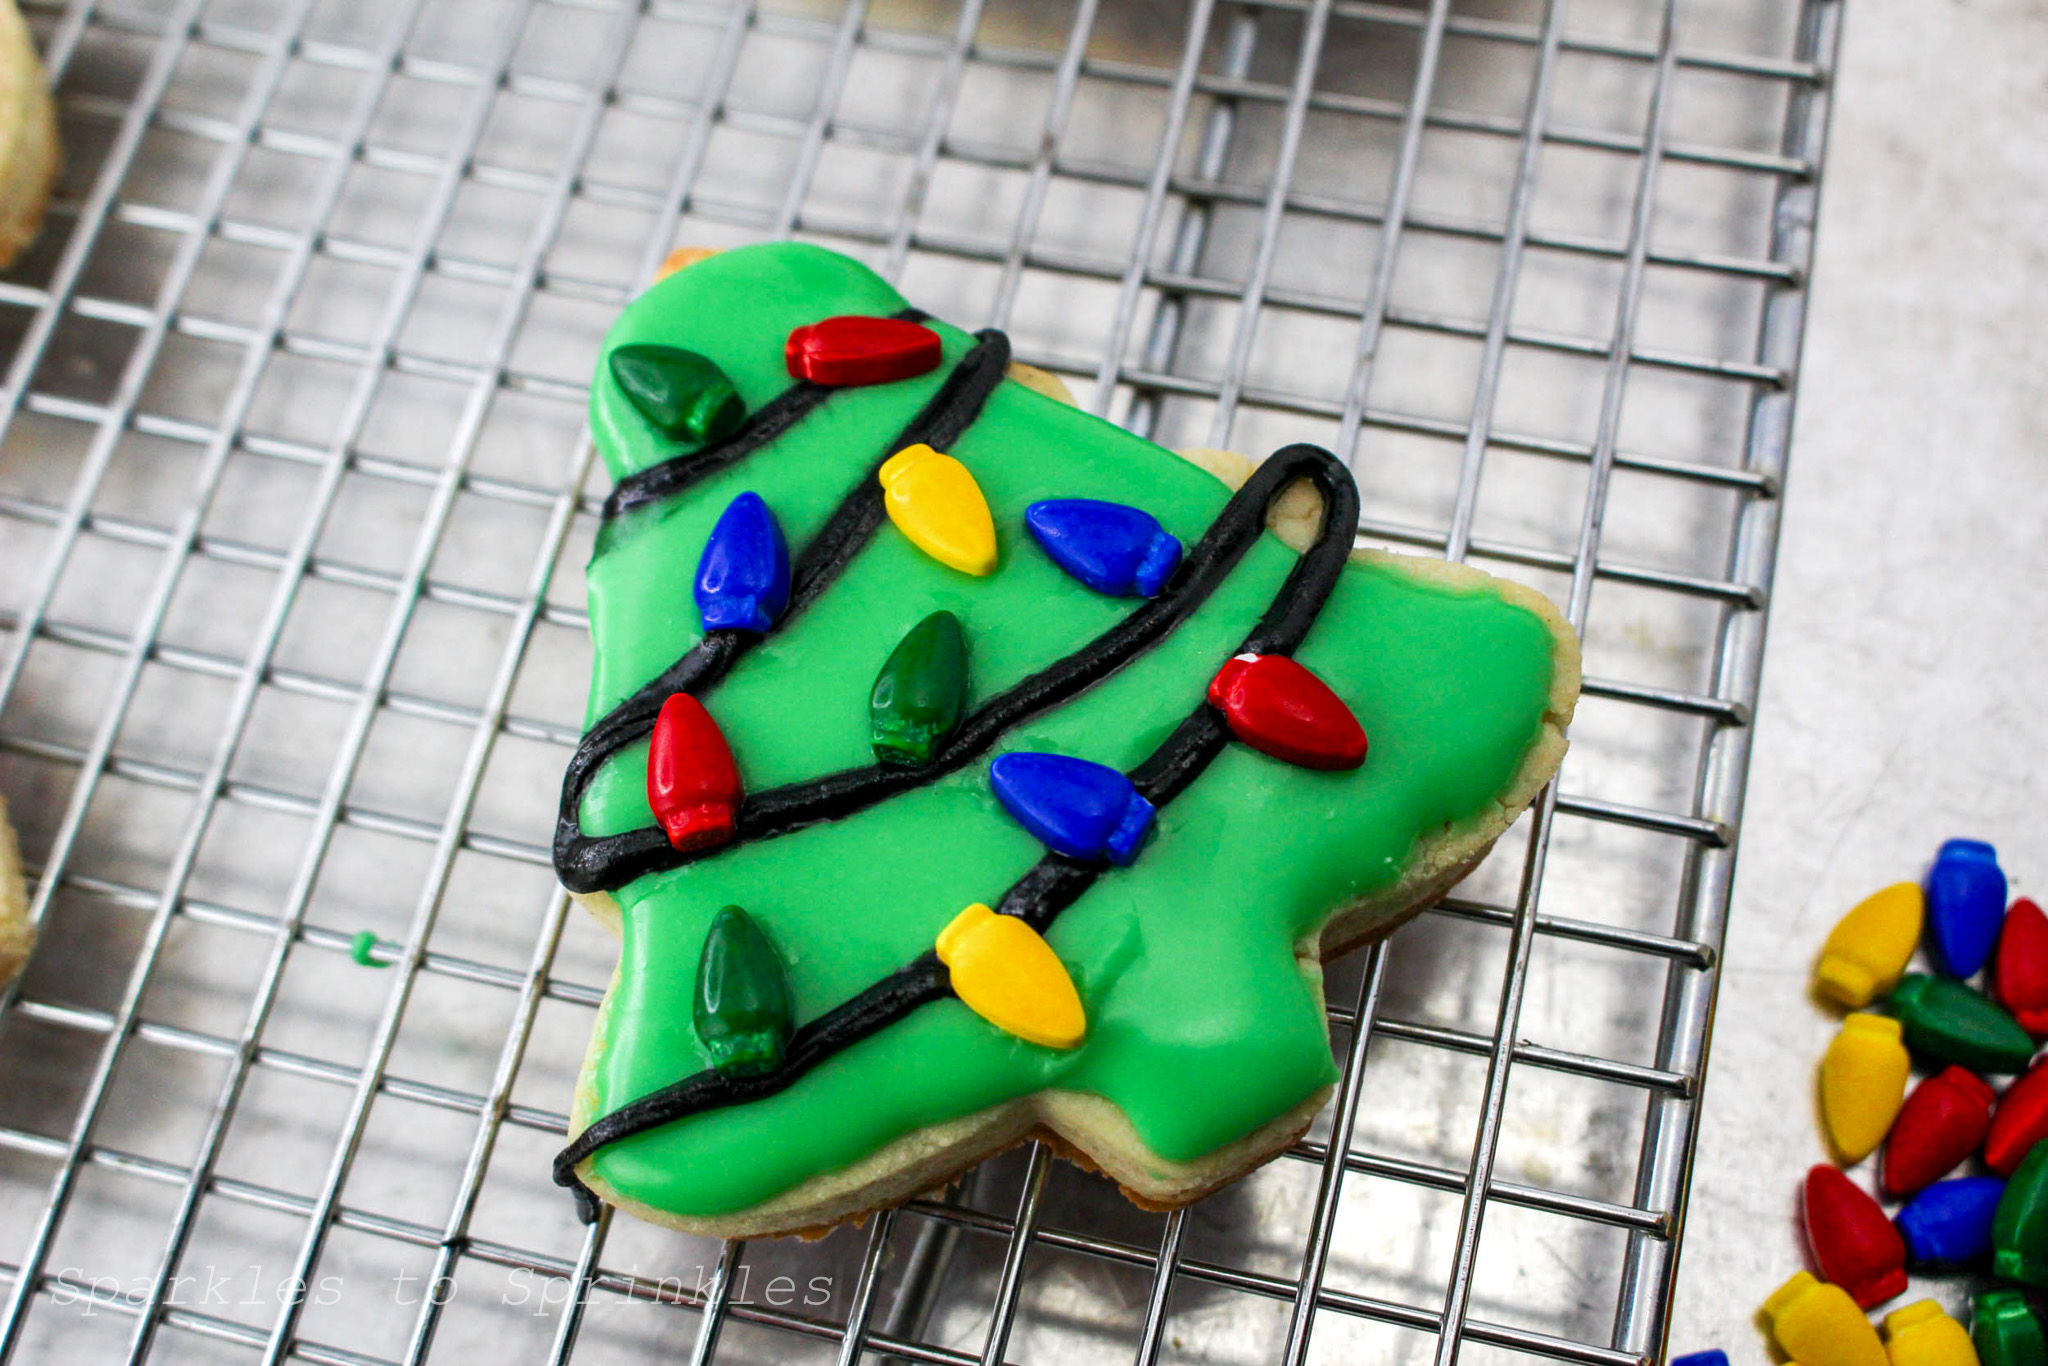
Gluten-Free Christmas Cookies
Get ready to bake up some holiday cheer with these festive and delicious gluten-free Christmas cookies! Perfect for decorating with your favorite icing and sprinkles, these cookies are crisp around the edges, soft in the middle, and completely gluten-free. Whether you’re making them with family or preparing a batch to share with friends, these cookies are guaranteed to bring some magic to your holiday season.

Gluten-Free Christmas Cookies
What makes these cookies extra special is their versatility. With an easy-to-work-with dough and a simple icing recipe, they’re perfect for creating colorful, fun, and festive designs. Plus, they can be made dairy-free, so everyone can enjoy a taste of holiday sweetness.
No matter your skill level, these gluten-free cookies are a joy to make. So grab your favorite cookie cutters and let’s make some holiday memories together!

Gluten-free Christmas cookies have become a staple in our holiday Christmas tradition. With more and more people going off gluten we are always looking for gluten-free desserts to share with others. These gluten-free cut out cookies are a fun way to share our festive treats with everyone we meet.

What You Will Love About This Recipe
Gluten-Free & Customizable: A cookie recipe everyone can enjoy, with options to make it dairy-free too!
Easy to Decorate: Perfect for holiday fun with family, from sprinkles to edible glitter.
Great Texture: Soft in the center and crisp on the edges—just like the classic Christmas cookies you remember.

Ingredients
For the Cookies:
2 cups gluten-free all-purpose flour blend
1 teaspoon baking powder
1/2 teaspoon salt
1/2 cup unsalted butter, softened
1 cup granulated sugar
1 large egg
2 teaspoons vanilla extract
2 to 4 tablespoons milk (or non-dairy milk for a dairy-free option), optional (see notes)
For the Icing:
2 cups powdered sugar
1-2 tablespoons milk (or non-dairy milk for a dairy-free option)
1/2 teaspoon vanilla extract
Food coloring (optional)
Sprinkles or edible glitter (optional)

How to Make Gluten Free Christmas Cookies
- Preheat your oven to 350°F (175°C). Line a baking sheet with parchment paper.
- In a medium bowl, whisk together the gluten-free flour, baking powder, and salt. Set aside.

- In a large mixing bowl, cream together the softened butter and sugar until light and fluffy, using a hand mixer or stand mixer.

- Beat in the egg and vanilla extract until well combined.

- Gradually add the dry ingredients to the wet ingredients, mixing until a dough forms. If the dough is too crumbly, you can add a little milk, a tablespoon at a time, until it’s manageable.

- Transfer the dough to a sheet of plastic wrap. Wrap tightly and refrigerate for at least 1 hour.


- Place a sheet of parchment paper on your work surface and dust it with gluten-free flour.
- Roll out the cookie dough to about 1/4-inch thickness. Use your favorite Christmas cookie cutters to cut out shapes from the dough. Carefully transfer the cut-out cookies to the prepared baking sheet, leaving some space between each cookie.

- Bake the cookies in the preheated oven for 8-10 minutes, or until the edges are lightly golden. Be careful not to overbake. Remove from the oven and let them cool on the baking sheet for 5 minutes, then transfer the cookies to a wire rack to cool completely.
- In a medium bowl, whisk together powdered sugar, milk, and vanilla extract until smooth and creamy. If the icing is too thick, add a little more milk. If it’s too thin, add more powdered sugar until you reach your desired consistency. If you want to make different colors of icing, divide the icing into separate bowls and add food coloring to each bowl.
- Once the cookies are completely cool, use a small spatula or a pastry bag to ice the cookies with the prepared icing. Add sprinkles or edible glitter on top of the icing, if desired.

- Allow the icing to set for a few hours or overnight until it hardens.
- Once the icing is set, your gluten-free cut-out Christmas cookies are ready to be enjoyed!

Tips & Tricks
- Chill the Dough: Refrigerating the dough for at least an hour makes it easier to roll out and cut shapes.
- Dust Your Rolling Surface: Use gluten-free flour to prevent sticking without altering the dough’s texture.
- Watch the Oven: Gluten-free cookies bake quickly! Keep an eye on them to avoid overbaking.
- Get Creative with Icing: Divide the icing into bowls and add food coloring to create festive designs.
- Let the Icing Set: Allow enough time for the icing to harden before stacking or storing the cookies.
FAQs
Air Fryer Keto Loaded Hasselback Zucchini
Slow Cooker Cheesy Cauliflower
Carb Free Gluten Free Garlic Bread


Gluten Free Christmas Cookies
Celebrate the season with these easy to make Gluten Free Christmas cookies with icing. These delicious cookies are not only fun to make with the kids but are full of flavor and perfect to share with your friends and family who can’t eat gluten.
Ingredients
- For the Cookies:
- 2 cups gluten-free all-purpose flour blend
- 1 teaspoon baking powder
- 1/2 teaspoon salt
- 1/2 cup unsalted butter, softened
- 1 cup granulated sugar
- 1 large egg
- 2 teaspoons vanilla extract
- 2 to 4 tablespoons milk (or non-dairy milk for a dairy-free option), optional (see notes)
- For the Icing:
- 2 cups powdered sugar
- 1-2 tablespoons milk (or non-dairy milk for a dairy-free option)
- 1/2 teaspoon vanilla extract
- Food coloring (optional)
- Sprinkles or edible glitter (optional)
Instructions
- Preheat your oven to 350°F (175°C). Line a baking sheet with parchment paper.
- In a medium bowl, whisk together the gluten-free flour, baking powder, and salt. Set aside.
- In a large mixing bowl, cream together the softened butter and sugar until light and fluffy, using a hand mixer or stand mixer.
- Beat in the egg and vanilla extract until well combined.
- Gradually add the dry ingredients to the wet ingredients, mixing until a dough forms. If the dough is too crumbly, you can add a little milk, a tablespoon at a time, until it's manageable.
- Transfer the dough to a sheet of plastic wrap. Wrap tightly and refrigerate for at least 1 hour.
- Place a sheet of parchment paper on your work surface and dust it with gluten-free flour.
- Roll out the cookie dough to about 1/4-inch thickness. Use your favorite Christmas cookie cutters to cut out shapes from the dough. Carefully transfer the cut-out cookies to the prepared baking sheet, leaving some space between each cookie.
- Bake the cookies in the preheated oven for 8-10 minutes, or until the edges are lightly golden. Be careful not to overbake. Remove from the oven and let them cool on the baking sheet for 5 minutes, then transfer the cookies to a wire rack to cool completely.
- In a medium bowl, whisk together powdered sugar, milk, and vanilla extract until smooth and creamy. If the icing is too thick, add a little more milk. If it's too thin, add more powdered sugar until you reach your desired consistency. If you want to make different colors of icing, divide the icing into separate bowls and add food coloring to each bowl.
- Once the cookies are completely cool, use a small spatula or a pastry bag to ice the cookies with the prepared icing. Add sprinkles or edible glitter on top of the icing, if desired.
- Allow the icing to set for a few hours or overnight until it hardens.
- Once the icing is set, your gluten-free cut-out Christmas cookies are ready to be enjoyed!
Notes
Yield: 2 dozen medium-sized Christmas cookies, depending on the size of your cookie cutters
Nutrition Information:
Yield:
24Serving Size:
1Amount Per Serving: Calories: 147Total Fat: 4gSaturated Fat: 3gTrans Fat: 0gUnsaturated Fat: 1gCholesterol: 18mgSodium: 70mgCarbohydrates: 26gFiber: 0gSugar: 18gProtein: 2g
I’m Melissa, the imaginative force behind Sparkles to Sprinkles, where creativity comes to life, and sprinkles of joy are scattered generously. Melissa is a proud Jersey girl who found love with a New York boy. As a mom to four wonderful boys and a few fur babies, her journey into the world of blogging began after making the life-changing decision to stay home and raise her children. Previously a dedicated workaholic, Melissa’s blog became her creative outlet and passion project. Inspired by her mother-in-law, a masterful cook renowned for her delicious home-cooked meals and legendary holiday feasts (think mouthwatering sausage stuffing), Melissa honed her culinary skills through a combination of family recipes and countless cooking classes. She often attended these classes with her son Michael, who shared her enthusiasm for cooking from a young age. Melissa’s love for learning extends beyond familiar cuisines, as she enjoys exploring international recipes in hands-on cooking classes. Her blog features a diverse array of recipes, showcasing her expertise with various kitchen appliances such as the Instant Pot, air fryer, Slow Cooker, Ninja Foodi, Instant Vortex Plus, and more. Join Melissa on her culinary adventures as she shares tried-and-true family favorites alongside exciting new discoveries!