Fried Chicken Ice Cream
TikTok has done it again with this Fried Chicken Ice Cream. You are going to love this new TikTok recipes of ice cream covered Twix bars with melted white chocolate that is then coated with cornflakes. It is a winning combination that is literally sweeping the world!
Fried Chicken Ice Cream
I am not going to lie, when I first heard of Fried chicken Ice cream I thought it was one of the most perfect April Fools Day dinner ideas that I had ever heard of! Then I realized that this Fried chicken Ice cream treat that people are raving about was being sold for so much money! I knew at that point I needed to head into the kitchen to perfect this recipe to help all of you make this fun fried chicken ice cream treat at home for a fraction of the price.

This recipe is super easy to make. It just takes a little bit of time and patience and the end result is a no-bake dessert that is sweet, creamy, and crunchy that everyone can’t get enough of!
If you love viral TikTok recipes, be sure you try our TikTok Viral Ranch Pickles and our Jam Seltzer Drink.

Ingredients:
1.75 quarts vanilla ice cream
6 Mini Twix Bars
2 cups white chocolate chips
3 cups corn flakes, crushed

How to Make Fried Chicken Ice Cream
- Place the cold ice cream in a large bowl. Have a cutting board or clean surface to place the ice cream on and can go in the freezer.
- Put your gloves on and have the Twix bars ready to go. Take a handful of ice cream and flatten it in your hand. Place a Twix in the middle and add more ice cream on top.
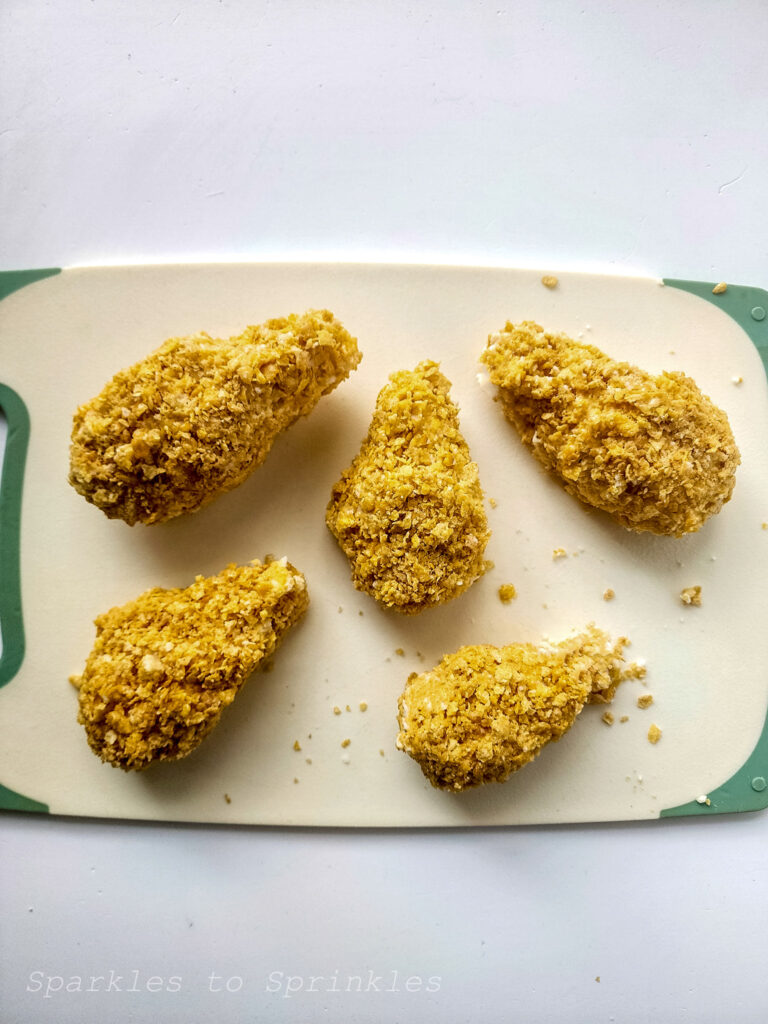
- Mold the ice cream to cover the Twix bar and create a chicken drumstick shape. Work quickly because the ice cream will start to melt and your hands will get cold.
- Once you have your desired chicken wing shape, place it on your cutting board. You can do any extra smoothing and shaping with a spoon while it’s on the platter.
- Repeat this with the rest of the ice cream and Twix bars.
- Once you have completed them all, place the platter in the freezer for 2 hours.
- About 30 minutes before the 2 hours is up, melt the white chocolate in the microwave at 30 second intervals until smooth.
- Prep the corn flakes by crushing them up into small pieces.
- Once you have your station prepared, remove the ice cream from the freezer.
- Pick up each ice cream drumstick and place first in the white chocolate and coat, then into the corn flakes. Pat and cover every inch of the white chocolate and do any extra shaping to make sure it still looks like a drumstick.
- Place back on the platter and repeat with the rest of the ice cream.
- Once you are finished, place the platter back into the freezer for another 2 hours.
- Once you take them out, enjoy!
Tips Tricks and FAQs
- When making your Fried Chicken Ice cream, it is best to work in batches. Leave part of the ice cream in the freezer when you are shaping your ice around your Twix bar. The same goes when adding the white chocolate and corn flakes. Pull a couple out at a time and then replace them in the freezer and grab the next batch.
- Feel free to make as many batches as you would like.
- The easiest way to crush the Corn Flakes is by adding them to a plastic bag, sealing it, and then rolling over them with a rolling pin.
- Be sure you use a high quality ice cream that you love.
- Mini Twix works the best. Regular size Twix will make some really big fried chicken pieces.
- Using a spoon to shape the ice cream and smooth it works great.
- Serve these as soon as you remove them from the freezer
Storage
These Fried chicken ice cream treats need to be eaten pretty quickly after you make them. You can store them in the freezer for up to 1 month, but you will find that the Corn Flakes will not be as crispy the longer they are in the freezer.

Fried Chicken Ice Cream
Tik Tok has done it again with this Fried Chicken Ice Cream. You are going to love this new creation of ice cream covered Twix bars with melted white chocolate that is then coated with cornflakes. It is a winning combination that is literally sweeping the world!
Ingredients
- 1.75 quarts vanilla ice cream
- 6 Mini Twix Bars
- 2 cups white chocolate chips
- 3 cups corn flakes, crushed
Instructions
- Place the cold ice cream in a large bowl. Have a cutting board or clean surface to place the ice cream on and can go in the freezer.
- Put your gloves on and have the Twix bars ready to go. Take a handful of ice cream and flatten in your hand. Place a Twix in the middle and add more ice cream on top.
- Mold the ice cream to cover the Twix bar and create a chicken drumstick shape. Work quickly because the ice cream will start to melt and your hands will get cold.
- Once you have your desired chicken wing shape, place it on your cutting board. You can do any extra smoothing and shaping with a spoon while its on the platter.
- Repeat this with the rest of the ice cream and Twix bars.
- Once you have completed them all, place the platter in the freezer for 2 hours.
- About 30 minutes before the 2 hours is up, melt the white chocolate in the microwave at 30 second intervals until smooth.
- Prep the corn flakes by crushing them up into small pieces.
- Once you have your station prepared, remove the ice cream from the freezer.
- Pick up each ice cream drumstick and place first in the white chocolate and coat, then into the corn flakes. Pat and cover every inch of the white chocolate and do any extra shaping to make sure it still looks like a drumstick.
- Place back on the platter and repeat with the rest of the ice cream.
- Once you are finished, place the platter back into the freezer for another 2 hours.
- Once you take them out, enjoy!
Notes
Yield: 6 Ice Cream Chicken Wings
Nutrition Information:
Yield:
6Serving Size:
1Amount Per Serving: Calories: 962Total Fat: 49gSaturated Fat: 32gTrans Fat: 0gUnsaturated Fat: 13gCholesterol: 84mgSodium: 391mgCarbohydrates: 119gFiber: 2gSugar: 95gProtein: 13g
I’m Melissa, the imaginative force behind Sparkles to Sprinkles, where creativity comes to life, and sprinkles of joy are scattered generously. Melissa is a proud Jersey girl who found love with a New York boy. As a mom to four wonderful boys and a few fur babies, her journey into the world of blogging began after making the life-changing decision to stay home and raise her children. Previously a dedicated workaholic, Melissa’s blog became her creative outlet and passion project. Inspired by her mother-in-law, a masterful cook renowned for her delicious home-cooked meals and legendary holiday feasts (think mouthwatering sausage stuffing), Melissa honed her culinary skills through a combination of family recipes and countless cooking classes. She often attended these classes with her son Michael, who shared her enthusiasm for cooking from a young age. Melissa’s love for learning extends beyond familiar cuisines, as she enjoys exploring international recipes in hands-on cooking classes. Her blog features a diverse array of recipes, showcasing her expertise with various kitchen appliances such as the Instant Pot, air fryer, Slow Cooker, Ninja Foodi, Instant Vortex Plus, and more. Join Melissa on her culinary adventures as she shares tried-and-true family favorites alongside exciting new discoveries!


